如何使用Bootstrap创建一个网页
Bootstrap是一个开源的CSS框架,用于为网站和网络应用程序创建一个响应性和可定制的前端。使用Bootstrap的网格系统,人们可以很容易地快速创建一个网页。现在的任何网页都需要有一个用于用户导航的导航条,一些内容和用于用户提交数据的表单。
在这篇文章中,我们将创建一个漂亮的网页,包括一个导航条、一篇文章和一个带有输入验证的表单,只用Bootstrap,不用CSS。
Bootstrap Setup:
第1步:创建一个名为index.html的文件,并在其中添加最初的HTML5模板代码。
<!DOCTYPE html>
<html lang="en">
  <head>
    <title>Web Page using Bootstrap</title>
  </head>

  <body></body>
</html>
步骤2:现在要添加bootstrap,你需要在你的HTML代码的body元素中包含以下script和link标签。
<script src=”https://cdn.jsdelivr.net/npm/bootstrap@5.1.3/dist/js/bootstrap.bundle.min.js”></script>
<link rel=”stylesheet” href=”https://cdn.jsdelivr.net/npm/bootstrap@5.1.3/dist/css/bootstrap.min.css” />
示例:
<!DOCTYPE html>
<html lang="en">
  <head>
    <link href=
"https://cdn.jsdelivr.net/npm/bootstrap@5.1.3/dist/css/bootstrap.min.css"
      rel="stylesheet"
    />
  </head>
  <body>
    <script src=
"https://cdn.jsdelivr.net/npm/bootstrap@5.1.3/dist/js/bootstrap.bundle.min.js"
    ></script>
  </body>
</html>
创建导航条:要创建一个基本的导航条,首先要在HTML文件中的一个导航元素上添加navbar, navbar-expand, navbar-dark, bg-color类。
另外,创建一个类别为navbar-nav的ul元素,并在其内部添加类别为nav-item的li元素,并使用anchor标签链接到不同的页面。这样做之后,你的index.html文件应该看起来像这样。
示例:
<!DOCTYPE html>
<html lang="en">
  <head>
    <link href=
"https://cdn.jsdelivr.net/npm/bootstrap@5.1.3/dist/css/bootstrap.min.css"
      rel="stylesheet"
    />
  </head>

  <body>
    <!-- NAVBAR -->
    <nav class="navbar navbar-expand navbar-dark bg-success">
      <div class="container-fluid">
        <a class="navbar-brand" href="./">
          GeeksForGeeks
        </a>
        <ul class="navbar-nav me-auto mb-2 mb-lg-0">
          <!-- NAVBAR LINKS -->
          <li class="nav-item">
            <a class="nav-link active" href="#">About Us</a>
          </li>
          <li class="nav-item">
            <a class="nav-link" href="#">Contact</a>
          </li>
        </ul>
      </div>
    </nav>
    <script src=
"https://cdn.jsdelivr.net/npm/bootstrap@5.1.3/dist/js/bootstrap.bundle.min.js"
    ></script>
  </body>
</html>
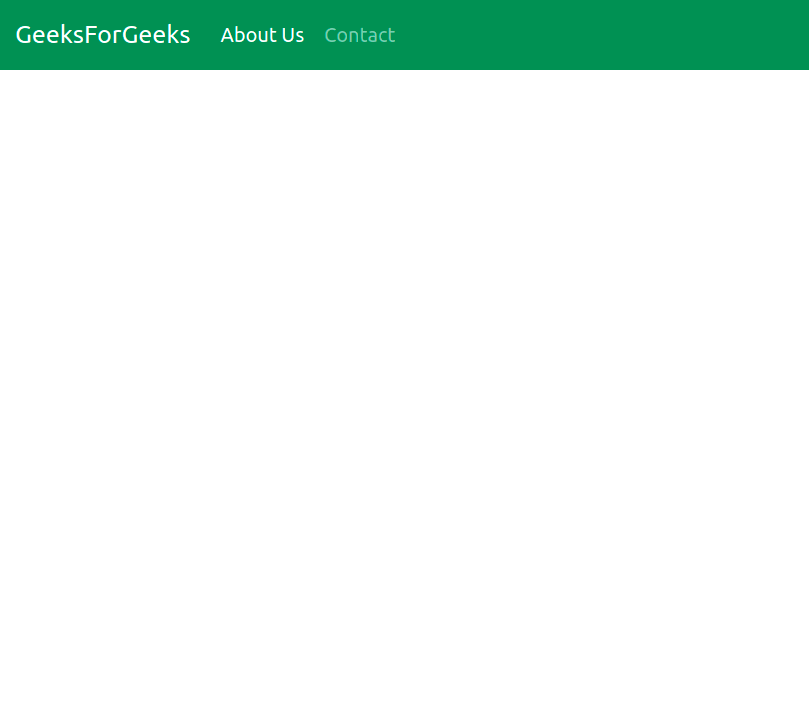
输出:

带2个链接的导航栏
在导航条上添加搜索栏和下拉菜单:要添加一个下拉菜单,请将nav-item dropdown类添加到锚的li标签,并将data-bs-toggle=”dropdown “属性与nav-link dropdown-toggle类一起添加到它里面的anchor标签。
为了添加下拉选项,在li标签中添加一个新的列表,其类别为dropdown-menu和dropdown-items,用于下拉中的不同页面。为了在ul和nav元素中添加一个搜索框,可以使用一个带有输入和按钮的普通表单标签,bootstrap会对其进行样式设计。这样做之后,你的代码应该看起来像这样。
示例:
<!DOCTYPE html>
<html lang="en">
  <head>
    <link href=
"https://cdn.jsdelivr.net/npm/bootstrap@5.1.3/dist/css/bootstrap.min.css"
      rel="stylesheet"
    />
  </head>

  <body>
    <!-- NAVBAR -->
    <nav class="navbar navbar-expand navbar-dark bg-success">
      <div class="container-fluid">
        <a class="navbar-brand" href="./">GeeksForGeeks</a>
        <ul class="navbar-nav me-auto mb-2 mb-lg-0">

          <!-- NAVBAR LINKS -->
          <li class="nav-item">
            <a class="nav-link active" href="#">About Us</a>
          </li>
          <li class="nav-item">
            <a class="nav-link" href="#">Contact</a>
          </li>

          <!--DROPDOWN  -->
          <li class="nav-item dropdown">
            <a
              class="nav-link dropdown-toggle"
              href="#"
              id="navbarDropdown"
              role="button"
              data-bs-toggle="dropdown"
            >
              Coding Articles
            </a>

            <!-- DROPDOWN OPTIONS -->
            <ul class="dropdown-menu">
              <li><a class="dropdown-item" href="#">
                Page 1
                </a>
              </li>
              <li><a class="dropdown-item" href="#">
                Page 2
                </a>
              </li>
            </ul>
          </li>
        </ul>

        <!-- SEARCH BOX -->
        <form class="d-flex">
          <input
            class="form-control me-2"
            type="search"
            placeholder="Search site"
          />
          <button class="btn btn-primary"
                  type="submit">
            Search
          </button>
        </form>
      </div>
    </nav>
    <script src=
"https://cdn.jsdelivr.net/npm/bootstrap@5.1.3/dist/js/bootstrap.bundle.min.js"
    ></script>
  </body>
</html>
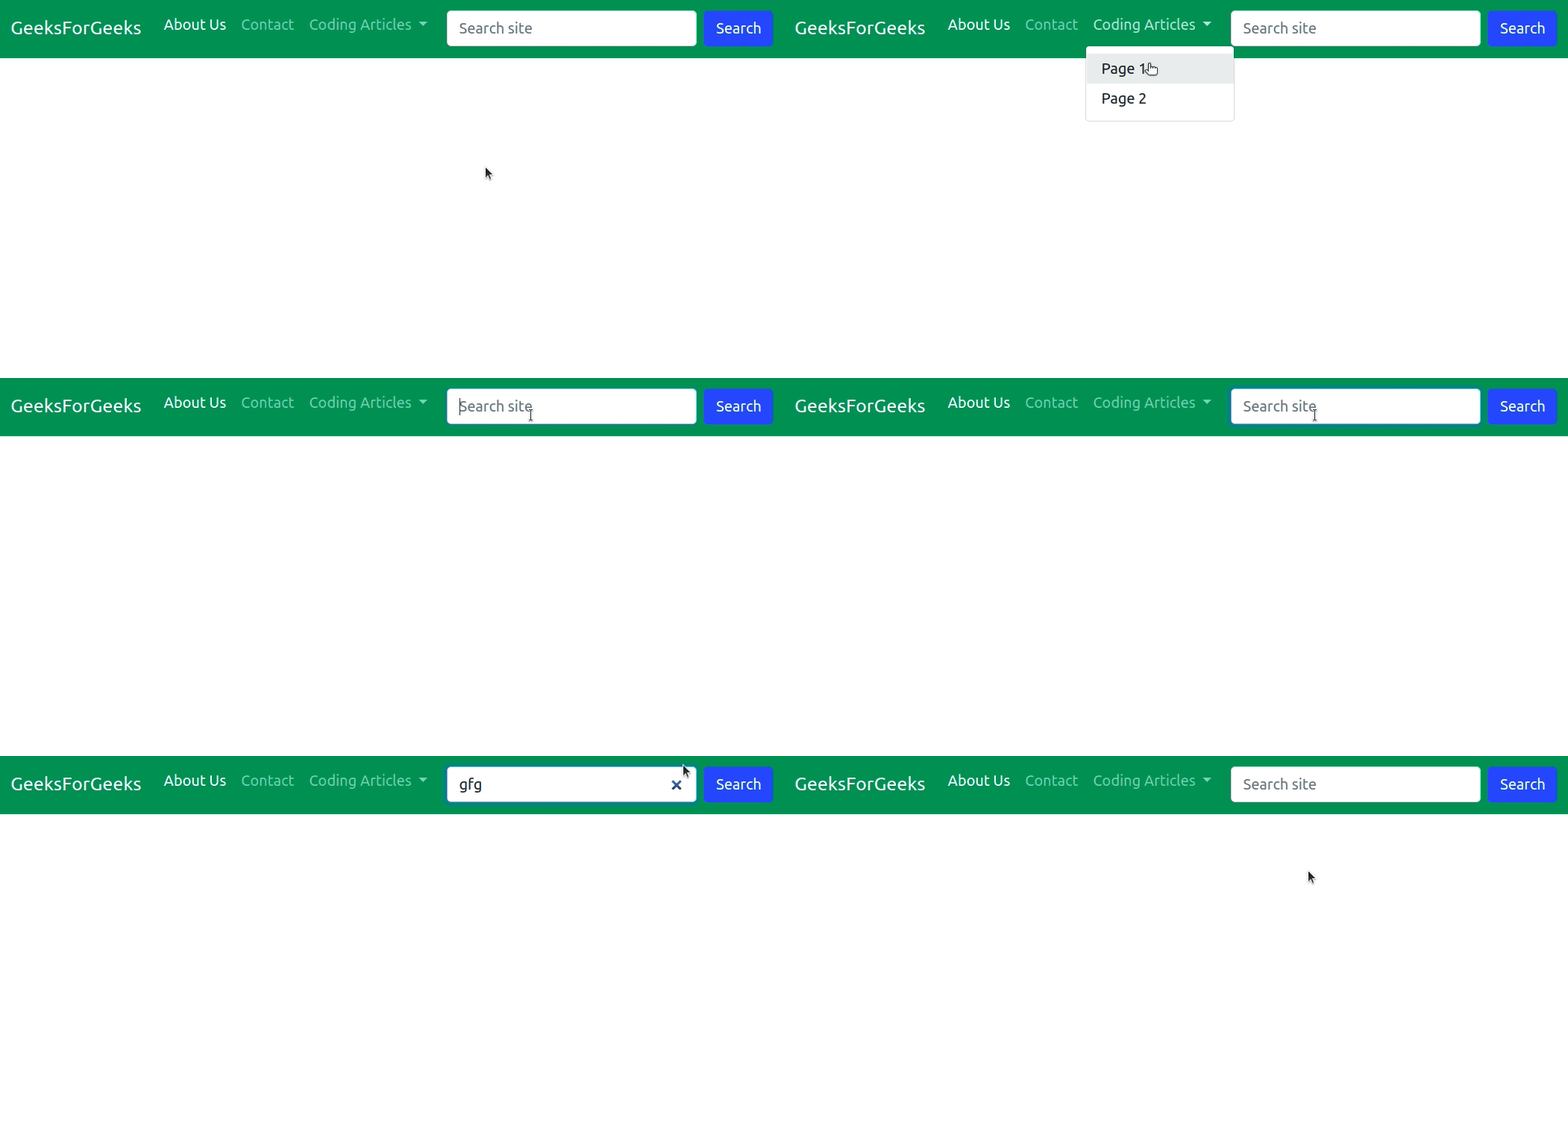
输出:

带下拉菜单和搜索框的导航栏
添加文章:为了添加文章或其他内容,我们可以利用bootstrap网格系统,使我们的网页具有良好的响应性,并有一个明确的布局。网格系统有一个行,每一行都有不同大小的列(最大为12),可以通过在一个div上添加col-sm-size类来指定。下面的代码在我们的网页上添加了一篇文章。
示例:
<!DOCTYPE html>
<html lang="en">
  <head>
    <link href=
"https://cdn.jsdelivr.net/npm/bootstrap@5.1.3/dist/css/bootstrap.min.css"
          rel="stylesheet"
    />
  </head>

  <body>
    <!-- NAVBAR -->
    <nav class="navbar navbar-expand
                navbar-dark bg-success">
      <div class="container-fluid">
        <a class="navbar-brand" href="./">
          GeeksForGeeks</a>
        <ul class="navbar-nav me-auto mb-2 mb-lg-0">

          <!-- NAVBAR LINKS -->
          <li class="nav-item">
            <a class="nav-link active" href="#">
              About Us</a>
          </li>
          <li class="nav-item">
            <a class="nav-link" href="#">
              Contact
            </a>
          </li>

          <!--DROPDOWN  -->
          <li class="nav-item dropdown">
            <a
              class="nav-link dropdown-toggle"
              href="#"
              id="navbarDropdown"
              role="button"
              data-bs-toggle="dropdown"
            >
              Coding Articles
            </a>

            <!-- DROPDOWN OPTIONS -->
            <ul class="dropdown-menu">
              <li>
                <a class="dropdown-item" href="#">
                  Page 1
                </a>
              </li>
              <li>
                <a class="dropdown-item" href="#">
                  Page 2
                </a>
              </li>
            </ul>
          </li>
        </ul>

        <!-- SEARCH BOX -->
        <form class="d-flex">
          <input
            class="form-control me-2"
            type="search"
            placeholder="Search site"
          />
          <button class="btn btn-primary" type="submit">
            Search
          </button>
        </form>
      </div>
    </nav>

    <!-- ARTICLE -->
    <div class="container mt-5">
      <div class="row">
        <div class="col-sm-2">Author Name</div>
        <div class="col-sm-8">
          <h2>Article Title</h2>
          <h5>Created on 20 Jan 2022</h5>
          <p>
            GeeksForGeeks is a Computer Science portal
            for geeks.It contains well written, well
            thought articles. This platform has been designed
            for every geek wishing to expand their knowledge,
            share their knowledge and is ready to grab their
            dream job. We have millions of articles, live as
            well as online courses, thousands of tutorials and
            much more just for the geek inside you.
          </p>

        </div>
      </div>
    </div>
    <script src=
"https://cdn.jsdelivr.net/npm/bootstrap@5.1.3/dist/js/bootstrap.bundle.min.js">
    </script>
  </body>
</html>
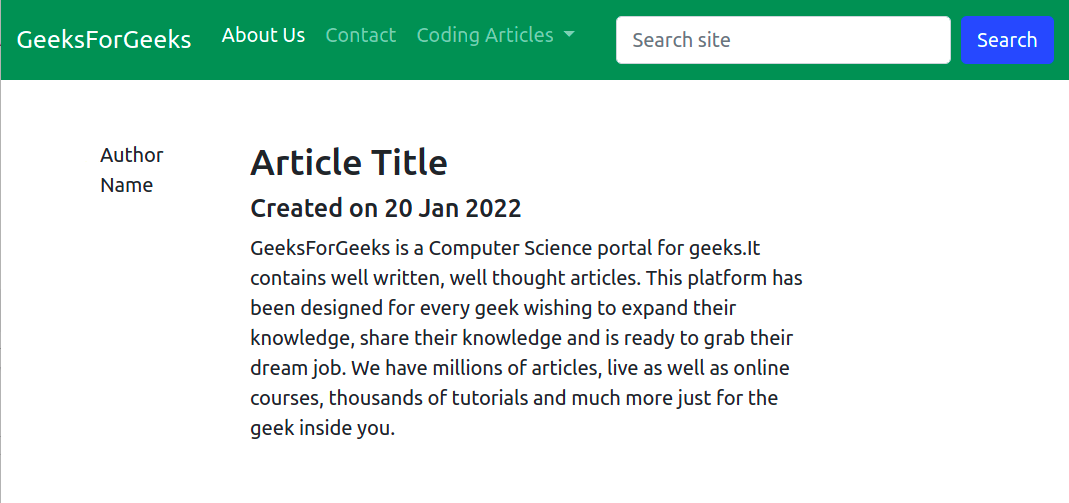
输出:

添加带有用户验证的表单:要了解更多关于如何在bootstrap中使用表单的信息,请参考Bootstrap表单的这篇文章。要在网页上添加一个输入验证的表单,请在你的index.html文件中添加这段代码。
示例:
<!DOCTYPE html>
<html lang="en">
  <head>
    <link href=
 "://cdn.jsdelivr.net/npm/bootstrap@5.1.3/dist/css/bootstrap.min.css"
      rel="stylesheet"
    />
  </head>

  <body>
    <!-- NAVBAR -->
    <nav class="navbar navbar-expand
                navbar-dark bg-success">
      <div class="container-fluid">
        <a class="navbar-brand" href="./">
          GeeksForGeeks
        </a>
        <ul class="navbar-nav me-auto mb-2 mb-lg-0">

          <!-- NAVBAR LINKS -->
          <li class="nav-item">
            <a class="nav-link active" href="#">
              About Us
            </a>
          </li>
          <li class="nav-item">
            <a class="nav-link" href="#">
              Contact
            </a>
          </li>

          <!--DROPDOWN  -->
          <li class="nav-item dropdown">
            <a
              class="nav-link dropdown-toggle"
              href="#"
              id="navbarDropdown"
              role="button"
              data-bs-toggle="dropdown"
            >
              Coding Articles
            </a>
            <!-- DROPDOWN OPTIONS -->
            <ul class="dropdown-menu">
              <li>
                <a class="dropdown-item" href="#">
                  Page 1
                </a>
              </li>
              <li>
                <a class="dropdown-item" href="#">
                  Page 2
                </a>
              </li>
            </ul>
          </li>
        </ul>
        <!-- SEARCH BOX -->
        <form class="d-flex">
          <input
            class="form-control me-2"
            type="search"
            placeholder="Search site"
          />
          <button class="btn btn-primary" type="submit">
            Search
          </button>
        </form>
      </div>
    </nav>

    <!-- ARTICLE -->
    <div class="container mt-5">
      <div class="row">
        <div class="col-sm-2">Author Name</div>
        <div class="col-sm-8">
          <h2>Article Title</h2>
          <h5>Created on 20 Jan 2022</h5>

          <!-- ARTICLE TEXT -->

<p>
            GeeksForGeeks is a Computer Science portal
            for geeks.It contains well written, well
            thought articles. This platform has been designed
            for every geek wishing to expand their knowledge,
            share their knowledge and is ready to grab their
            dream job. We have millions of articles, live as
            well as online courses, thousands of tutorials and
            much more just for the geek inside you.
          </p>

        </div>
      </div>

      <!-- FORM -->
      <form class="was-validated">
        <!-- Email Address Input -->
        <div class="mb-3">
          <label for="email" class="form-label">
            Email Address:
          </label>
          <input
            type="email"
            class="form-control"
            id="email"
            placeholder="Enter your email id"
            required
          />
          <div class="valid-feedback">
            Valid Email id
          </div>
          <div class="invalid-feedback">
            Please fill out this field.
          </div>
        </div>
        <!-- Password Input -->
        <div class="mb-3">
          <label for="password" class="form-label">
            Password:
          </label>
          <input
            type="password"
            class="form-control"
            id="password"
            placeholder="Enter your password"
            minlength="8"
            required
          />
          <div class="form-text" id="password-help-block">
            Password needs to be 8 characters long.
          </div>
          <div class="valid-feedback">
            Valid Password.
          </div>
          <div class="invalid-feedback">
            Please fill out this field.
          </div>
        </div>
        <!-- Checkbox -->
        <div class="form-check mb-3">
          <input
            class="form-check-input"
            type="checkbox"
            id="checkbox"
            required
          />
          <label class="form-check-label" for="checkbox">
            I agree on T & C.
          </label>
          <div class="valid-feedback">
            You Agree to the T & C.
          </div>
          <div class="invalid-feedback">
            Check this checkbox to continue.
          </div>
        </div>
        <button type="submit" class="btn btn-primary">
          Submit
        </button>
      </form>
    </div>

    <script src=
"https://cdn.jsdelivr.net/npm/bootstrap@5.1.3/dist/js/bootstrap.bundle.min.js">
    </script>
  </body>
</html>
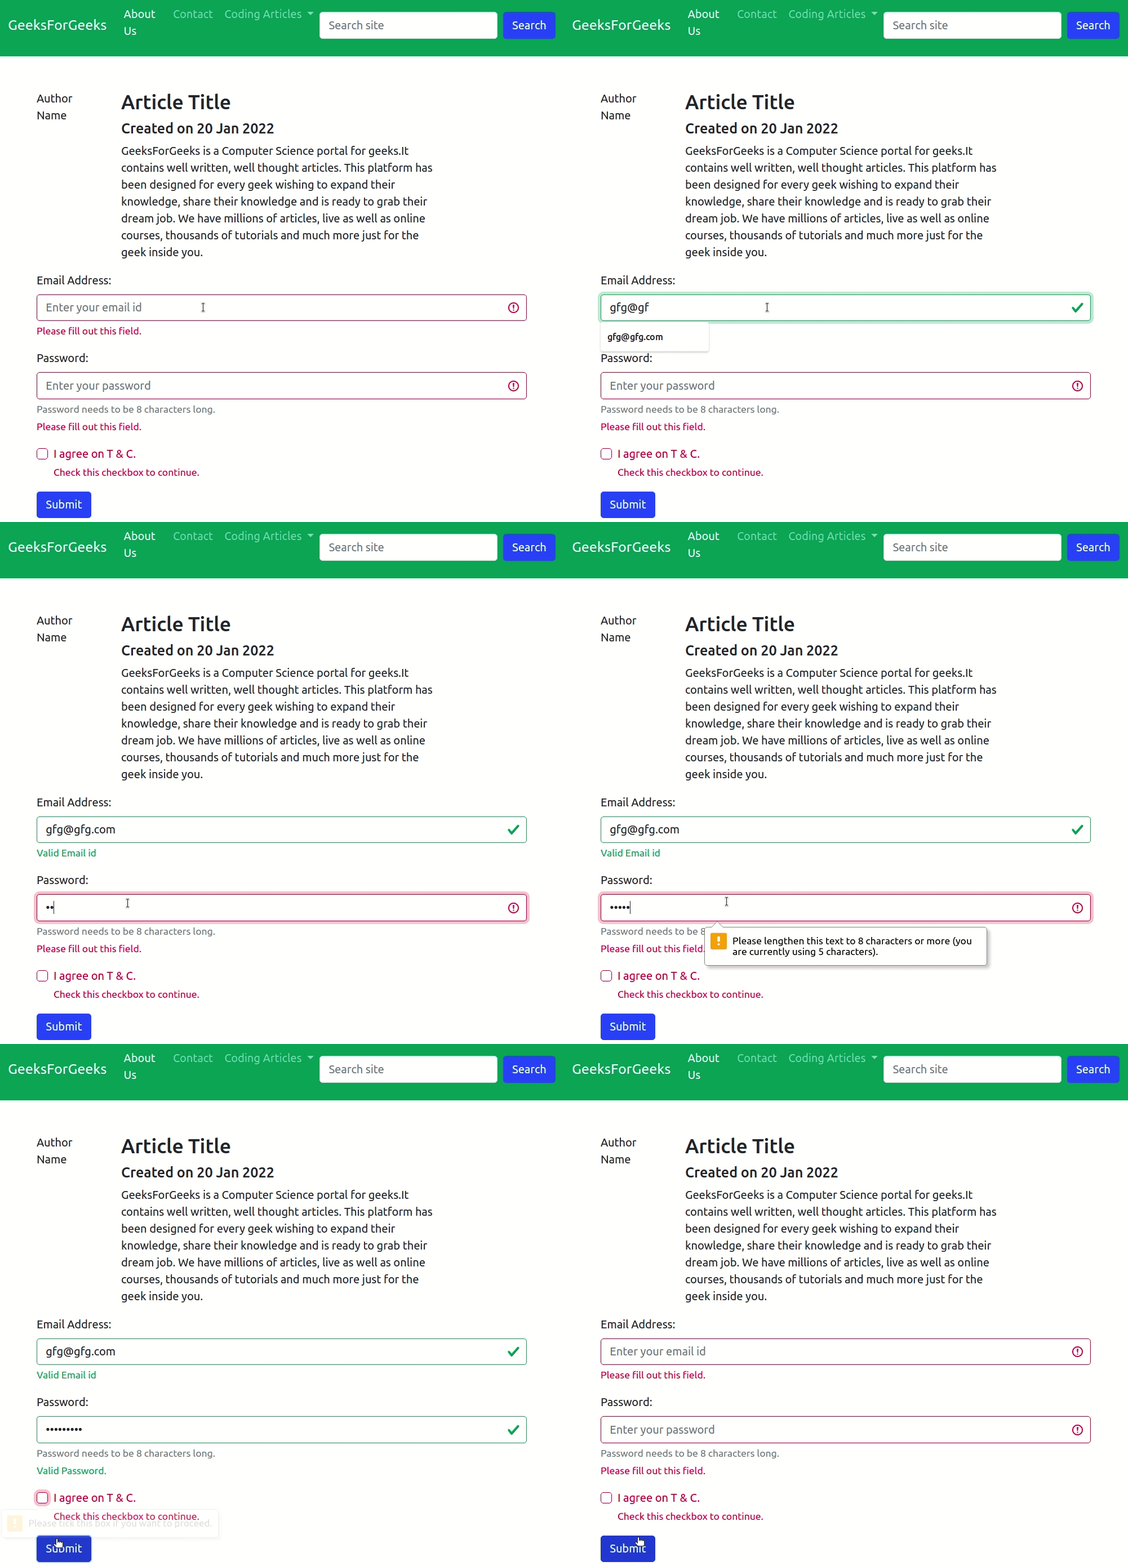
输出:

使用bootstrap的最终网页与一个表单
 极客教程
极客教程