如何使用bootstrap在底部设置带有左侧图片和按钮的div
我们可以通过以下两种方法在底部设置带有左侧图像和按钮的div。
方法1:使用引导法
Float-left
这些实用类根据当前视口的大小,利用CSS的浮动属性,将一个组件向左浮动或禁止浮动。!important被包括在内是为了躲避(避免)特殊性问题。这些都是利用与我们的网格系统相同的视口断点。
Position-relative:
它与CSS属性position: relative相同。
Position-absolute:
它与CSS属性position: absolute相同。
示例:
<!DOCTYPE html>
<html lang="en">
<head>
    <!-- Required meta tags -->
    <meta charset="utf-8"/>
    <meta name="viewport" content="width=device-width,
        initial-scale=1, shrink-to-fit=no"/>
    <!-- Bootstrap CSS -->
    <link rel="stylesheet" href=
"https://stackpath.bootstrapcdn.com/bootstrap/4.5.0/css/bootstrap.min.css"
        integrity=
"sha384-9aIt2nRpC12Uk9gS9baDl411NQApFmC26EwAOH8WgZl5MYYxFfc+NcPb1dKGj7Sk"
        crossorigin="anonymous"/>
    <script src=
"https://kit.fontawesome.com/577845f6a5.js"
        crossorigin="anonymous">
    </script>
    <title>Set div with left image
    </title>
    <style type="text/css">
        .bottom-left {
            left: 0;
        }
    </style>
</head>
<body>
    <h1 style="color: #006400;">
        <br/>
        GeeksforGeeks
    </h1>
    <div class="float-left">
        <img src=
"https://media.geeksforgeeks.org/wp-content/uploads/20200712114621/testimg.JPG"
        height="150"/>
    </div>
    <div class="position-relative" style="color: green;">
        <h1>Hey There..!!</h1>

<p><b>This is an Example..</b></p>


<p>Here I have used class float-left of
            bootstrap to set div with left image.</p>

        <br/>
    </div>
    <div class="position-relative">
        <div class="position-absolute bottom-left">
            <button type="button"
                class="btn btn-success">
                Click me!
            </button>
        </div>
    </div>
</body>
</html>
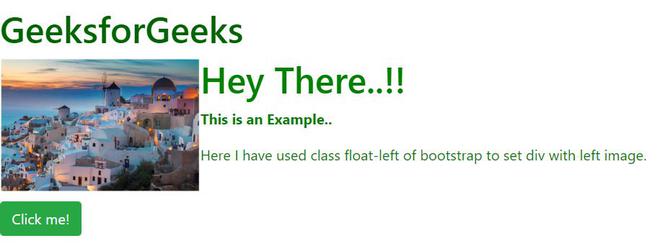
输出:
注:如果你的内容较少,请将<br> 标签放在内容的末尾,否则按钮就会错位,因为它是与内容相关的位置。
使用bootstrap 3,我们也可以通过bootstrap网格系统在底部设置带有左图和按钮的div,在底部设置带有右图和按钮的div,如下所示。
示例:
<!DOCTYPE html>
<html lang="en">
<head>
    <!-- Required meta tags -->
    <meta charset="utf-8" />
    <meta name="viewport" content="width=device-width,
        initial-scale=1, shrink-to-fit=no"/>
    <!-- Bootstrap CSS -->
    <!-- Latest compiled and minified CSS -->
    <link rel="stylesheet" href=
"https://maxcdn.bootstrapcdn.com/bootstrap/3.3.7/css/bootstrap.min.css"
        integrity=
"sha384-BVYiiSIFeK1dGmJRAkycuHAHRg32OmUcww7on3RYdg4Va+PmSTsz/K68vbdEjh4u"
        crossorigin="anonymous"/>
    <!-- Optional theme -->
    <link rel="stylesheet" href=
"https://maxcdn.bootstrapcdn.com/bootstrap/3.3.7/css/bootstrap-theme.min.css"
        integrity=
"sha384-rHyoN1iRsVXV4nD0JutlnGaslCJuC7uwjduW9SVrLvRYooPp2bWYgmgJQIXwl/Sp"
        crossorigin="anonymous" />
    <!-- Latest compiled and minified JavaScript -->
    <script src=
"https://maxcdn.bootstrapcdn.com/bootstrap/3.3.7/js/bootstrap.min.js"
        integrity=
"sha384-Tc5IQib027qvyjSMfHjOMaLkfuWVxZxUPnCJA7l2mCWNIpG9mGCD8wGNIcPD7Txa"
        crossorigin="anonymous">
        </script>
    <title>Set div with left image</title>
    <style type="text/css">
        .bottom-left {
            left: 0;
        }
        .bottom-right {
            right: 0;
        }
    </style>
</head>
<body>
    <div class="container-fluid">
        <div class="col-md-6">
            <div class="pull-right">
                <img src=
"https://media.geeksforgeeks.org/wp-content/uploads/20200712114621/testimg.JPG"
                    height="150" />
            </div>
            <div style="color: green; text-align: left;">
                <h1>Hey There..!!</h1>

<p><b>This is an Example..</b></p>


<p>Here I have used class pull-right of
                    bootstrap to set div with right image.
                </p>

                <br/>
                <br/>
            </div>
            <div class="pull-right bottom-right">
                <button type="button" class="btn btn-success">
                    Click me!
                </button>
            </div>
        </div>
        <div class="col-md-6">
            <div class="pull-left">
                <img src=
"https://media.geeksforgeeks.org/wp-content/uploads/20200712114621/testimg.JPG"
                    height="150" />
            </div>
            <div style="color: green;
                            text-align: right;">
                <h1>Hey There..!!</h1>

<p><b>This is an Example..</b></p>


<p>
                    Here I have used class pull-left of
                    bootstrap to set div with left image.
                </p>

                <br/>
                <br/>
            </div>
            <div class="pull-left bottom-left">
                <button type="button"
                    class="btn btn-success">
                    Click me!
                </button>
            </div>
        </div>
    </div>
</body>
</html>
输出:
注意:由于bootstrap网格系统,当代码在IDE上运行时,输出将看起来不同,因此在你的源代码上运行此代码。
方法2:使用Flexbox
示例:
<!DOCTYPE html>
<html lang="en">
<head>
    <!-- Required meta tags -->
    <meta charset="utf-8" />
    <meta name="viewport" content="width=device-width,
        initial-scale=1, shrink-to-fit=no" />
    <title>Set div with left image</title>
    <style type="text/css">
        .flex_row {
            display: flex;
            flex-direction: row;
            flex-wrap: nowrap;
            justify-content: flex-start;
            align-content: stretch;
            align-items: flex-start;
        }
        .article {
            box-sizing: border-box;
            flex: 1 1 50%;
            align-self: stretch;
            padding: 10px;
        }
        .content {
            box-sizing: border-box;
            flex: 1 1 auto;
            align-self: stretch;
            padding: 0 10px;
            display: flex;
            flex-direction: column;
            flex-wrap: nowrap;
        }
        .innercontent {
            flex: 1 1 auto;
            align-self: stretch;
            color: green;
        }
        .buttonBar {
            flex: 0 0 auto;
        }
        .onRight {
            text-align: left;
        }
    </style>
</head>
<body>
    <h1 style="color: #006400;">
        <br />
        GeeksforGeeks
    </h1>
    <div class="flex_row">
        <div class="article onRight flex_row">
            <div class="image">
                <img src=
"https://media.geeksforgeeks.org/wp-content/uploads/20200712114621/testimg.JPG"
                    height="150" />
            </div>
            <div class="content">
                <div class="innercontent">
                    <h1>Hey There..!!</h1>

<p>
                        <b>This is an Example..</b>
                    </p>


<p>Here I have used Flexbox model
                        to set div with left image
                        and button at bottom.
                    </p>

                    <br/>
                </div>
                <div class="buttonBar">
                    <button>Click me!</button>
                </div>
            </div>
        </div>
    </div>
</body>
</html>
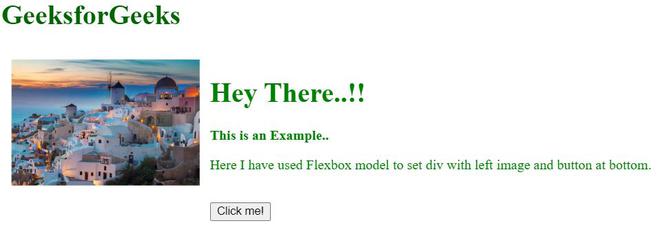
输出:
 极客教程
极客教程

