如何在Material UI中使用AppBar组件
Material UI是一个包含不同风格和响应式设计的各种组件的库。例如,Material UI包含一个AppBar组件,我们可以直接将其导入React组件并作为其他组件的子组件使用。
另外, Material UI库还包含不同的组件,如按钮、链接、标签栏、分页等。此外,我们可以在使用组件时通过传递一个道具来操作每个组件。例如,我们可以通过传递尊重的道具使 AppBar响应。
本教程将教我们如何在Material UI中使用AppBar组件。
在应用程序中使用Material UI库之前,用户应该安装Material UI库。打开终端,进入项目目录,输入以下命令,在React应用程序中安装Material UI。
npm install @mui/material @mui/icons-material
语法
用户可以按照下面的语法来使用Material UI库来制作时尚的AppBar组件。
<Box sx = {{ flexGrow: 1 }}>
   <AppBar position = "static">
      <Toolbar>
         {/* Add the content for toolbar */}
      </Toolbar>
   </AppBar>
</Box>
在上面的语法中,我们使用了AppBar组件,并将位置作为一个道具传递。此外,我们还将AppBar组件包裹在Box组件中,并将Toolbar组件作为AppBar组件的一个子组件加入。
例子
在下面的例子中,我们使用了Material UI库中的AppBar组件并创建了简单的顶部导航条。
在AppBar组件中,我们还传递了一些带道具的子组件。在TypoGraphy组件中,我们传递了’sx={{flexGrow: 1}}’作为道具,它允许我们在AppBar组件的右角设置其他内容。
此外,我们还在导航条的右角添加了注册和登录按钮。
import React from "react";
import AppBar from "@mui/material/AppBar";
import Box from "@mui/material/Box";
import Typography from "@mui/material/Typography";
import Button from "@mui/material/Button";
import Toolbar from "@mui/material/Toolbar";

export default function App() {
   return (
      <Box>
         <AppBar position="static">
            <Toolbar>
               {/* sx = {flexGrow: 1} allows us to set all content at right except typography */}
               <Typography variant = "h4" sx = {{ flexGrow: 1 }}>
                  AppBar
               </Typography>
               <Button color = "inherit"> Sign Up </Button>
               <Button color = "inherit"> Sign In </Button>
            </Toolbar>
         </AppBar>
      </Box>
   );
}
输出

例子
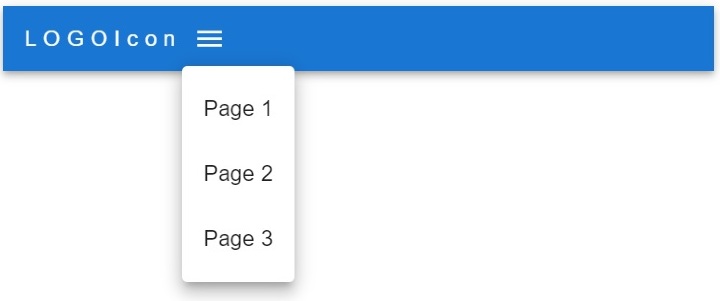
在下面的例子中,我们使用Material UI库的AppBar组件创建了响应式导航条。
用户可以在笔记本电脑尺寸的设备上看到行中的菜单项,在平板电脑和移动设备上则是一个工具提示。同时,用户可以在页面阵列中改变菜单选项。此外,开发者可以观察到我们是如何使用map()方法来创建每个菜单项的。
import * as React from "react";

import Container from "@mui/material/Container";
import Toolbar from "@mui/material/Toolbar";
import Button from "@mui/material/Button";
import MenuItem from "@mui/material/MenuItem";
import IconButton from "@mui/material/IconButton";
import Box from "@mui/material/Box";
import Typography from "@mui/material/Typography";
import AppBar from "@mui/material/AppBar";
import Menu from "@mui/material/Menu";
import MenuIcon from "@mui/icons-material/Menu";

export default function App() {
   const pages = ["Page 1", "Page 2", "Page 3"];

   const [menuItems, setmenuItems] = React.useState(null);
   // function to close and open the tooltip menu
   const openMenuToolTip = (event) => {
      setmenuItems(event.currentTarget);
   };

   const closeMenuToolTip = () => {
      setmenuItems(null);
   };
   return (
      <AppBar position = "static">
         <Container maxWidth = "xxl">
            {/* adding the toolbar */}
            <Toolbar disableGutters>
               {/* adding the logo icon */}
               <Typography
                  Variant = "h4"
                  sx = {{
                  letterSpacing: "5px",
                  color: "white",
                  textDecoration: "none",
                  }}
               >
                  LOGOIcon
               </Typography>
               {/* menu icon for mobile and tablet devices */}
               <Box sx = {{ flexGrow: 1, display: { xs: "flex", md: "none" } }}>
               <IconButton onClick = {openMenuToolTip} color = "inherit">
                  <MenuIcon />
               </IconButton>
               {/* tooptip options */}
               <Menu
                  anchorEl = {menuItems}
                  open = {Boolean(menuItems)}
                  onClose = {closeMenuToolTip}
               >
                  {pages.map((page) => (
                     <MenuItem key = {page} onClick = {closeMenuToolTip}>
                        <Typography textAlign = "center"> {page} </Typography>
                     </MenuItem>
                  ))}
               </Menu>
               </Box>
               {/* menu items for laptop devices */}
               <Box sx = {{ flexGrow: 1, display: { xs: "none", md: "flex" } }}>
                  {pages.map((page) => (
                     <Button
                        key = {page}
                        onClick = {closeMenuToolTip}
                        sx = {{ color: "white", display: "block" }}
                     >
                        {page}
                     </Button>
                  ))}
               </Box>
            </Toolbar>
         </Container>
      </AppBar>
   );
}
输出

例子
在下面的例子中,我们使用AppBar组件在导航栏中添加了搜索栏。我们为搜索栏创建了自定义样式。
在输出中,用户可以看到,我们在AppBar组件的右角添加了搜索栏。
import * as React from "react";
import { styled } from "@mui/material/styles";
import AppBar from "@mui/material/AppBar";
import Box from "@mui/material/Box";
import InputBase from "@mui/material/InputBase";
import Toolbar from "@mui/material/Toolbar";
import SearchIcon from "@mui/icons-material/Search";
import Typography from "@mui/material/Typography";

// different styles for the search bar
// style for search div
const Search = styled("div")(({ theme }) => ({
   position: "relative",
   width: "100%",
   [theme.breakpoints.up("sm")]: {
      marginLeft: theme.spacing(1),
      width: "auto",
   },
}));

// style for a search icon
const SearchIconWrapper = styled("div")(({ theme }) => ({
   display: "flex",
   alignItems: "center",
   padding: theme.spacing(0, 2),
   height: "100%",
   position: "absolute",
}));

// style for input in the search
const StyledInputBase = styled(InputBase)(({ theme }) => ({
   color: "inherit",
   "& .MuiInputBase-input": {
      padding: theme.spacing(1, 1, 1, 0),
      paddingLeft: `3.5rem`,
      width: "100%",
   },
}));

export default function App() {
   return (
      <Box sx = {{ flexGrow: 1 }}>
         <AppBar position = "static">
            <Toolbar>
               <Typography sx = {{ flexGrow: 1 }}>Text</Typography>
                  {/* adding the search to AppBar component */}
               <Search>
                  <SearchIconWrapper>
                     <SearchIcon />
                  </SearchIconWrapper>
                  <StyledInputBase placeholder="Search texts" />
               </Search>
            </Toolbar>
         </AppBar>
      </Box>
   );
}
输出

在本教程中,用户学习了如何使用Material UI的AppBar组件。我们看到了三个使用AppBar组件的不同例子。在第一个例子中,我们创建了一个基本的导航条,在第二个例子中,我们创建了响应式导航条,而在第三个例子中,我们在AppBar组件中添加了搜索栏。
 极客教程
极客教程