Android 音频管理器
什么是Android中的音频管理器
音频管理器这个名字本身就告诉我们,它是用来管理安卓应用程序中的音频配置文件。这通常用于在安卓设备的不同音频模式之间进行切换,如振铃模式、静音模式和振动模式。
Android管理器的实现
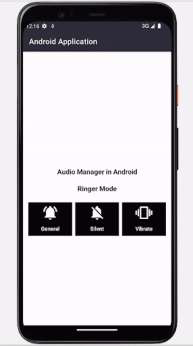
我们将创建一个简单的应用程序,其中我们将简单地显示3个按钮和2个文本视图。我们的安卓应用程序中的3个按钮用于在不同的音频模式之间切换,如铃声模式、无声模式和振动模式。我们将在文本视图中显示当前激活的模式,以通知用户当前在用户设备中激活的模式。我们将按照一步一步的指南来实现安卓应用程序中的敬酒信息。
第1步:在Android Studio中创建一个新项目
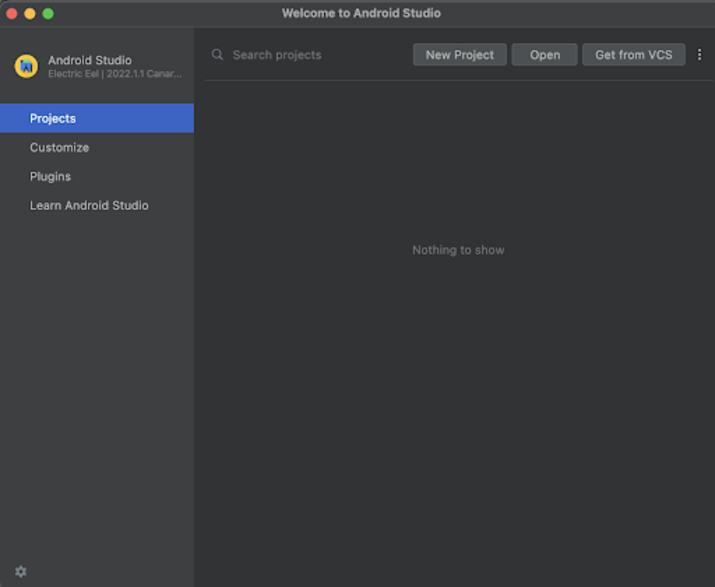
导航到Android studio,如下图所示。在下面的屏幕上点击新项目来创建一个新的Android Studio项目。

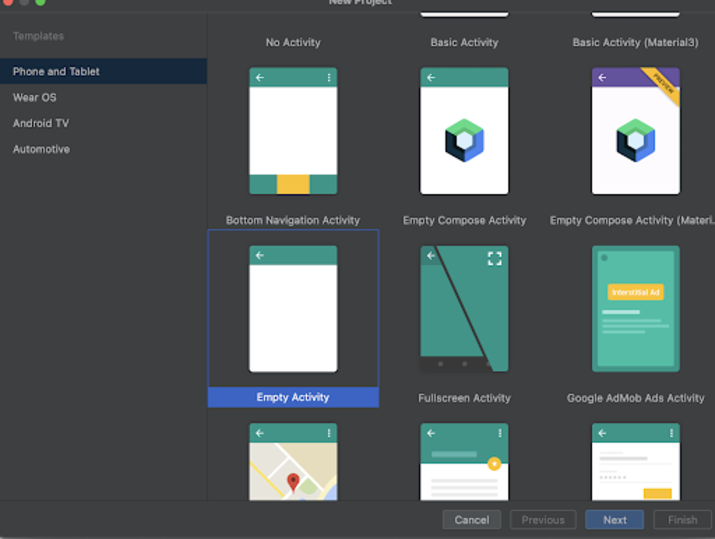
点击新项目后,你会看到下面的屏幕。

在这个屏幕中,我们必须简单地选择空活动并点击下一步。点击下一步后,你会看到下面的屏幕。

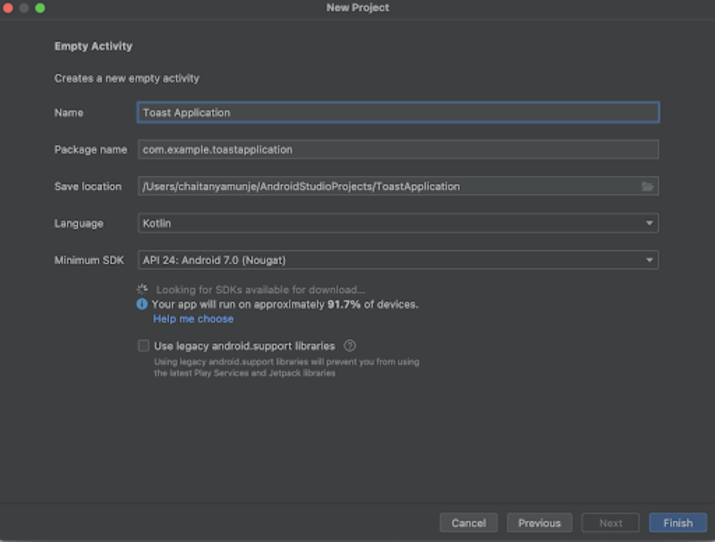
在这个屏幕上,我们必须简单地指定项目名称。然后包的名称将被自动生成。
注意 - 确保将语言选择为Kotlin。
在指定了所有的细节后,点击完成,创建一个新的Android studio项目。
一旦我们的项目被创建,我们将看到两个文件被打开,即 activity_main.xml 和 MainActivity.kt 文件。
第2步:在drawable文件夹中添加图片
导航到app>drawable>右键点击它>New>vector asset>点击剪贴画图标并搜索你要添加到应用程序中的图标。然后简单地改变图标的名称并将该图标添加到我们的drawable文件夹中。
第3步:使用 activity_main.xml 工作
导航到 activity_main.xml。如果这个文件不可见。要打开这个文件。在左边的窗格中导航到app>res>layout>activity_main.xml来打开这个文件。打开这个文件后。将下面的代码添加到其中。在代码中添加注释,以便详细了解。
<?xml version="1.0" encoding="utf-8"?>
<RelativeLayout xmlns:android="http://schemas.android.com/apk/res/android"
   xmlns:app="http://schemas.android.com/apk/res-auto"
   xmlns:tools="http://schemas.android.com/tools"
   android:layout_width="match_parent"
   android:layout_height="match_parent"
   tools:context=".MainActivity">

   <!-- creating a simple text view -->
   <TextView
      android:id="@+id/idTVHeading"
      android:layout_width="match_parent"
      android:layout_height="wrap_content"
      android:layout_above="@id/idTVMode"
      android:layout_marginStart="5dp"
      android:layout_marginTop="5dp"
      android:layout_marginEnd="5dp"
      android:layout_marginBottom="5dp"
      android:gravity="center"
      android:padding="5dp"
      android:text="Audio Manager in Android"
      android:textAlignment="center"
      android:textColor="#FF000000"
      android:textSize="18sp"
      android:textStyle="bold" />

   <!-- creating a text view for displaying current audio mode-->
   <TextView
      android:id="@+id/idTVMode"
      android:layout_width="match_parent"
      android:layout_height="wrap_content"
      android:layout_centerInParent="true"
      android:layout_margin="5dp"
      android:gravity="center"
      android:padding="5dp"
      android:text="Current RingTone Mode"
      android:textAlignment="center"
      android:textColor="#FF000000"
      android:textSize="18sp"
      android:textStyle="bold" />


   <!-- creating a linear layout for three buttons-->
   <LinearLayout
      android:layout_width="match_parent"
      android:layout_height="wrap_content"
      android:layout_below="@id/idTVMode"
      android:layout_margin="10dp"
      android:orientation="horizontal"
      android:weightSum="3">

      <!-- creating a linear layout for our General button-->
      <LinearLayout
         android:id="@+id/idLLGeneral"
         android:layout_width="0dp"
         android:layout_height="wrap_content"
         android:layout_margin="4dp"
         android:layout_weight="1"
         android:background="@color/black"
         android:orientation="vertical"
         android:padding="3dp">

         <!-- adding image view for our general mode-->
         <ImageView
            android:layout_width="50dp"
            android:layout_height="50dp"
            android:layout_gravity="center"
            android:padding="3dp"
            android:src="@drawable/ic_general"
            app:tint="@color/white" />

         <!-- adding text view for the general mode-->
         <TextView
            android:layout_width="match_parent"
            android:layout_height="wrap_content"
            android:layout_gravity="center"
            android:layout_margin="3dp"
            android:padding="4dp"
            android:text="General"
            android:textAlignment="center"
            android:textColor="@color/white"
            android:textStyle="bold" />

      </LinearLayout>

      <!-- creating a linear layout for our Silent button-->
      <LinearLayout
         android:id="@+id/idLLSilent"
         android:layout_width="0dp"
         android:layout_height="wrap_content"
         android:layout_margin="4dp"
         android:layout_weight="1"
         android:background="@color/black"
         android:orientation="vertical"
         android:padding="3dp">

         <!-- adding image view for our silent mode-->
         <ImageView
            android:layout_width="50dp"
            android:layout_height="50dp"
            android:layout_gravity="center"
            android:padding="3dp"
            android:src="@drawable/ic_silent"
            app:tint="@color/white" />

         <!-- adding text view for the silent mode-->
         <TextView
            android:layout_width="match_parent"
            android:layout_height="wrap_content"
            android:layout_gravity="center"
            android:layout_margin="3dp"
            android:padding="4dp"
            android:text="Silent"
            android:textAlignment="center"
            android:textColor="@color/white"
            android:textStyle="bold" />

      </LinearLayout>

      <!-- creating a linear layout for our Vibrate button-->
      <LinearLayout
         android:id="@+id/idLLVibrate"
         android:layout_width="0dp"
         android:layout_height="wrap_content"
         android:layout_margin="4dp"
         android:layout_weight="1"
         android:background="@color/black"
         android:orientation="vertical"
         android:padding="3dp">

         <!-- adding image view for our vibrate mode-->
         <ImageView
            android:layout_width="50dp"
            android:layout_height="50dp"
            android:layout_gravity="center"
            android:padding="3dp"
            android:src="@drawable/ic_vibrate"
            app:tint="@color/white" />

         <!-- adding text view for the vibrate mode-->
         <TextView
            android:layout_width="match_parent"
            android:layout_height="wrap_content"
            android:layout_gravity="center"
            android:layout_margin="3dp"
            android:padding="4dp"
            android:text="Vibrate"
            android:textAlignment="center"
            android:textColor="@color/white"
            android:textStyle="bold" />

      </LinearLayout>
   </LinearLayout>
</RelativeLayout>
解释 - 在上面的代码中,我们正在创建一个相对布局作为根布局。在这个布局中,我们可以在id和参数的帮助下将所有的元素相对对齐。
在这个相对布局中,我们正在创建一个简单的文本视图,用来显示应用程序的标题。
在这个文本视图之后,我们再创建一个文本视图,用来显示当前在我们设备中被激活的音频模式。
在这个文本视图之后,我们显示三个垂直的线性布局,作为水平线性布局中的一个按钮,用于改变我们设备的音频模式。在这个线性布局的帮助下,我们将能够在我们的应用程序中切换音频模式,从一般到无声,振动模式和其他。
第4步:使用MainActivity.kt工作
导航到MainActivity.kt。如果该文件不可见。要打开这个文件。在左侧窗格中导航到app>java>你的应用程序的包名>MainActivity.kt来打开这个文件。打开这个文件后。将下面的代码添加到其中。在代码中加入注释,以便详细了解。
package com.example.gptapp

import android.app.NotificationManager
import android.content.Context
import android.content.Intent
import android.media.AudioManager
import android.os.Build
import android.os.Bundle
import android.provider.Settings
import android.widget.LinearLayout
import android.widget.TextView
import android.widget.Toast
import androidx.appcompat.app.AppCompatActivity

class MainActivity : AppCompatActivity() {

   // creating variables for 3 linear layout and text view.
   lateinit var silentLL: LinearLayout
   lateinit var generalLL: LinearLayout
   lateinit var vibrateLL: LinearLayout
   lateinit var modeTV: TextView

   // creating class variable for audio manager class.
   private var audioManager: AudioManager? = null

   // current mode to store integer value of ringer mode.
   var currentmode = 0
   override fun onCreate(savedInstanceState: Bundle?) {
      super.onCreate(savedInstanceState)
      setContentView(R.layout.activity_main)
      // initializing variables on below line.
      silentLL = findViewById(R.id.idLLSilent)
      generalLL = findViewById(R.id.idLLGeneral)
      vibrateLL = findViewById(R.id.idLLVibrate)
      modeTV = findViewById(R.id.idTVMode)

      // initializing audio manager class on below line
      audioManager = applicationContext.getSystemService(Context.AUDIO_SERVICE) as AudioManager?

      // setting current mode to ringer mode on below line.
      currentmode = audioManager!!.ringerMode

      // updating text view for different modes on below line.
      when (currentmode) {
         AudioManager.RINGER_MODE_NORMAL -> modeTV.setText("Ringer Mode")
         AudioManager.RINGER_MODE_SILENT -> modeTV.setText("Silent Mode")
         AudioManager.RINGER_MODE_VIBRATE -> modeTV.setText("Vibrate Mode")
         else -> modeTV.setText("Fail to get mode")
      }

      // adding click listener for silent linear layout.
      silentLL.setOnClickListener {
         // creating and initializing variable for notification manager.
         val notificationManager = getSystemService(NOTIFICATION_SERVICE) as NotificationManager
         // on below line we are checking if notification policy access is granted or not.
         if (Build.VERSION.SDK_INT >= Build.VERSION_CODES.M && !notificationManager.isNotificationPolicyAccessGranted) {
            // if the permission is not granted we are opening an intent to accept the policy.
            val intent = Intent(Settings.ACTION_NOTIFICATION_POLICY_ACCESS_SETTINGS)
            startActivity(intent)
         }
         // on below line set ringer mode here will sets your ringer mode to silent mode
         audioManager!!.ringerMode = AudioManager.RINGER_MODE_SILENT
         // on below line displaying a toast message
         Toast.makeText(this@MainActivity, "Silent Mode Activated..", Toast.LENGTH_SHORT).show()
         // on below line setting text to mode text view as silent mode.
         modeTV.setText("Silent Mode Activated..")
      }

      // adding click listener for general linear layout
      generalLL.setOnClickListener {
         // set ringer mode here will sets your ringer mode to normal mode on below line.
         audioManager!!.setRingerMode(AudioManager.RINGER_MODE_NORMAL);
         // displaying toast message on below line.
         Toast.makeText(this@MainActivity, "Ringtone Mode Activated..", Toast.LENGTH_SHORT)
            .show();
         // on below line setting text to mode text view as ringtone mode.
         modeTV.setText("Ringtone Mode Activated..");
      }

      // adding click listener for vibrate linear layout
      vibrateLL.setOnClickListener {
         // set ringer mode here will sets your ringer mode to vibrate on below line.
         audioManager!!.setRingerMode(AudioManager.RINGER_MODE_VIBRATE);
         // displaying toast message on below line.
         Toast.makeText(this@MainActivity, "Vibrate Mode Activated..", Toast.LENGTH_SHORT)
            .show();
         // on below line setting text to mode text view as vibrate mode is activated
         modeTV.setText("Vibrate Mode Activated..");
      }
   }
}
解释 – 在上述MainActivity.kt文件的代码中。首先,我们为不同的视图创建了一个变量,如文本视图和线性布局。然后我们为音频管理器类创建一个变量,并将其初始化为空。之后,我们再为当前模式创建一个变量为0,用来选择当前音频模式 。
现在在我们的onCreate方法中,我们正在用我们在activity_main.xml文件中给出的唯一的id初始化我们的线性布局和文本视图变量。
在初始化我们的视图后,我们正在通过调用get系统服务和传递我们必须使用的服务名称来初始化我们的音频管理器变量。我们将使用音频服务来管理我们应用程序中的音频模式。然后我们初始化我们的当前模式变量,并在其中设置设备的当前响铃模式。
然后我们添加一个开关条件,在这个条件下,我们将为不同的铃声模式更新模式文本视图信息。我们还为我们的模式文本视图指定了默认的条件文本。
在为我们的模式文本视图指定文本后,我们正在为我们不同的线性布局添加点击监听器
在每个线性布局的点击监听器中,我们通过调用音频管理器来改变音频模式,然后为当前的音频模式改变文本。之后,我们将简单地显示祝酒词来通知用户音频模式已被更新。
添加上述代码后,现在我们只需点击顶部栏的绿色图标,就可以在移动设备上运行我们的应用程序。
注意 - 确保你已经连接到你的真实设备或模拟器。

总结
在上面的教程中,我们学习了什么是安卓中的音频管理器,以及我们如何在安卓应用程序中使用它来切换不同的音频模式。
 极客教程
极客教程