Flutter 圆形揭幕动画
什么是Flutter中的圆形揭幕动画
环形显示是一种动画,在许多安卓应用程序中,当一个图像被显示的方式,通过添加一个动画,它是看到。在许多安卓应用程序,如支付应用程序,当用户收到任何奖励的付款,奖励是显示与一个特定的动画添加到它。通过这种方式,循环动画得以实现。
循环显示动画的实现
我们将创建一个简单的应用程序,在Flutter中显示一个圆形的揭示动画。我们将创建一个按钮,点击该按钮,我们将对我们的图像进行动画。我们将按照一步一步的指南来实现安卓应用程序中的敬酒信息。
第1步:在Android Studio中创建一个新的flutter项目
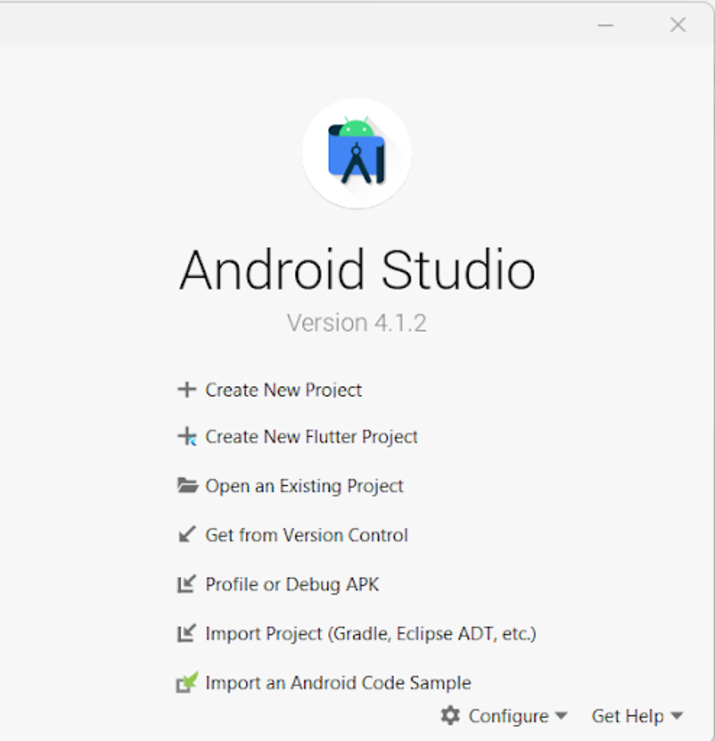
导航到Android studio,如下图所示。在下面的屏幕上点击新项目来创建一个新的Flutter项目。

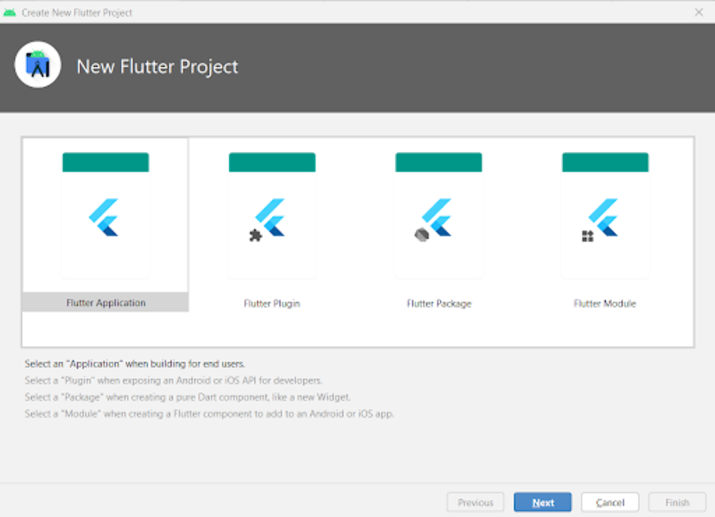
点击新项目后,您将看到下面的屏幕。

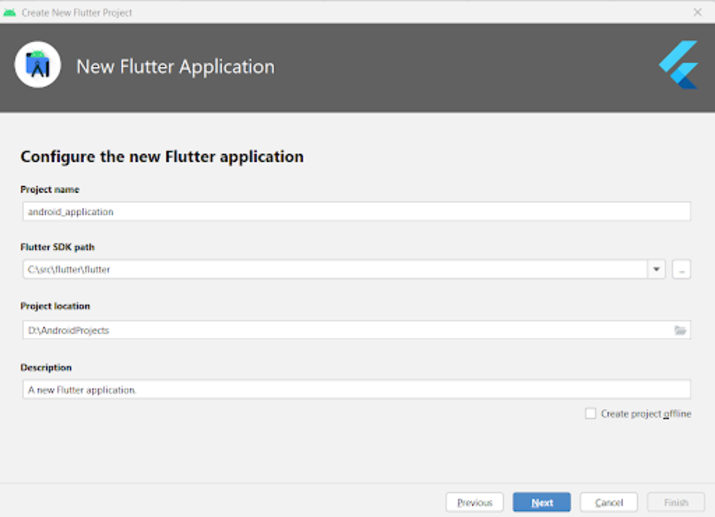
在这个屏幕上,你必须选择Flutter应用程序,然后点击下一步,你会看到下面的屏幕。

在这个屏幕中,您必须指定项目名称,然后简单地点击下一步来创建您的新Flutter项目。
第2步:添加依赖以在Flutter中使用圆形显示动画
为了添加一个新的依赖关系,以便在Flutter中使用圆形显示动画。从左边的窗格导航到您的项目名称,然后导航到pubspec.yaml文件,在dev_dependencies部分添加下面的依赖关系,以使用圆形显示动画。
dev_dependencies:
   flutter_test:
      sdk: flutter
 circular_reveal_animation: ^2.0.1
在添加了你的依赖性之后,我们还必须在我们的项目中添加assets文件夹的位置。为了增加assets文件夹的位置。转到第62行,你必须在pubspec.yaml文件中添加assets文件夹。
# To add assets to your application, add an assets section, like this:
assets:
   - assets/
在你的pubspec.yaml文件中加入上述代码后。只需点击右上角出现的Pub get选项,就可以安装依赖关系。如果您看到获取依赖项的选项,请点击它来安装所有的依赖项。
第3步:在您的Flutter项目中添加图片
现在,由于我们将在揭示效果后显示图片,我们必须在我们的项目中添加图片。为了添加图片。复制您的图片。然后导航到您的项目,在里面右击您的项目目录>新建>目录并命名为assets。然后将你复制的图片粘贴到该目录。确保给图片命名为logo.png,因为我们将在代码中使用相同的名称来指定图片。
第4步:使用main.dart文件
导航到你的项目>lib>main.dart文件,并在其中添加以下代码。在代码中添加注释,以了解详细情况。
import 'package:circular_reveal_animation/circular_reveal_animation.dart';
import 'package:flutter/material.dart';

void main() {
   runApp(const MyApp());
}

class MyApp extends StatelessWidget {
   const MyApp({Key? key}) : super(key: key);

   @override
   Widget build(BuildContext context) {
      return MaterialApp(
         // on below line adding title for our application.
         title: 'Flutter Demo',
         // on below line specifying theme data for our application
         theme: ThemeData(
            primarySwatch: Colors.blue,
         ),
         // on below line calling our home page.
         home: MyHomePage(),
         // on below line disabling our debug check mode banner
         debugShowCheckedModeBanner: false,
      );
   }
}

class MyHomePage extends StatefulWidget {
   MyHomePage({Key? key}) : super(key: key);

   @override
   _MyHomePageState createState() => _MyHomePageState();
}

class _MyHomePageState extends State<MyHomePage>
with SingleTickerProviderStateMixin {
   // on below line creating variables for animation controller, animation and button text.
   late AnimationController animationController;
   late Animation<double> animation;
   var buttonText = "Show Image";

   @override
   void initState() {
      super.initState();
      // on below line initializing animation controller.
      animationController = AnimationController(
         vsync: this,
         // on below line specifying duration
         duration: Duration(milliseconds: 1000),
      );

      // on below line creating our animation to be added on image.
      animation = CurvedAnimation(
         // on below line specifying parent and curve for it
         parent: animationController,
         curve: Curves.easeIn,
      );
   }

   @override
   Widget build(BuildContext context) {
      return Scaffold(
         // on below line creating app bar for our app
         appBar: AppBar(
         // specifying text in our app bar
         title: Text("Android Application"),
         ),
         // adding padding for it.
         body: Padding(
            padding: const EdgeInsets.all(16.0),
            // wrapping our column to center of screen.
            child: Center(
               child: Column(
                  // aligning column on below line.
                  crossAxisAlignment: CrossAxisAlignment.center,
                  mainAxisAlignment: MainAxisAlignment.center,
                  // specifying main axis size on below line.
                  mainAxisSize: MainAxisSize.min,
                  // creating childrens to be displayed on below line.
                  children: <Widget>[
                     // creating a text for circular animation on below line.
                     const Text(
                        "Circular Reveal Animation in Android",
                        // specifying text alignment, max lines, style for our text
                        textAlign: TextAlign.center,
                        maxLines: 1,
                        style: TextStyle(
                           color: Colors.black,
                           fontSize: 20.0,
                           fontWeight: FontWeight.bold),
                     ),
                     // creating a sized box on below line.
                     const SizedBox(
                        height: 10,
                     ),
                     // creating a circular reveal animation on below line.
                     CircularRevealAnimation(
                        // specifying image for it on below line.
                        child: Image.asset('assets/logo.png'),
                        // adding animation for image on below line.
                        animation: animation,
                        // adding center offset for our image on below line.
                        centerOffset: Offset(130, 100),
                     ),
                     // adding sized box for image
                     const SizedBox(
                        height: 10,
                     ),
                     // adding elevated button to start and stop our animation
                     ElevatedButton(
                        // adding text for our button
                        child: Text(
                           // on below line specifying button text and style for our button.
                           buttonText,
                           style: const TextStyle(
                              color: Colors.white, fontWeight: FontWeight.bold),
                        ),
                        // adding on pressed for our button
                        onPressed: () {
                           // checking for current image state and setting animation for it.
                           if (animationController.status == AnimationStatus.forward ||
                           animationController.status ==
                           AnimationStatus.completed) {
                              // reversing the animation for image.
                              animationController.reverse();
                              // changing the button text on below line.
                              setState(() {
                                 buttonText = "Show Image";
                              });
                           } else {
                              // changing the button text on below line.
                              setState(() {
                                 buttonText = "Hide Image";
                              });
                              // setting animation controller to animated button on below line.
                              animationController.forward();
                           }
                        }
                     )
                  ],
               ),
            ),
         ),
      );
   }
}
解释 > 在上面的代码中,我们可以看到main方法,其中我们正在调用我们的MyApp类,我们在下面创建一个无状态的widget。在这个无状态的部件中,我们正在创建一个构建方法,在这个方法中我们将返回我们的材料应用程序。在这个material app中,我们指定了app的标题,app的主题,以及我们必须显示的主页,并将debug check mode banner设置为false。
之后,我们创建一个主页状态方法,它将扩展主页的状态。现在在这个类中,我们正在为动画控制器、动画和我们必须在按钮中显示的文本创建变量。
然后我们通过调用initstate方法来初始化我们的状态。 在这个方法中,我们正在初始化我们的动画控制器和我们的动画。
然后我们创建一个构建方法,在这个方法中我们指定我们的应用栏并为其添加标题。然后,我们为我们的屏幕从各个方向添加一个padding。然后,我们将应用程序中的所有子程序添加到屏幕的中心。在这里面,我们指定了一个列。在这一列中,我们将创建不同的孩子,这些孩子将以垂直方式排列。在这一列中,我们首先创建一个文本小部件来显示应用程序的标题。
之后,我们正在创建一个大小不一的盒子部件,在我们的文本部件和一个圆形显示动画部件之间添加一个间隙。在这个小组件之后,我们正在创建一个圆形显示动画小组件,在这个小组件中,我们指定了我们必须在动画后显示的图像。在这之后,我们再次添加大小的方框。然后我们创建一个高架按钮,我们将使用圆形显示动画来显示和隐藏我们的图像。在我们的按钮的onPressed方法中,我们正在显示我们的图像和隐藏我们的图像。同时,我们也在更新我们按钮的文本。
添加完上述代码后,现在我们只需点击顶部栏的绿色图标,就可以在移动设备上运行我们的应用程序。
注意 - 确保你已经连接到你的真实设备或模拟器。

总结
在上面的教程中,我们学习了什么是安卓中的循环揭幕动画,以及我们如何使用Flutter在安卓应用程序中使用该动画。
 极客教程
极客教程