用OpenCV、Keras和TensorFlow进行区域建议物体检测
在这篇文章中,我们将学习如何用OpenCV、Keras和TensorFlow实现区域建议物体检测。
安装所有的依赖项
使用pip命令来安装所有的依赖项
pip install tensorflow keras imutils
pip install opencv-contrib-python
注意:确保安装上述OpenCV包,否则你可能面临导入错误。
步骤1:读取图像并应用OpenCV的选择性搜索方法
在这一步,我们将读取图像并对其应用OpenCV的选择性搜索方法。这个方法将返回一个矩形的列表,这些矩形基本上是感兴趣的区域。OpenCV为这种选择性搜索提供了两种不同的方法,一种是 “快速 “方法,另一种是 “精确 “方法,你必须根据你的使用情况来决定使用哪一种。
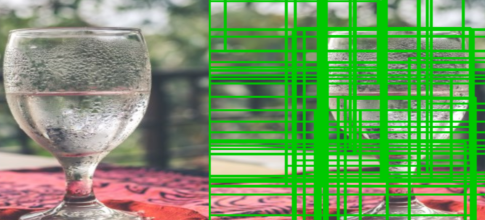
现在我们已经有了矩形,在我们进一步讨论之前,让我们试着将它所返回的感兴趣的区域可视化。
import numpy as np
import cv2

# this is the model we'll be using for
# object detection
from tensorflow.keras.applications import Xception

# for preprocessing the input
from tensorflow.keras.applications.xception import preprocess_input
from tensorflow.keras.applications import imagenet_utils
from tensorflow.keras.preprocessing.image import img_to_array
from imutils.object_detection import non_max_suppression

# read the input image
img = cv2.imread('Assets/img2.jpg')

# instanciate the selective search
# segmentation algorithm of opencv
search = cv2.ximgproc.segmentation.createSelectiveSearchSegmentation()

# set the base image as the input image
search.setBaseImage(img)

# since we'll use the fast method we set it as such
search.switchToSelectiveSearchFast()

# you can also use this for more accuracy:
# search.switchToSelectiveSearchQuality()
rects = search.process()  # process the image

roi = img.copy()
for (x, y, w, h) in rects:

    # Check if the width and height of
    # the ROI is atleast 10 percent
    # of the image dimensions and only then
    # show it
    if (w / float(W) < 0.1 or h / float(H) < 0.1):
        continue

    # Let's visualize all these ROIs
    cv2.rectangle(roi, (x, y), (x + w, y + h),
                  (0, 200, 0), 2)

roi = cv2.resize(roi, (640, 640))
final = cv2.hconcat([cv2.resize(img, (640, 640)), roi])
cv2.imshow('ROI', final)
cv2.waitKey(0)
输出:

这些是我们的函数在过滤掉不够大的ROI后收到的所有兴趣区域,也就是说,如果ROI的宽度或高度小于图像的10%,我们就不考虑它。
第2步:使用ROI创建一个最终输入阵列和边界框的列表
我们将创建两个单独的列表,其中包含RGB格式的图像,另一个列表将包含边界框坐标。这些列表将分别用于预测和创建边界框。我们还将确保我们只对足够大的ROI进行预测,例如,至少有我们图像20%的宽度或高度。
rois = []
boxes = []
(H, W) = img.shape[:2]
rois = []
boxes = []
(H, W) = img.shape[:2]

for (x, y, w, h) in rects:

    # check if the ROI has atleast
    # 20% the size of our image
    if w / float(W) < 0.2 or h / float(H) < 0.2:
        continue

    # Extract the Roi from image
    roi = img[y:y + h, x:x + w]

    # Convert it to RGB format
    roi = cv2.cvtColor(roi, cv2.COLOR_BGR2RGB)

    # Resize it to fit the input requirements of the model
    roi = cv2.resize(roi, (299, 299))

    # Further preprocessing
    roi = img_to_array(roi)
    roi = preprocess_input(roi)

    # Append it to our rois list
    rois.append(roi)

    # now let's store the box co-ordinates
    x1, y1, x2, y2 = x, y, x + w, y + h
    boxes.append((x1, y1, x2, y2))
现在,我们有了经过过滤和预处理的兴趣区域,让我们用它们来创建预测,使用我们的模型。
第3步:使用模型生成预测结果
我们使用Keras预训练模型中的ResNet50模型,主要是因为它对机器的影响不大,而且准确率也高。因此,首先,我们将创建我们的模型实例,然后传入我们的输入->ROI列表并生成预测。
在代码中,它看起来像这样。
# ———— Model————— #

model = Xception(weights=’imagenet’)

# Convert ROIS list to arrays for predictions

input_array = np.array(rois)

print(“Input array shape is ;” ,input_array.shape)

#———- Make Predictions ——-#

preds = model.predict(input_array)

preds = imagenet_utils.decode_predictions(preds, top=1)
现在,我们有了预测,让我们在图像上显示结果。
第4步:创建对象字典
在这一步中,我们将创建一个新的字典,基本上包含标签作为键,作为边界框,和概率作为值。这样我们就可以很容易地访问每个标签的预测,并对其应用非最大压制。我们可以通过循环预测并过滤掉置信度超过90%的预测(你可以根据你的需要改变它)来做到这一点。让我们看看代码。
# Initiate the dictionary
objects = {}
for (i, pred) in enumerate(preds):

    # extract the prediction tuple
    # and store it's values
     iD = pred[0][0]
    label = pred[0][1]
     prob = pred[0][2]

  if prob >= 0.9:

        # grab the bounding box associated
        # with the prediction and
        # convert the coordinates
        box = boxes[i]

        # create a tuple using box and probability
        value = objects.get(label, [])

        # append the value to the list for the label
        value.append((box, prob))

         # Add this tuple to the objects
        # dictionary that we initiated
        objects[label] = value
输出:
{‘img’: [((126, 295, 530, 800), 0.5174897), ((166, 306, 497, 613), 0.510667), ((176, 484, 520, 656), 0.56631094), ((161, 304, 499, 613), 0.55209666), ((161, 306, 504, 613), 0.6020483), ((161, 306, 499, 613), 0.54256636), ((140, 305, 499, 800), 0.5012991), ((144, 305, 516, 800), 0.50028765), ((162, 305, 499, 642), 0.84315413), ((141, 306, 517, 800), 0.5257749), ((173, 433, 433, 610), 0.56347036)], ‘matchstick’: [((169, 633, 316, 800), 0.56465816), ((172, 633, 313, 800), 0.7206488), ((333, 639, 467, 800), 0.60068905), ((169, 633, 314, 800), 0.693922), ((172, 633, 314, 800), 0.70851576), ((167, 632, 314, 800), 0.6374499), ((172, 633, 316, 800), 0.5995729), ((169, 640, 307, 800), 0.67480534)], ‘guillotine’: [((149, 591, 341, 800), 0.59910816), ((149, 591, 338, 800), 0.7370558), ((332, 633, 469, 800), 0.5568006), ((142, 591, 341, 800), 0.6165994), ((332, 634, 468, 800), 0.63907826), ((332, 633, 468, 800), 0.57237893), ((142, 590, 321, 800), 0.6664309), ((331, 635, 467, 800), 0.5186203), ((332, 634, 467, 800), 0.58919555)], ‘water_tower’: [((144, 596, 488, 800), 0.50619787)], ‘barber_chair’: [((165, 465, 461, 576), 0.5565266)]}
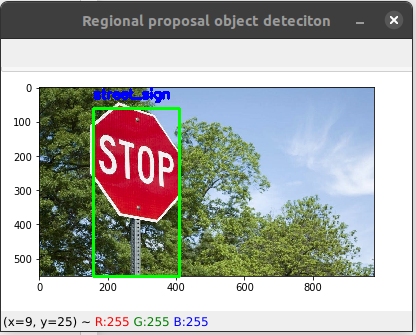
正如你所看到的,这是一个字典,其中标签 “摇椅 “是关键,我们有一个元组列表,其中有边界框和概率作为值存储在这个标签上。
第5步:在图像上显示检测到的物体
如果你还不知道的话,再看一下对象字典,我们一个标签有多个边界框,那么直接在图像上显示出来,不就会有一个集群吗?
因此,我们需要使用non_max_suppression方法,我们将为我们解决这个问题。但是要使用这个函数,我们需要一个边界框数组和一个概率数组,它给我们返回一个边界框数组。
# Loop through the labels
# for each label apply the non_max_suppression
for label in objects.keys():

    # clone the original image
    # o that we can draw on it
    img_copy = img.copy()
    boxes = np.array([pred[0] for pred in objects[label]])
    proba = np.array([pred[1] for pred in objects[label]])
    boxes = non_max_suppression(boxes, proba)

    # Now unpack the co-ordinates of the bounding box
    (startX, startY, endX, endY) = boxes[0]

    # Draw the bounding box
    cv2.rectangle(img_copy, (startX, startY),
                  (endX, endY), (0, 255, 0), 2)
    y = startY - 10 if startY - 10 > 10 else startY + 10

    # Put the label on the image
    cv2.putText(img_copy, label, (startX, y),
                cv2.FONT_HERSHEY_SIMPLEX, 0.45, (255, 0), 2)

    # Show the image
    cv2.imshow("Regional proposal object detection", img_copy)
    cv2.waitKey(0)
下面是完整的实现方案:
# import the packages
import numpy as np
import cv2

# this is the model we'll be using for
# object detection
from tensorflow.keras.applications import Xception

# for preprocessing the input
from tensorflow.keras.applications.xception import preprocess_input
from tensorflow.keras.applications import imagenet_utils
from tensorflow.keras.preprocessing.image import img_to_array
from imutils.object_detection import non_max_suppression

# read the input image
img = cv2.imread('/content/img4.jpg')

# instanciate the selective search
# segmentation algorithm of opencv
search = cv2.ximgproc.segmentation.createSelectiveSearchSegmentation()

# set the base image as the input image
search.setBaseImage(img)
search.switchToSelectiveSearchFast()

# you can also use this for more accuracy ->
# search.switchToSelectiveSearchQuality()
rects = search.process()  # process the image

rois = []
boxes = []
(H, W) = img.shape[:2]
for (x, y, w, h) in rects:

    # check if the ROI has atleast
    # 20% the size of our image
    if w / float(W) < 0.1 or h / float(H) < 0.1:
        continue

    # Extract the Roi from image
    roi = img[y:y + h, x:x + w]

    # Convert it to RGB format
    roi = cv2.cvtColor(roi, cv2.COLOR_BGR2RGB)

    # Resize it to fit the input requirements of the model
    roi = cv2.resize(roi, (299, 299))

    # Further preprocessing
    roi = img_to_array(roi)
    roi = preprocess_input(roi)

    # Append it to our rois list
    rois.append(roi)

    # now let's store the box co-ordinates
    x1, y1, x2, y2 = x, y, x + w, y + h
    boxes.append((x1, y1, x2, y2))

# ------------ Model--------------- #
model = Xception(weights='imagenet')


# Convert ROIS list to arrays for predictions
input_array = np.array(rois)
print("Input array shape is ;", input_array.shape)

#---------- Make Predictions -------#
preds = model.predict(input_array)
preds = imagenet_utils.decode_predictions(preds, top=1)


# Initiate the dictionary
objects = {}
for (i, pred) in enumerate(preds):

    # extract the prediction tuple
    # and store it's values
    iD = pred[0][0]
    label = pred[0][1]
    prob = pred[0][2]

    if prob >= 0.9:

        # grab the bounding box associated
        # with the prediction and
        # convert the coordinates
        box = boxes[i]

        # create a tuble using box and probability
        value = objects.get(label, [])

        # append the value to the list for the label
        value.append((box, prob))

        # Add this tuple to the objects dictionary
        # that we initiated
        objects[label] = value


# Loop through the labels
# for each label apply the non_max_suppression
for label in objects.keys():

    # clone the original image so that we can
    # draw on it
    img_copy = img.copy()
    boxes = np.array([pred[0] for pred in objects[label]])
    proba = np.array([pred[1] for pred in objects[label]])
    boxes = non_max_suppression(boxes, proba)

    # Now unpack the co-ordinates of the bounding box
    (startX, startY, endX, endY) = boxes[0]

    # Draw the bounding box
    cv2.rectangle(img_copy, (startX, startY),
                  (endX, endY), (0, 255, 0), 2)
    y = startY - 10 if startY - 10 > 10 else startY + 10

    # Put the label on the image
    cv2.putText(img_copy, label, (startX, y),
                cv2.FONT_HERSHEY_SIMPLEX, 0.45, (255, 0), 2)

    # Show the image
    cv2.imshow("Regional proposal object detection", img_copy)
    cv2.waitKey(0)
输出:

 极客教程
极客教程