Yii 模型
模型是代表业务逻辑和规则的对象。要创建一个模型,应该扩展 yii\base\Model 类或其子类。
属性
属性代表业务数据。它们可以像数组元素或对象属性一样访问。每个属性是模型的一个公开可访问的属性。要指定一个模型具有哪些属性,应该重写 yii\base\Model::attributes() 方法。
让我们来看看基本应用模板中的 ContactForm 模型。
<?php
   namespace app\models;
   use Yii;
   use yii\base\Model;
   /**
   * ContactForm is the model behind the contact form.
   */
   class ContactForm extends Model {
      public name;
      publicemail;
      public subject;
      publicbody;
      public verifyCode;
      /**
      * @return array the validation rules.
      */
      public function rules() {
         return [
            // name, email, subject and body are required
            [['name', 'email', 'subject', 'body'], 'required'],
            // email has to be a valid email address
            ['email', 'email'],
            // verifyCode needs to be entered correctly
            ['verifyCode', 'captcha'],
         ];
      }
      /**
      * @return array customized attribute labels
      */
      public function attributeLabels() {
         return [
            'verifyCode' => 'Verification Code',
         ];
      }
      /**
      * Sends an email to the specified email address using the information         collected by this model.
      * @param  stringemail the target email address
      * @return boolean whether the model passes validation
      */
      public function contact(email) {
         if (this->validate()) {
            Yii::app->mailer->compose()
               ->setTo(email)
               ->setFrom([this->email =>this->name])
               ->setSubject(this->subject)
               ->setTextBody(this->body)
               ->send();
            return true;
         }
         return false;
      }
   }
?>
步骤1: 在SiteController中创建一个名为 actionShowContactModel 的函数,代码如下:
public function actionShowContactModel() {
   mContactForm = new \app\models\ContactForm();mContactForm->name = "contactForm";
   mContactForm->email = "user@gmail.com";mContactForm->subject = "subject";
   mContactForm->body = "body";   var_dump(mContactForm);
}
在上面的代码中,我们定义了 ContactForm 模型,设置了属性,并在屏幕上显示了该模型。
步骤2 − 现在,如果您在Web浏览器的地址栏中键入 http://localhost:8080/index.php?r=site/show-contact-model ,您将看到以下内容。
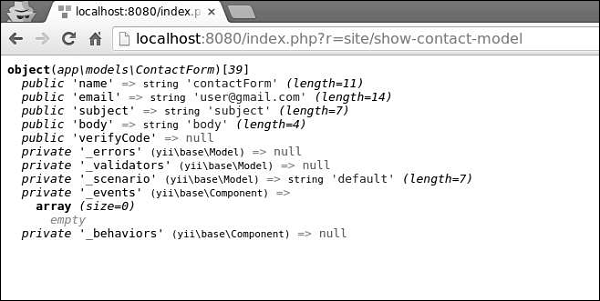
如果您的模型扩展自 yii\base\Model ,那么它的所有成员变量(公共和非静态的)都是属性。在 ContactForm 模型中有五个属性 – 名称,电子邮件,主题,正文和 verifyCode ,您可以轻松添加新的属性。
属性标签
您经常需要显示与属性关联的标签。默认情况下,属性标签是由 yii\base\Model::generateAttributeLabel() 方法自动生成的。要手动声明属性标签,您可以覆盖 yii\base\Model::attributeLabels() 方法。
步骤1 - 如果您打开 http://localhost:8080/index.php?r=site/contact ,您将看到以下页面。
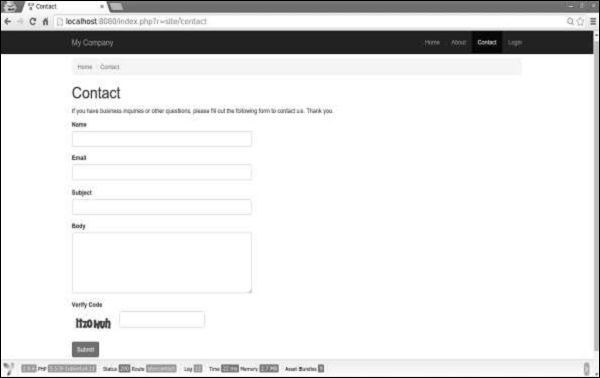
请注意,属性标签与它们的名称相同。
步骤2 —— 现在,请按照以下方式修改 ContactForm 模型中的 attributeLabels 函数。
public function attributeLabels() {
   return [
      'name' => 'name overridden',
      'email' => 'email overridden',
      'subject' => 'subject overridden',
      'body' => 'body overridden',
      'verifyCode' => 'verifyCode overridden',
   ];
}
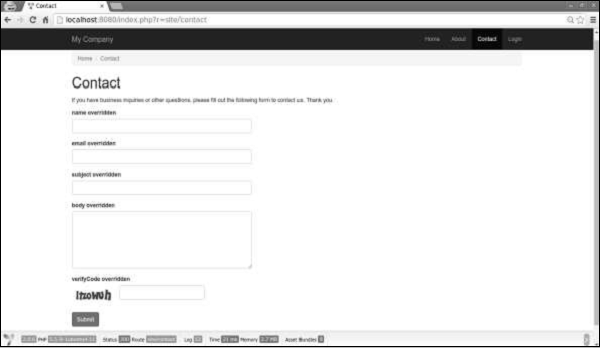
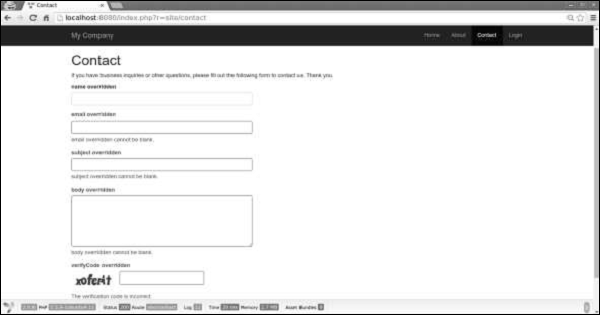
步骤3 - 如果你再次打开 http://localhost:8080/index.php?r=site/contact ,你会注意到标签已经发生了变化,如下图所示。
场景
您可以在不同的场景中使用模型。例如,当一个访客想要发送一个联系表单时,我们需要所有的模型属性。当一个用户要做同样的事情时,他已经登录了,所以我们不需要他的名字,因为可以很容易地从数据库中获取。
要声明场景,我们应该重写 scenarios() 函数。它返回一个数组,其键是场景名称,值是 激活属性 。激活属性是要验证的属性。它们还可以 大规模分配 。
步骤1 − 以以下方式修改 ContactForm 模型。
<?php
   namespace app\models;
   use Yii;
   use yii\base\Model;
   /**
   * ContactForm is the model behind the contact form.
   */
   class ContactForm extends Model {
      public name;
      publicemail;
      public subject;
      publicbody;
      public verifyCode;
      const SCENARIO_EMAIL_FROM_GUEST = 'EMAIL_FROM_GUEST';
      const SCENARIO_EMAIL_FROM_USER = 'EMAIL_FROM_USER';
      public function scenarios() {
         return [
            self::SCENARIO_EMAIL_FROM_GUEST => ['name', 'email', 'subject',               'body', 'verifyCode'],
            self::SCENARIO_EMAIL_FROM_USER => ['email' ,'subject', 'body',               'verifyCode'],
         ];
      }
      /**
      * @return array the validation rules.
      */
      public function rules() {
         return [
            // name, email, subject and body are required
            [['name', 'email', 'subject', 'body'], 'required'],
            // email has to be a valid email address
            ['email', 'email'],
            // verifyCode needs to be entered correctly
            ['verifyCode', 'captcha'],
         ];
      }
      /**
      * @return array customized attribute labels
      */
      public function attributeLabels() {
         return [
            'name' => 'name overridden',
            'email' => 'email overridden',
            'subject' => 'subject overridden',
            'body' => 'body overridden',
            'verifyCode' => 'verifyCode overridden',
         ];
      }
      /**
      * Sends an email to the specified email address using the information         collected by this model.
      * @param  stringemail the target email address
      * @return boolean whether the model passes validation
      */
      public function contact(email) {
         if (this -> validate()) {
            Yii::app->mailer->compose()
               ->setTo(email)
               ->setFrom([this->email =>this->name])
               ->setSubject(this->subject)               ->setTextBody(this->body)
               ->send();
            return true;
         }
         return false;
      }
   }
?>
我们添加了两个场景。一个是为访客而设计的,另一个是为已认证用户设计的。当用户已认证时,我们不需要他的名字。
步骤2 - 现在,修改 SiteController 的 actionContact 函数。
public function actionContact() {
   model = new ContactForm();model->scenario = ContactForm::SCENARIO_EMAIL_FROM_GUEST;
   if (model->load(Yii::app->request->post()) && model->
      contact(Yii::app->params ['adminEmail'])) {
         Yii::app->session->setFlash('contactFormSubmitted');          returnthis->refresh();
   }
   return this->render('contact', [
      'model' =>model,
   ]);
}
步骤3 − 在Web浏览器中键入 http://localhost:8080/index.php?r=site/contact 。你会注意到当前所有模型属性都是必需的。
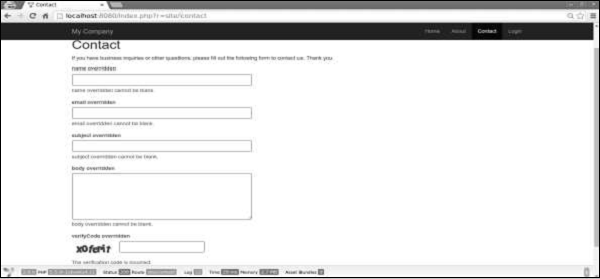
步骤4 - 如果你在 actionContact 中更改模型的场景,如下代码所示,你会发现name属性不再需要。
$model->scenario = ContactForm::SCENARIO_EMAIL_FROM_USER;
大规模任务
大规模任务是通过一行代码从多个输入属性创建模型的便捷方式。
代码行如下 –
$mContactForm = new \app\models\ContactForm;
$mContactForm->attributes = \Yii::$app->request->post('ContactForm');
上述给定的代码行与以下代码等效 –
$mContactForm = new \app\models\ContactForm;
$postData = \Yii::$app->request->post('ContactForm', []);
$mContactForm->name = isset($postData['name']) ? $postData['name'] : null;
$mContactForm->email = isset($postData['email']) ? $postData['email'] : null;
$mContactForm->subject = isset($postData['subject']) ? $postData['subject'] : null;
$mContactForm->body = isset($postData['body']) ? $postData['body'] : null;
前者更加清洁。请注意, massive assignment (大规模赋值)仅适用于 safe attributes (安全属性)。「safe attributes」只是在 scenario() 函数中列出的当前场景属性。
数据导出
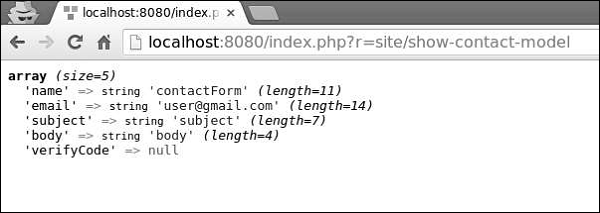
模型通常需要以不同的格式进行导出。要将模型转换为数组,请修改 SiteController 的 actionShowContactModel 函数。
public function actionShowContactModel() {
   mContactForm = new \app\models\ContactForm();mContactForm->name = "contactForm";
   mContactForm->email = "user@gmail.com";mContactForm->subject = "subject";
   mContactForm->body = "body";
   var_dump(mContactForm->attributes);
}
类型 http://localhost:8080/index.php?r=site/show-contact-model 在地址栏中输入,您将看到以下内容:
将模型转换为 JSON 格式,按照以下方式修改 actionShowContactModel 函数 –
public function actionShowContactModel() {
   mContactForm = new \app\models\ContactForm();mContactForm->name = "contactForm";
   mContactForm->email = "user@gmail.com";mContactForm->subject = "subject";
   mContactForm->body = "body";
   return \yii\helpers\Json::encode(mContactForm);
}
浏览器输出 −
{
   "name":"contactForm",
   "email":"user@gmail.com",
   "subject":"subject",
   "body":"body ",
   "verifyCode":null
}
重要点
在一个良好设计的应用中, 模型通常比控制器更快。模型应该−
- 包含业务逻辑。
- 包含验证规则。
- 包含属性。
- 不包含HTML。
- 不直接访问请求。
- 不包含太多场景。
 极客教程
极客教程