如何使用jQuery设计图片滑块

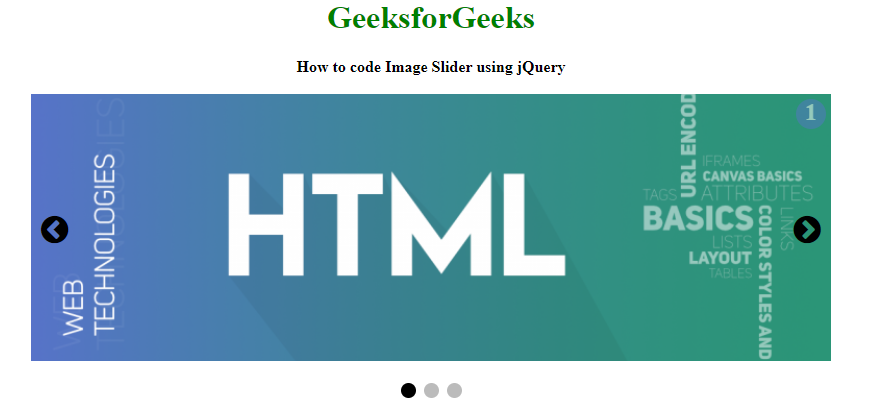
一个幻灯片容器,在网页上循环播放图片列表。下面的文章将指导你使用HTML、CSS和jQuery实现一个图像滑块。jQuery图像滑块包含的图像,使用上一个和下一个图标来运行它们。上一个和下一个箭头是用来在图片上的鼠标悬停事件中来回穿越的。下面的示例代码通过使用HTML、CSS和jQuery,以一种简单而灵活的方式在旋转木马中逐一显示图片。我们将分两部分完成这个任务,首先我们将用HTML创建结构,用CSS设计结构,用jQuery实现互动。
创建结构:在本节中,我们将创建图像滑块的结构。
- HTML代码。HTML是用来创建图像滑块的结构。
<!DOCTYPE html>
<html>

<head>
    <title>
        How to Design Image
        Slider using jQuery ?
    </title>

    <meta name="viewport"
          content="width=device-width, initial-scale=1">

    <link rel="stylesheet" href=
"https://cdnjs.cloudflare.com/ajax/libs/font-awesome/4.7.0/css/font-awesome.min.css">
</head>

<body>
    <center>
        <h1 style="color:green">
            GeeksforGeeks
        </h1>

        <b>
            How to code Image
            Slider using jQuery
        </b>

        <br><br>
    </center>

    <!-- Image container of the image slider -->
    <div class="image-container">
        <div class="slide">
            <div class="slideNumber">1</div>
            <img src=
"https://www.geeksforgeeks.org/wp-content/uploads/html-768x256.png">
        </div>
        <div class="slide">
            <div class="slideNumber">2</div>
            <img src=
"https://www.geeksforgeeks.org/wp-content/uploads/CSS-768x256.png">
        </div>
        <div class="slide">
            <div class="slideNumber">3</div>
            <img src=
"https://www.geeksforgeeks.org/wp-content/uploads/jquery-banner.png">
        </div>

        <!-- Next and Previous icon to change images -->
        <a class="previous" onclick="moveSlides(-1)">
            <i class="fa fa-chevron-circle-left"></i>
        </a>
        <a class="next" onclick="moveSlides(1)">
            <i class="fa fa-chevron-circle-right"></i>
        </a>
    </div>
    <br>

    <div style="text-align:center">
        <span class="footerdot"
            onclick="activeSlide(1)">
        </span>
        <span class="footerdot"
            onclick="activeSlide(2)">
        </span>
        <span class="footerdot"
            onclick="activeSlide(3)">
        </span>
    </div>
</body>

</html>
设计结构:在这里我们将通过使用CSS完成图片滑块的设计部分,并通过使用jQuery使滑块互动。
- CSS代码。在所有元素的标签和类别的基础上设计结构。
<style>
    img {
        width: 100%;
    }
    .height {
        height: 10px;
    }

    /* Image-container design */
    .image-container {
        max-width: 800px;
        position: relative;
        margin: auto;
    }

    .next {
        right: 0;
    }

    /* Next and previous icon design */
    .previous,
    .next {
        cursor: pointer;
        position: absolute;
        top: 50%;
        padding: 10px;
        margin-top: -25px;
    }

    /* caption decorate */
    .captionText {
        color: #000000;
        font-size: 14px;
        position: absolute;
        padding: 12px 12px;
        bottom: 8px;
        width: 100%;
        text-align: center;
    }

     /* Slider image number */
    .slideNumber {
        background-color: #5574C5;
        color: white;
        border-radius: 25px;
        right: 0;
        opacity: .5;
        margin: 5px;
        width: 30px;
        height: 30px;
        text-align: center;
        font-weight: bold;
        font-size: 24px;
        position: absolute;
    }
    .fa {
        font-size: 32px;
    }

    .fa:hover {
        transform: rotate(360deg);
        transition: 1s;
        color: white;
    }

    .footerdot {
        cursor: pointer;
        height: 15px;
        width: 15px;
        margin: 0 2px;
        background-color: #bbbbbb;
        border-radius: 50%;
        display: inline-block;
        transition: background-color 0.5s ease;
    }

    .active,
    .footerdot:hover {
        background-color: black;
    }

</style>
- jQuery代码:jQuery被用来设计滑块的互动。
<script>
    var slideIndex = 1;
    displaySlide(slideIndex);

    function moveSlides(n) {
        displaySlide(slideIndex += n);
    }

    function activeSlide(n) {
        displaySlide(slideIndex = n);
    }

    /* Main function */
    function displaySlide(n) {
        var i;
        var totalslides =
            document.getElementsByClassName("slide");
        var totaldots =
            document.getElementsByClassName("footerdot");

        if (n > totalslides.length) {
            slideIndex = 1;
        }

        if (n < 1) {
            slideIndex = totalslides.length;
        }
        for (i = 0; i < totalslides.length; i++) {
            totalslides[i].style.display = "none";
        }
        for (i = 0; i < totaldots.length; i++) {
            totaldots[i].className =
            totaldots[i].className.replace(" active", "");
        }
        totalslides[slideIndex - 1].style.display = "block";
        totaldots[slideIndex - 1].className += " active";
    }
</script>
完整的解决方案:在本节中,我们将把上述各节结合起来,这将是一个图像滑块。
<!DOCTYPE html>
<html>

<head>
    <title>
        How to Design Image
        Slider using jQuery ?
    </title>

    <meta name="viewport"
          content="width=device-width, initial-scale=1">

    <link rel="stylesheet" href=
"https://cdnjs.cloudflare.com/ajax/libs/font-awesome/4.7.0/css/font-awesome.min.css">

    <style>
        img {
            width: 100%;
        }
        .height {
            height: 10px;
        }

        /* Image-container design */
        .image-container {
            max-width: 800px;
            position: relative;
            margin: auto;
        }

        .next {
            right: 0;
        }

        /* Next and previous icon design */
        .previous,
        .next {
            cursor: pointer;
            position: absolute;
            top: 50%;
            padding: 10px;
            margin-top: -25px;
        }

        /* caption decorate */
        .captionText {
            color: #000000;
            font-size: 14px;
            position: absolute;
            padding: 12px 12px;
            bottom: 8px;
            width: 100%;
            text-align: center;
        }

         /* Slider image number */
        .slideNumber {
            background-color: #5574C5;
            color: white;
            border-radius: 25px;
            right: 0;
            opacity: .5;
            margin: 5px;
            width: 30px;
            height: 30px;
            text-align: center;
            font-weight: bold;
            font-size: 24px;
            position: absolute;
        }
        .fa {
            font-size: 32px;
        }

        .fa:hover {
            transform: rotate(360deg);
            transition: 1s;
            color: white;
        }

        .footerdot {
            cursor: pointer;
            height: 15px;
            width: 15px;
            margin: 0 2px;
            background-color: #bbbbbb;
            border-radius: 50%;
            display: inline-block;
            transition: background-color 0.5s ease;
        }

        .active,
        .footerdot:hover {
            background-color: black;
        }
    </style>
</head>

<body>
    <center>
        <h1 style="color:green">
            GeeksforGeeks
        </h1>

        <b>
            How to code Image
            Slider using jQuery
        </b>

        <br><br>
    </center>

    <!-- Image container of the image slider -->
    <div class="image-container">
        <div class="slide">
            <div class="slideNumber">1</div>
            <img src=
"https://www.geeksforgeeks.org/wp-content/uploads/html-768x256.png">
        </div>
        <div class="slide">
            <div class="slideNumber">2</div>
            <img src=
"https://www.geeksforgeeks.org/wp-content/uploads/CSS-768x256.png">
        </div>
        <div class="slide">
            <div class="slideNumber">3</div>
            <img src=
"https://www.geeksforgeeks.org/wp-content/uploads/jquery-banner.png">
        </div>

        <!-- Next and Previous icon to change images -->
        <a class="previous" onclick="moveSlides(-1)">
            <i class="fa fa-chevron-circle-left"></i>
        </a>
        <a class="next" onclick="moveSlides(1)">
            <i class="fa fa-chevron-circle-right"></i>
        </a>
    </div>
    <br>

    <div style="text-align:center">
        <span class="footerdot"
            onclick="activeSlide(1)">
        </span>
        <span class="footerdot"
            onclick="activeSlide(2)">
        </span>
        <span class="footerdot"
            onclick="activeSlide(3)">
        </span>
    </div>

    <script>
        var slideIndex = 1;
        displaySlide(slideIndex);

        function moveSlides(n) {
            displaySlide(slideIndex += n);
        }

        function activeSlide(n) {
            displaySlide(slideIndex = n);
        }

        /* Main function */
        function displaySlide(n) {
            var i;
            var totalslides =
                document.getElementsByClassName("slide");

            var totaldots =
                document.getElementsByClassName("footerdot");

            if (n > totalslides.length) {
                slideIndex = 1;
            }
            if (n < 1) {
                slideIndex = totalslides.length;
            }
            for (i = 0; i < totalslides.length; i++) {
                totalslides[i].style.display = "none";
            }
            for (i = 0; i < totaldots.length; i++) {
                totaldots[i].className =
                totaldots[i].className.replace(" active", "");
            }
            totalslides[slideIndex - 1].style.display = "block";
            totaldots[slideIndex - 1].className += " active";
        }
    </script>
</body>

</html>
输出:

 极客教程
极客教程