Django中的Razorpay集成
支付是在线生态系统的一个组成部分,无论是在电子商务商店处理订单还是向某人进行简单的捐赠。将支付网关集成到你的网站中可能是一个繁琐的过程。让我们来看看如何将Razorpay整合到Django网站中。
第1步:启动Django项目
确保你已经完成了django的安装。创建一个名为dj_razorpay的新项目,然后启动一个名为payment的新应用。在settings.py文件中的installed_apps列表中加入 “payment”。同时,应用migrations.
INSTALLED_APPS = [
    ...
    'payment',
    ...
]
第2步:获取Razorpay钥匙
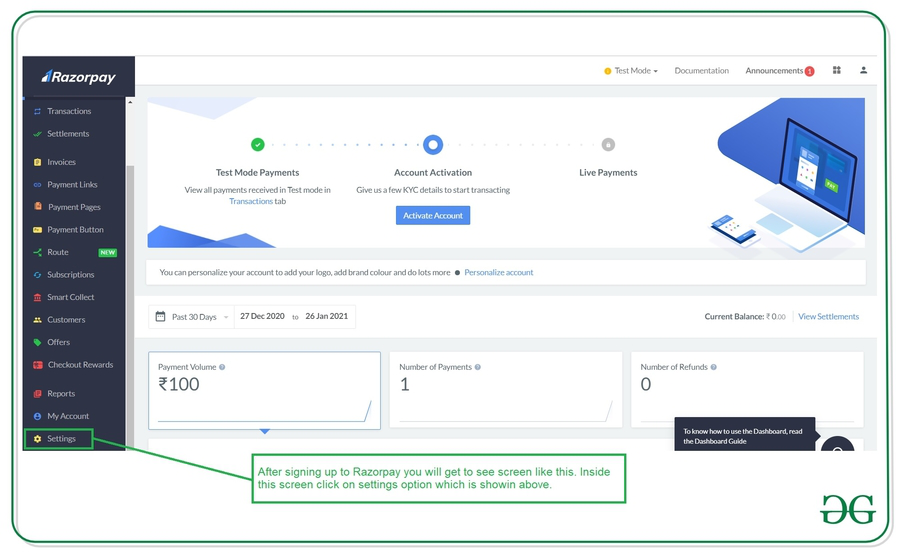
首先,在Razorpay的网站上创建一个账户,你只需用你的电子邮件和密码注册,并添加一些基本信息,如你的手机号码。

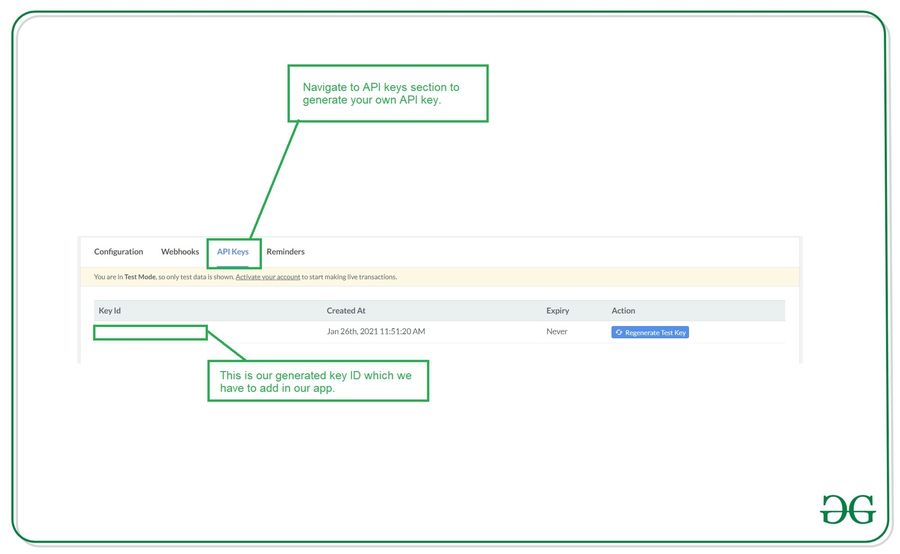
在设置屏幕内,点击创建一个新的密钥选项,你的密钥将被生成。你将得到密钥ID和密钥秘密。目前,我们的支付将处于 “测试模式”,即没有真正的交易会发生,支付选项也是有限的。要接受真正的钱和解锁更多的支付选项,你需要完成你的KYC并提供你的银行信息。无论哪种模式,整合过程都是一样的。
注意:你将只被显示一次密钥秘密,所以要立即把它复制到某个地方。

现在在settings.py文件中加入Key Id和_Key Secret。
RAZOR_KEY_ID = YOUR_KEY_ID
RAZOR_KEY_SECRET = YOUR_KEY_SECRET
在我们继续前进之前,让我们安装razorpay的python包。
pip install razorpay
第3步:Views.py
1.这是程序的主要步骤。首先,我们需要了解Razorpay的支付方式。
2.从我们的Django服务器创建一个Razor订单。
3.将订单标识和其他选项传递给前台。
4.用户点击付款按钮,用其中一种付款方式付款。
5.Razorpay处理支付成功和失败。
6.失败时,Razorpay为重试支付提供便利。
7.一旦成功,Razorpay会向我们服务器上的一个回调URL发出一个帖子请求。
8.验证付款签名,以确认付款是真实的,没有被篡改。
9.一旦通过验证,捕捉付款并呈现成功页面。
更多细节见代码注释。
注: Razorpay中的金额是以货币为单位的,即500卢比会变成50000便士。
from django.shortcuts import render
import razorpay
from django.conf import settings
from django.views.decorators.csrf import csrf_exempt
from django.http import HttpResponseBadRequest


# authorize razorpay client with API Keys.
razorpay_client = razorpay.Client(
    auth=(settings.RAZOR_KEY_ID, settings.RAZOR_KEY_SECRET))


def homepage(request):
    currency = 'INR'
    amount = 20000  # Rs. 200

    # Create a Razorpay Order
    razorpay_order = razorpay_client.order.create(dict(amount=amount,
                                                       currency=currency,
                                                       payment_capture='0'))

    # order id of newly created order.
    razorpay_order_id = razorpay_order['id']
    callback_url = 'paymenthandler/'

    # we need to pass these details to frontend.
    context = {}
    context['razorpay_order_id'] = razorpay_order_id
    context['razorpay_merchant_key'] = settings.RAZOR_KEY_ID
    context['razorpay_amount'] = amount
    context['currency'] = currency
    context['callback_url'] = callback_url

    return render(request, 'index.html', context=context)


# we need to csrf_exempt this url as
# POST request will be made by Razorpay
# and it won't have the csrf token.
@csrf_exempt
def paymenthandler(request):

    # only accept POST request.
    if request.method == "POST":
        try:

            # get the required parameters from post request.
            payment_id = request.POST.get('razorpay_payment_id', '')
            razorpay_order_id = request.POST.get('razorpay_order_id', '')
            signature = request.POST.get('razorpay_signature', '')
            params_dict = {
                'razorpay_order_id': razorpay_order_id,
                'razorpay_payment_id': payment_id,
                'razorpay_signature': signature
            }

            # verify the payment signature.
            result = razorpay_client.utility.verify_payment_signature(
                params_dict)
            if result is not None:
                amount = 20000  # Rs. 200
                try:

                    # capture the payemt
                    razorpay_client.payment.capture(payment_id, amount)

                    # render success page on successful caputre of payment
                    return render(request, 'paymentsuccess.html')
                except:

                    # if there is an error while capturing payment.
                    return render(request, 'paymentfail.html')
            else:

                # if signature verification fails.
                return render(request, 'paymentfail.html')
        except:

            # if we don't find the required parameters in POST data
            return HttpResponseBadRequest()
    else:
       # if other than POST request is made.
        return HttpResponseBadRequest()
注意:有必要捕获付款,否则将自动退还给付款人。
现在将上述视图映射到urls.py.中的urls。
# dj_razorpay/urls.py

from django.contrib import admin
from django.urls import path
from payment import views

urlpatterns = [
    path('', views.homepage, name='index'),
    path('paymenthandler/', views.paymenthandler, name='paymenthandler'),
    path('admin/', admin.site.urls),
]
第4步:前台
我们需要传递Razorpay订单ID和上一步中提到的其他选项。首先加载Razorpay的javascript代码,渲染支付窗口,并用从后台收到的选项初始化它。给付款按钮添加一个事件监听器,这样一旦点击,付款窗口就会打开。
在这里,我们在主页上渲染了支付按钮本身。我们还需要另外两个页面来显示付款成功和失败。
<!DOCTYPE html>
<html lang="en">
  <head>
    <meta charset="UTF-8" />
    <meta http-equiv="X-UA-Compatible" content="IE=edge" />
    <meta name="viewport" content="width=device-width, initial-scale=1.0" />
    <title>GFG</title>
    <style>

      * {
        box-sizing: border-box;
        padding: 0px;
        margin: 0px;
        font-family: cursive;
      }
      html,
      body {
        height: 100%;
      }
      body {
        background-color: #f1f5f8;
        display: flex;
        justify-content: center;
        align-items: center;
      }
      .card {
        background-color: white;
        padding: 25px;
        border: 1px solid #bbbbbb;
        border-radius: 5px;
        box-shadow: 1px 1px 10px 0px rgb(0 0 0 / 25%);
      }
      .title {
        text-align: center;
        letter-spacing: 1px;
      }
      .muted {
        color: #8e7f7f;
        display: block;
        margin-bottom: 10px;
        text-align: center;
      }
      .btn_container {
        padding: 20px;
        text-align: center;
      }
      .btn {
        border-radius: 4px;
        cursor: pointer;
        padding: 4px 8px;
        background-color: #ffaaa7;
        color: white;
        font-size: 1.2em;
        font-weight: 600;
        letter-spacing: 1px;
      }
    </style>
  </head>
  <body>
    <div class="card">
      <h1 class="title">Buy Me a Chai ☕</h1>
      <small class="muted"
        >If you like my work, you can support me by donating ₹200</small
      >
      <div class="btn_container">
        <!-- Payment Button -->
        <button class="btn" id="pay-btn">Donate❤️</button>
      </div>
    </div>
  </body>

  <!-- Razorpay's Javascript code. -->
  <script src="https://checkout.razorpay.com/v1/checkout.js"></script>
  <script>
    var options = {

      // Enter the Key ID generated from the Dashboard
      key: "{{ razorpay_merchant_key }}",

      // Amount is in currency subunits.
      // Default currency is INR. Hence,
      // 50000 refers to 50000 paise
      amount: "{{ razorpay_amount }}",
      currency: "{{ currency }}",

      // Your/store name.
      name: "Dj Razorpay",

      // Pass the `id` obtained in the response of Step 1
      order_id: "{{ razorpay_order_id }}",
      callback_url: "{{ callback_url }}",
    };

    // initialise razorpay with the options.
    var rzp1 = new Razorpay(options);

    // add event listener to the payment button.
    document.getElementById("pay-btn").onclick = function (e) {
      rzp1.open();
      e.preventDefault();
    };
  </script>
</html>
第5步:测试
现在,让我们启动服务器,并检查是否一切工作正常!
python manage.py runserver
我们成功收到了付款!!您可以在Razorpay的仪表板上查看这些付款。
 极客教程
极客教程