Angular PrimeNG树属性
Angular PrimeNG是一个开源的框架,有丰富的原生Angular UI组件,用来做很好的造型,这个框架用来做响应式的网站非常容易。它提供了大量的模板、组件、主题设计、广泛的图标库等等。在这篇文章中,我们将学习Angular PrimeNG树属性。
Angular PrimeNG Tree用于将分层数据显示为一棵树。这些属性被用来对树进行不同的操作,这样我们就可以相应地显示数据。
- value(array)。它是一个treenodes的数组。
- selectionMode(string)。它定义了选择模式,有效值为单一、多个和复选框。
- selection(any)。它是一个单一的treenode实例或一个数组来指代选择。
- style(字符串)。它是组件的内联风格。
- styleClass(string)。它是组件的风格类。
- contextMenu(上下文菜单)。它是上下文菜单的实例。
- layout(string)。它定义了树的方向,有效值是垂直和水平。默认值是垂直。
- draggableScope(string/array)。它是可拖动节点的范围,以匹配dropppableScope。
- droppableScope(string/array)。是指dropppable节点的范围,以匹配dragableScope。
- draggableNodes(boolean)。它检查节点是否可以拖动。默认值为false。
- droppableNodes(boolean)。它检查节点是否是可放弃的。默认值是false。
- metaKeySelection(boolean)。它定义了如何选择多个项目,当为真时,需要按metaKey来选择或取消选择一个项目,当设置为假选择时,每个项目可以单独切换。默认值是true。
- propagateSelectionUp(boolean)。它检查复选框的选择是否会传播到祖先节点。默认值为true。
- propagateSelectionDown(boolean)。它检查复选框的选择是否传播到子代节点。默认值为true。
- loading(boolean)。它显示一个加载器,表示数据加载正在进行中。默认值为false。
- loadingIcon(string)。它显示加载器,同时表示数据加载正在进行中。默认值是pi pi-spinner。
- emptyMessage(string)。当没有数据时,它显示没有找到记录的文本。
- ariaLabel(string)。它用于定义一个给树贴标签的字符串。
- ariaLabelledBy(字符串)。它建立了组件和标签之间的关系,其值应该是一个或多个元素ID。
- togglerAriaLabel(string)。它定义了一个字符串,用于标记toggler图标的可访问性。
- validateDrop(boolean)。如果设置为true,可以根据onNodeDrop定义的条件接受或拒绝掉落。默认值是false。
- filter(boolean)。如果设置为true,显示一个输入字段来过滤项目。默认值是false。
- filterBy(string)。它决定哪一个或哪几个字段进行搜索。
- filterMode(string)。它是过滤有效值的模式,即宽松和严格。默认是宽松的。
- filterPlaceholder(string)。这是过滤器输入为空时要显示的占位符文本。
- filterLocale(string)。它是在过滤中使用的locale。默认的locale是主机环境的当前locale。
- scrollHeight(string)。它是可滚动视窗的高度。
- virtualScroll(boolean)。如果设置为 “true”,数据应该在滚动过程中按需加载。默认值是false。
- virtualScrollItemSize(number)。它为VirtualScrolling设置列表中的一个项目的高度。
- virtualScrollOptions(ScrollerOptions)。它设置了滚动器的功能
- trackBy(Function)。它设置了优化节点列表渲染的函数。
语法:要使用任何属性,请使用以下语法。
<p-tree [value]="files1"
    selectionMode="checkbox">
</p-tree>
创建Angular应用程序和模块安装。
第1步:使用以下命令创建一个Angular应用程序。
ng new geeks_angular
第2步:在创建你的项目文件夹即geeks_angular后,使用以下命令移动到它。
cd geeks_angular
步骤3:在你给定的目录中安装PrimeNG。
npm install primeng --save
npm install primeicons --save
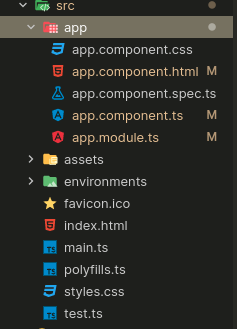
项目结构:项目结构将如下所示。

运行应用程序的步骤:编写以下命令来运行该应用程序。
ng serve --open
例子1:在下面的例子中,我们有简单的TreeNodes,并启用了checkbox。
app.component.html
<h1 style="color:green;text-align:center;">
    GeeksforGeeks
</h1>
<h3>Angular PrimeNG Tree Properties</h3>
<p-tree [value]="files1"
        selectionMode="checkbox">
</p-tree>
app.component.ts
import { Component } from '@angular/core';
import { TreeNode } from 'primeng/api';

@Component({
    selector: 'app-root',
    templateUrl: './app.component.html',
    styleUrls: ['./app.component.css'],
})
export class AppComponent {
    files1: TreeNode[] = [];

    files2: TreeNode[] = [];

    ngOnInit() {
        this.files1 = [
            {
                label: 'Data Structures',
                icon: 'pi pi-folder',

                children: [
                    {
                        label: 'List',
                        icon: 'pi pi-folder',

                        children: [
                            {
                                label: 'Singly List',
                                icon: 'pi pi-code',
                            },
                            {
                                label: 'Doubly List',
                                icon: 'pi pi-code',
                            },
                            {
                                label: 'Circularly List',
                                icon: 'pi pi-code',
                            },
                        ],
                    },
                    {
                        label: 'Queue',
                        icon: 'pi pi-folder',

                        children: [
                            {
                                label: 'Simple Queue',
                                icon: 'pi pi-code',
                            },
                            {
                                label: 'Doubly ended Queue',
                                icon: 'pi pi-code',
                            },
                        ],
                    },
                ],
            },
            {
                label: 'Algorithms',
                icon: 'pi pi-folder',

                children: [
                    {
                        label: 'Greedy ',
                        icon: 'pi pi-code',
                    },
                    {
                        label: 'BFS ',
                        icon: 'pi pi-code',
                    },
                    {
                        label: 'Dynamic Programming',
                        icon: 'pi pi-code',
                    },
                ],
            },
        ];
        this.files2 = this.files1;
    }
}
app.module.ts
import { NgModule } from '@angular/core';
import { BrowserModule } from '@angular/platform-browser';
import { HttpClientModule } from '@angular/common/http';
import { BrowserAnimationsModule } from
    '@angular/platform-browser/animations';
import { RouterModule } from '@angular/router';
import { AppComponent } from './app.component';

import { FormsModule } from '@angular/forms';
import { TreeModule } from 'primeng/tree';
import { ButtonModule } from 'primeng/button';

@NgModule({
    imports: [
        BrowserModule,
        BrowserAnimationsModule,
        TreeModule,
        ButtonModule,
        HttpClientModule,
        FormsModule,
        RouterModule.forRoot([{ path: '', component: AppComponent }]),
    ],
    declarations: [AppComponent],
    bootstrap: [AppComponent],
})
export class AppModule { }
输出:

例2:在下面的例子中,我们启用了。过滤模式。
app.component.html
<h1 style="color:green;text-align:center;">
    GeeksforGeeks
</h1>
<h3>Angular PrimeNG Tree Properties</h3>
<p-tree [value]="files1"
        filter="true">
</p-tree>
app.component.ts
import { Component } from '@angular/core';
import { TreeNode } from 'primeng/api';

@Component({
    selector: 'app-root',
    templateUrl: './app.component.html',
    styleUrls: ['./app.component.css'],
})
export class AppComponent {
    files1: TreeNode[] = [];

    files2: TreeNode[] = [];

    ngOnInit() {
        this.files1 = [
            {
                label: 'Data Structures',
                icon: 'pi pi-folder',

                children: [
                    {
                        label: 'List',
                        icon: 'pi pi-folder',

                        children: [
                            {
                                label: 'Singly List',
                                icon: 'pi pi-code',
                            },
                            {
                                label: 'Doubly List',
                                icon: 'pi pi-code',
                            },
                            {
                                label: 'Circularly List',
                                icon: 'pi pi-code',
                            },
                        ],
                    },
                    {
                        label: 'Queue',
                        icon: 'pi pi-folder',

                        children: [
                            {
                                label: 'Simple Queue',
                                icon: 'pi pi-code',
                            },
                            {
                                label: 'Doubly ended Queue',
                                icon: 'pi pi-code',
                            },
                        ],
                    },
                ],
            },
            {
                label: 'Algorithms',
                icon: 'pi pi-folder',

                children: [
                    {
                        label: 'Greedy ',
                        icon: 'pi pi-code',
                    },
                    {
                        label: 'BFS ',
                        icon: 'pi pi-code',
                    },
                    {
                        label: 'Dynamic Programming',
                        icon: 'pi pi-code',
                    },
                ],
            },
        ];
        this.files2 = this.files1;
    }
}
app.module.ts
import { NgModule } from '@angular/core';
import { BrowserModule } from '@angular/platform-browser';
import { HttpClientModule } from '@angular/common/http';
import { BrowserAnimationsModule } from '@angular/platform-browser/animations';
import { RouterModule } from '@angular/router';
import { AppComponent } from './app.component';

import { FormsModule } from '@angular/forms';
import { TreeModule } from 'primeng/tree';
import { ButtonModule } from 'primeng/button';

@NgModule({
    imports: [
        BrowserModule,
        BrowserAnimationsModule,
        TreeModule,
        ButtonModule,
        HttpClientModule,
        FormsModule,
        RouterModule.forRoot([{ path: '', component: AppComponent }]),
    ],
    declarations: [AppComponent],
    bootstrap: [AppComponent],
})
export class AppModule { }
输出:

 极客教程
极客教程