如何使用Ajax在数据库中查找电子邮件
在本文中,我们将学习如何使用Ajax在数据库中查找电子邮件。jQuery的ajax()方法使用异步HTTP请求连接到服务器。在这里,我们将使用Node.js服务器和MongoDB数据库。
让我们逐步理解实现过程。
步骤1: 创建一个名为 CHECKEMAIL 的文件夹,并运行以下命令启动一个Node.js应用程序。
npm init -y
步骤2: 使用以下命令安装所需的npm软件包。
npm install express body-parser mongoose nodemon
步骤3: 在您的项目目录中创建一个名为 index.js 的文件。
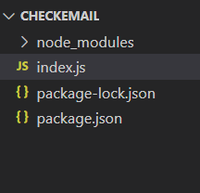
项目结构: 我们的项目目录现在应该如下所示。
步骤4: 需要和配置express应用程序,以便它可以开始监听请求。我们的服务器配置为使用端口3000。
index.js
const express = require("express");
const bodyParser = require("body-parser");
const app = express();

app.use(express.json());
app.use(
bodyParser.urlencoded({
    extended: true})
);

app.listen(3000, () => {
    console.log("Server started on port 3000");
});
步骤5: 在package.json文件中包含下面的脚本。这意味着我们可以使用npm start启动服务器,这将使用我们之前安装的Nodemon软件包。
package.json
"scripts": {
     "start": "nodemon index.js"
},
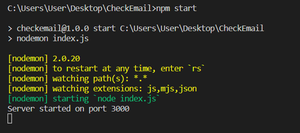
步骤6: 在终端中输入以下命令启动服务器。
步骤7: 使用mongoose软件包要求连接到MongoDB数据库。如果您正在使用本地项目,则MongoDB服务器的URL可能是mongodb:/localhost:27017/databaseName。默认端口是27017。
const mongoose = require("mongoose");
mongoose
    .connect("mongodb://localhost:27017/mydb", {
        useNewUrlParser: true,
      })
      .then(() => {
        console.log("Database connected");
      })
      .catch((err) => {
        console.log("Connection failed");
      })
步骤8: 重新启动服务器,查看数据库是否成功连接。
使用Ajax在数据库中查找电子邮件的步骤:
步骤1: 创建一个名为index.html的HTML文件,其中包含一个输入字段和提交按钮。当用户按下提交按钮时,它会向服务器的/路由发送带有JSON数据的POST请求,然后服务器会给出适当的响应。
<!DOCTYPE html>
<html lang="en">

<head>
    <meta charset="UTF-8" />
    <meta http-equiv="X-UA-Compatible" content="IE=edge" />
    <meta name="viewport"
        content="width=device-width, initial-scale=1.0" />
    <script src=
"https://ajax.googleapis.com/ajax/libs/jquery/3.6.0/jquery.min.js">
      </script>
</head>

<body>
    <h1 style="color: green">GeeksforGeeks</h1>
    <input type="text" placeholder="Email"
        name="email" id="email" />
    <button id="btn">Submit</button>
    <div id="output" style="background-color: green;
        color: #fff; width: fit-content">
      </div>

    <script>
        (document).ready(() => {
            ("#btn").click(() => {
                ("#output").empty();
                let email =("#email").val();
                .ajax({
                    method: "POST",
                    url: "/",
                    data: { emailId: email },
                    success: function (data) {

                        // Success callback function
                        if (data.length !== 0) {
                            ("#output").append(`<p>_id:
                            {data[0]._id}</p>`);
                            ("#output").append(`<p>email:
                            {data[0].email}</p>`);
                        } else {
                            ("#output").append(`<p>Not Found!</p>`);
                        }
                        console.log(data);
                    },
                    error: function (error) {

                        // Error callback function
                        console.log(error);
                    },
                });
            });
        });
    </script>
</body>

</html>
步骤2: 创建一个get请求,将HTML文件呈现在我们的服务器上。
app.get("/", (req, res) => {
    res.sendFile(path.join(__dirname + "/index.html"));
});
步骤3: 创建一个模型来表示我们数据库的结构。我们在这里有一个模式,它概述了我们数据库的结构。它有一个email属性。
const userSchema = {
    email: {
        type: String,
        required: true,
      },
};
const user = mongoose.model("users", userSchema);
步骤4: 使用我们刚刚创建的模型处理post请求。email属性接受请求体中的emailId。
app.post("/", async (req, res) => {
    try {
        const userEmail = await user.find({
            email: req.body.emailId });
        res.send(userEmail);
      } catch (error) {
        console.log(error);
      }
});
输出:

步骤5: 创建一个Express服务器并监听端口。
const express = require('express');
const app = express();
const port = 3000;

app.listen(port, () => {
    console.log(`Server is running on port ${port}`);
});
阅读更多:JavaScript 教程
 极客教程
极客教程

