CSS overflow
在前端开发中,CSS是不可或缺的一部分。然而,有时候我们会遇到一些CSS相关的问题,需要在网上搜索解决方案。而其中一个非常有用的网站就是CSS Overflow(cssoverflow.com),这个网站上有大量关于CSS的问题和解决方案,可以帮助我们解决各种CSS方面的困惑。
在本文中,我们将介绍一些常见的CSS问题,并提供相应的解决方案。我们将使用cssoverflow.com上的一些示例代码来演示这些解决方案。希望这些示例能帮助你更好地理解CSS,并解决你在前端开发中遇到的问题。
1. 如何实现文字溢出显示省略号
有时候,我们希望当文字内容过长时,能够自动显示省略号,而不是换行显示。这在一些列表项或标题中非常常见。下面是一个示例代码,演示如何实现文字溢出显示省略号:
<!DOCTYPE html>
<html lang="en">
<head>
<meta charset="UTF-8">
<meta name="viewport" content="width=device-width, initial-scale=1.0">
<title>Text Overflow Example</title>
<style>
  .ellipsis {
    white-space: nowrap;
    overflow: hidden;
    text-overflow: ellipsis;
    width: 200px;
    border: 1px solid #ccc;
  }
</style>
</head>
<body>
  <div class="ellipsis">This is a long text that will be truncated with an ellipsis.</div>
</body>
</html>
Output:

在这个示例中,我们使用了white-space: nowrap;来防止文字换行,overflow: hidden;来隐藏溢出的部分,text-overflow: ellipsis;来显示省略号。通过设置width属性,我们可以控制显示的宽度。
2. 如何实现文字溢出显示提示框
有时候,我们希望当文字内容过长时,能够在鼠标悬停时显示完整内容的提示框。这在一些表格或链接中非常常见。下面是一个示例代码,演示如何实现文字溢出显示提示框:
<!DOCTYPE html>
<html lang="en">
<head>
<meta charset="UTF-8">
<meta name="viewport" content="width=device-width, initial-scale=1.0">
<title>Tooltip Example</title>
<style>
  .tooltip {
    position: relative;
    display: inline-block;
    border-bottom: 1px dotted black;
  }

  .tooltip .tooltiptext {
    visibility: hidden;
    width: 120px;
    background-color: #555;
    color: #fff;
    text-align: center;
    border-radius: 6px;
    padding: 5px 0;
    position: absolute;
    z-index: 1;
    bottom: 125%;
    left: 50%;
    margin-left: -60px;
    opacity: 0;
    transition: opacity 0.3s;
  }

  .tooltip:hover .tooltiptext {
    visibility: visible;
    opacity: 1;
  }
</style>
</head>
<body>
  <div class="tooltip">Hover over me
    <span class="tooltiptext">This is a tooltip text that will be displayed on hover.</span>
  </div>
</body>
</html>
Output:

在这个示例中,我们使用了position: relative;和position: absolute;来实现提示框的定位。通过设置visibility和opacity属性,我们可以控制提示框的显示和隐藏。当鼠标悬停在包含.tooltip类的元素上时,.tooltiptext元素将显示出来。
3. 如何实现响应式布局
在移动设备越来越普及的今天,响应式布局已经成为前端开发的标配。下面是一个示例代码,演示如何实现一个简单的响应式布局:
<!DOCTYPE html>
<html lang="en">
<head>
<meta charset="UTF-8">
<meta name="viewport" content="width=device-width, initial-scale=1.0">
<title>Responsive Layout Example</title>
<style>
  .container {
    display: flex;
    flex-wrap: wrap;
  }

  .item {
    flex: 1 1 200px;
    margin: 10px;
    padding: 10px;
    border: 1px solid #ccc;
  }

  @media screen and (max-width: 600px) {
    .item {
      flex: 1 1 100%;
    }
  }
</style>
</head>
<body>
  <div class="container">
    <div class="item">Item 1</div>
    <div class="item">Item 2</div>
    <div class="item">Item 3</div>
  </div>
</body>
</html>
Output:

在这个示例中,我们使用了display: flex;和flex-wrap: wrap;来实现一个灵活的布局。通过设置.item元素的flex属性,我们可以控制每个项目的大小。在@media查询中,我们根据屏幕宽度的不同,调整了.item元素的大小,实现了响应式布局。
4. 如何实现垂直居中
在前端开发中,垂直居中是一个比较常见的问题。下面是一个示例代码,演示如何实现一个元素在父容器中垂直居中:
<!DOCTYPE html>
<html lang="en">
<head>
<meta charset="UTF-8">
<meta name="viewport" content="width=device-width, initial-scale=1.0">
<title>Vertical Center Example</title>
<style>
  .container {
    display: flex;
    justify-content: center;
    align-items: center;
    height: 200px;
    border: 1px solid #ccc;
  }

  .item {
    width: 100px;
    height: 50px;
    background-color: #f0f0f0;
  }
</style>
</head>
<body>
  <div class="container">
    <div class="item">Centered</div>
  </div>
</body>
</html>
Output:

在这个示例中,我们使用了display: flex;、justify-content: center;和align-items: center;来实现元素在父容器中的垂直居中。通过设置.container的高度和边框,我们可以看到.item元素在垂直方向上居中显示。
5. 如何实现横向滚动
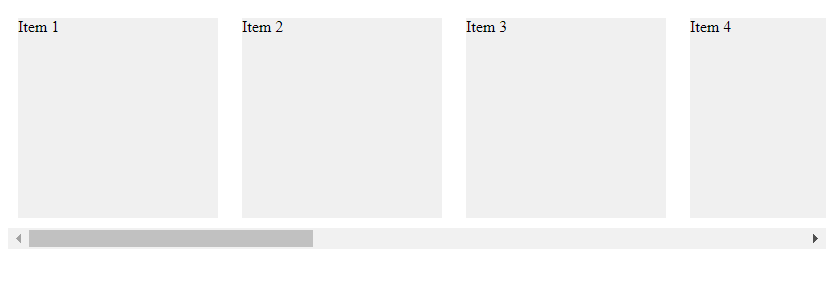
有时候,我们希望在页面中显示横向滚动的内容,比如一个横向导航栏或图片轮播。下面是一个示例代码,演示如何实现横向滚动:
<!DOCTYPE html>
<html lang="en">
<head>
<meta charset="UTF-8">
<meta name="viewport" content="width=device-width, initial-scale=1.0">
<title>Horizontal Scroll Example</title>
<style>
  .container {
    white-space: nowrap;
    overflow-x: auto;
    width: 100%;
  }

  .item {
    display: inline-block;
    width: 200px;
    height: 200px;
    background-color: #f0f0f0;
    margin: 10px;
  }
</style>
</head>
<body>
  <div class="container">
    <div class="item">Item 1</div>
    <div class="item">Item 2</div>
    <div class="item">Item 3</div>
    <div class="item">Item 4</div>
    <div class="item">Item 5</div>
    <div class="item">Item 6</div>
    <div class="item">Item 7</div>
    <div class="item">Item 8</div>
    <div class="item">Item 9</div>
    <div class="item">Item 10</div>
  </div>
</body>
</html>
Output:

在这个示例中,我们使用了white-space: nowrap;和overflow-x: auto;来实现横向滚动。通过设置.container的宽度和.item元素的display: inline-block;,我们可以让.item元素在一行显示,并在内容溢出时出现横向滚动条。
6. 如何实现背景图像全屏显示
有时候,我们希望背景图像能够全屏显示,并且不变形。下面是一个示例代码,演示如何实现背景图像全屏显示:
<!DOCTYPE html>
<html lang="en">
<head>
<meta charset="UTF-8">
<meta name="viewport" content="width=device-width, initial-scale=1.0">
<title>Full Screen Background Image Example</title>
<style>
  body {
    margin: 0;
    padding: 0;
    background: url('https://geek-docs.com/wp-content/uploads/2021/10/geek-docs-logo.png') no-repeat center center fixed;
    background-size: cover;
  }

  .content {
    text-align: center;
    padding: 50px;
    color: #fff;
  }
</style>
</head>
<body>
  <div class="content">
    <h1>Welcome to Geek Docs</h1>
    <p>Your go-to source for all things geeky!</p>
  </div>
</body>
</html>
Output:

在这个示例中,我们使用了background、background-size: cover;和background-position: center center;来实现背景图像全屏显示。通过设置body元素的margin和padding为0,我们可以让背景图像充满整个屏幕。
7. 如何实现多列布局
有时候,我们希望页面中的内容能够以多列的形式显示,比如新闻列表或产品展示。下面是一个示例代码,演示如何实现多列布局:
<!DOCTYPE html>
<html lang="en">
<head>
<meta charset="UTF-8">
<meta name="viewport" content="width=device-width, initial-scale=1.0">
<title>Multi-column Layout Example</title>
<style>
  .container {
    column-count: 3;
    column-gap: 20px;
  }

  .item {
    margin-bottom: 20px;
    padding: 10px;
    background-color: #f0f0f0;
  }
</style>
</head>
<body>
  <div class="container">
    <div class="item">Item 1</div>
    <div class="item">Item 2</div>
    <div class="item">Item 3</div>
    <div class="item">Item 4</div>
    <div class="item">Item 5</div>
    <div class="item">Item 6</div>
    <div class="item">Item 7</div>
    <div class="item">Item 8</div>
    <div class="item">Item 9</div>
  </div>
</body>
</html>
Output:

在这个示例中,我们使用了column-count: 3;和column-gap: 20px;来实现多列布局。通过设置.container的列数和列间距,我们可以让内容以多列的形式显示。
8. 如何实现圆角边框
有时候,我们希望元素的边框能够显示为圆角,而不是直角。下面是一个示例代码,演示如何实现圆角边框:
<!DOCTYPE html>
<html lang="en">
<head>
<meta charset="UTF-8">
<meta name="viewport" content="width=device-width, initial-scale=1.0">
<title>Border Radius Example</title>
<style>
  .box {
    width: 200px;
    height: 200px;
    background-color: #f0f0f0;
    border-radius: 10px;
  }
</style>
</head>
<body>
  <div class="box"></div>
</body>
</html>
Output:

在这个示例中,我们使用了border-radius: 10px;来实现元素的圆角边框。通过设置.box元素的宽度、高度和border-radius属性,我们可以让元素的边框显示为圆角。
9. 如何实现渐变背景色
有时候,我们希望元素的背景色能够显示为渐变效果,而不是纯色。下面是一个示例代码,演示如何实现渐变背景色:
<!DOCTYPE html>
<html lang="en">
<head>
<meta charset="UTF-8">
<meta name="viewport" content="width=device-width, initial-scale=1.0">
<title>Gradient Background Example</title>
<style>
  .gradient {
    width: 200px;
    height: 200px;
    background: linear-gradient(to right, #ff0000, #00ff00);
  }
</style>
</head>
<body>
  <div class="gradient"></div>
</body>
</html>
Output:

在这个示例中,我们使用了background: linear-gradient(to right, #ff0000, #00ff00);来实现元素的渐变背景色。通过设置.gradient元素的宽度、高度和background属性,我们可以让元素的背景色显示为从红色到绿色的渐变效果。
10. 如何实现动画效果
有时候,我们希望页面中的元素能够显示动画效果,比如淡入淡出或移动效果。下面是一个示例代码,演示如何实现一个简单的动画效果:
<!DOCTYPE html>
<html lang="en">
<head>
<meta charset="UTF-8">
<meta name="viewport" content="width=device-width, initial-scale=1.0">
<title>Animation Example</title>
<style>
  .box {
    width: 100px;
    height: 100px;
    background-color: #f0f0f0;
    position: relative;
    animation: move 2s infinite alternate;
  }

  @keyframes move {
    0% {
      left: 0;
    }
    100% {
      left: 200px;
    }
  }
</style>
</head>
<body>
  <div class="box"></div>
</body>
</html>
Output:

在这个示例中,我们使用了@keyframes和animation属性来实现一个简单的移动动画效果。通过设置.box元素的初始位置和动画关键帧,我们可以让元素在页面上来回移动。
 极客教程
极客教程