如何在使用Angular的路线之间导航时显示加载屏幕
在这篇文章中,我们将看到如何在从一个组件导航到另一个组件时显示一个加载屏幕。当用户通过路线导航时,应用程序可能会与后台通信以加载一些有用的数据,它可能会产生一些延迟。这时,如果用户在屏幕上没有看到任何东西,他可能会认为要么是应用程序坏了,要么是客户端机器出了问题。因此,有必要在一些信息或加载动画的帮助下让用户参与到应用程序中。
环境设置:我们将创建一个简单的应用程序,它将在导航时模拟一些延迟,并在浏览路线时显示一个加载旋钮。让我们快速设置环境。
npm install -g @angular/cli
ng new <project-name>
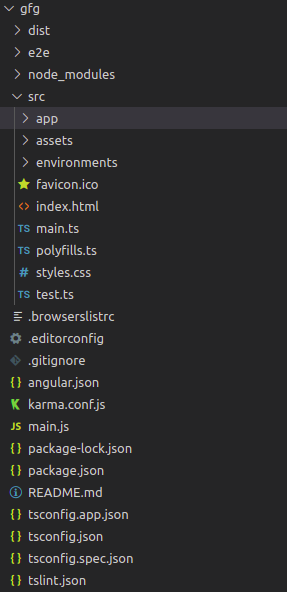
项目结构:执行上述命令后,你将得到一个像这样的项目结构。

现在执行这些命令:
cd <project-name>
ng serve -o
输出:打开**http://localhost:4200*,检查默认的angular登陆页面是否正在加载。
按以下步骤操作:
- 第1步:我们将从一个JSON文件而不是实际的服务器上加载数据。在src/assets/中创建一个新文件data.json并添加以下数据。
data.json:
     {
        "K.S. Williamson": 0,
        "S.P.D. Smith": 0,
        "M. Labuschagne": 0,
        "J.E. Root": 0,
        "V. Kohli": 0,
        "Babar Azam": 0,
        "H.M. Nicholls": 0,
        "C.A. Pujara": 0,
        "D.A. Warner": 0,
        "B.A. Stokes": 0,
        "Gerard Abood": 1,
        "Afzaal Ahmed": 1,
        "Mesbahuddin Ahmed": 1,
        "Tanvir Ahmed": 1,
        "Javed Akhtar": 1,
        "A. F. M. Akhtaruddin": 1,
        "Rizwan Akram": 1,
        "Jahangir Alam": 1,
        "Brian Aldridge": 1
    }
- 第2步:为了读取这些数据,我们将使用angular的HttpClient模块。我们需要在app.module.ts文件中注册它。
     import { NgModule } from '@angular/core';
    import { BrowserModule } from '@angular/platform-browser';

    import { AppRoutingModule } from './app-routing.module';
    import { AppComponent } from './app.component';
    // Import this module
    import {HttpClientModule} from '@angular/common/http';
    @NgModule({
      declarations: [
        AppComponent,
      ],
      imports: [
        BrowserModule,
        AppRoutingModule,
        HttpClientModule   // Register the module here
      ],
      providers: [],
      bootstrap: [AppComponent]
    })
    export class AppModule { }
- 第3步:现在创建两个新的组件。我们将在这两个之间进行导航。
     ng generate component batsman
    ng generate component umpire
它将为每个组件生成4个文件。我们将了解其中一个文件的代码。另一个将有类似的工作。在batsman.component.ts中,添加以下代码。
     import { HttpClient } from '@angular/common/http';
    import { Component, OnInit } from '@angular/core';

    @Component({
      selector: 'app-batsman',
      templateUrl: './batsman.component.html',
      styleUrls: ['./batsman.component.css']
    })
    export class BatsmanComponent implements OnInit {

      constructor(private http:HttpClient) { }
      batsman = []
      ngOnInit(): void {
        this.http.get('assets/data.json').subscribe(
          result => {
            setTimeout(() => {
              for (let key in result) {
                if (!result[key]) {
                  this.batsman.push(key);
                }
              }
            }, 2000);
          }
        )
      }

    }
首先,导入HttpClient类。我们在构造函数中创建了一个HttpClient对象作为依赖性注入。我们还初始化了一个空的batsman数组。HttpClient的get()方法将返回一个Observable,该方法将数据作为其subscribe(result_callback, error_callback)方法的第一个参数。在回调中,我们模拟了2000毫秒的延迟,并推送了数值为0的名字。这意味着,一旦页面被加载,将有2秒的延迟,batsman数组将被填充。现在在batsman.component.html中添加以下代码。
     <div *ngIf="!batsman.length">
        <div class="spinner-border m-5" role="status">
            <span class="sr-only"></span>
          </div>
    </div>

    <div *ngIf="batsman.length">
        <table>
            <tr *ngFor="let person of batsman">
                <td>{{person}}</td>
            </tr>
        </table>
    </div>
- 第4步:有两个div标签。第一个是在击球手阵列为空时显示。另一个将在数组被填充时显示。因此,在没有收到数据之前,我们将查看包含加载动画的第一个div。Bootstrap中存在spinner-border类。所以我们需要将bootstrap添加到我们的项目中。编辑index.html文件,如下所示。
    <!DOCTYPE html>
    <html lang="en">
      <head>
        <meta charset="utf-8" />
        <title>Geeks For Geeks</title>
        <base href="/" />
        <meta name="viewport"
              content="width=device-width, initial-scale=1" />
        <link rel="icon" type="image/x-icon"
              href="favicon.ico" />
        <!--Add this line-->
        <link href=
    "https://cdn.jsdelivr.net/npm/bootstrap@5.0.0-beta2/dist/css/bootstrap.min.css"
              rel="stylesheet"
              integrity=
    "sha384-BmbxuPwQa2lc/FVzBcNJ7UAyJxM6wuqIj61tLrc4wSX0szH/Ev+nYRRuWlolflfl"
              crossorigin="anonymous"/>
      </head>
      <body>
        <app-root></app-root>
        <!--Add these lines-->
        <script src=
    "https://cdn.jsdelivr.net/npm/@popperjs/core@2.6.0/dist/umd/popper.min.js"
                integrity=
    "sha384-KsvD1yqQ1/1+IA7gi3P0tyJcT3vR+NdBTt13hSJ2lnve8agRGXTTyNaBYmCR/Nwi"
                crossorigin="anonymous">
        </script>
        <script src=
    "https://cdn.jsdelivr.net/npm/bootstrap@5.0.0-beta2/dist/js/bootstrap.min.js"
                integrity=
    "sha384-nsg8ua9HAw1y0W1btsyWgBklPnCUAFLuTMS2G72MMONqmOymq585AcH49TLBQObG"
                crossorigin="anonymous">
        </script>
      </body>
    </html>
- 第5步:现在分别在umpires.component.ts和umpires.component.html中添加以下代码。
     import { HttpClient } from '@angular/common/http';
    import { Component, OnInit } from '@angular/core';
    import { CricketService } from '../cricket.service';

    @Component({
      selector: 'app-umpires',
      templateUrl: './umpires.component.html',
      styleUrls: ['./umpires.component.css']
    })
    export class UmpiresComponent implements OnInit {

      constructor(private http:HttpClient) { }
      umpires = [];
      ngOnInit(): void {
        this.http.get('assets/data.json').subscribe(
          result => {
            setTimeout(() => {
              for (let key in result) {
                if (result[key]) {
                  this.umpires.push(key);
                }
              }
            }, 2000);

          }
        )
      }

    }
     <div *ngIf="!umpires.length">
        <div class="spinner-border m-5" role="status">
            <span class="sr-only"></span>
          </div>
    </div>

    <div *ngIf="umpires.length">
        <table>
            <tr *ngFor="let person of umpires">
                <td>{{person}}</td>
            </tr>
        </table>
    </div>
- 第6步:在app-routing.module.ts中为这些组件创建路由,如下所示。
     import { NgModule } from '@angular/core';
    import { RouterModule, Routes } from '@angular/router';
    import { BatsmanComponent } from './batsman/batsman.component';
    import { UmpiresComponent } from './umpires/umpires.component';

    const routes: Routes = [
      {path:'batsman', component:BatsmanComponent},
      {path:'umpires', component:UmpiresComponent}
    ];

    @NgModule({
      imports: [RouterModule.forRoot(routes)],
      exports: [RouterModule]
    })
    export class AppRoutingModule { }
- 第7步:在”path“键中添加路径,在”component“键中添加各自的组件。导入必要的组件。现在在app.component.html中为用户创建链接,编码部分就完成了。
     <div>
      <a [routerLink]="['batsman']">Batsman</a> ||
      <a [routerLink]="['umpires']">Umpires</a>
      <router-outlet></router-outlet>
    </div>
上面的代码创建了两个链接,可以导航到各自的组件。<router-outlet>标签显示被导航的组件。
运行以下命令:
ng serve -o
输出:

 极客教程
极客教程