如何在Angular 9中构建渐进式网络应用程序(PWA)
在这篇文章中,我们将使用Angular开发一个PWA(渐进式网络应用程序)。
什么是PWA?
渐进式网络应用程序(PWA)是网络应用程序,其设计使其具有能力、可靠性和可安装性。PWA是用现代API构建和增强的,以提供增强的功能、可靠性和可安装性,同时又能在任何地方、任何设备上用单一代码库接触到任何人。PWA不需要通过应用商店进行部署;相反,我们使用不同的方法,通过URL在网络服务器上进行部署。但在开发PWA时,我们必须注意以下因素。
1.响应性。在每一个设备上工作,如桌面、手机或平板电脑,没有任何破损。
2.2.安全和保障。 使用HTTPS为我们的PWA提供数据,确保安全。
3.渐进式。使用现代网络功能,为每个用户开发类似应用程序的体验。
4.自动更新。下载和安装更新,无需用户干预。(这是在服务工作者的帮助下进行的)。
5.可发现。PWA应该是可以通过搜索引擎搜索的。(使用网络应用程序清单)
6.可安装。可安装在用户的设备主屏幕上。
7.离线工作。它应该为离线工作和在稀疏的网络上配置。
第1步:初始化新的Angular项目:现在,首先让我们开始创建一个Angular应用程序。在这里,我们将创建一个简单的天气应用程序。要做到这一点,首先,创建一个新的Angular应用程序,并使用以下命令导航到项目目录内。
ng new weather-app
cd weather-app
第2步:添加Bootstrap链接:在开发前端时,我们将使用Bootstrap进行样式设计。在你的项目的index.html文件中添加以下链接。
<link href="https://cdn.jsdelivr.net/npm/bootstrap@5.0.0-beta3/dist/css/bootstrap.min.css" rel="stylesheet" integrity="sha384-eOJMYsd53ii+scO/bJGFsiCZc+5NDVN2yr8+0RDqr0Ql0h+rP48ckxlpbzKgwra6″ crossorigin="anonymous">
<script src=”https://cdn.jsdelivr.net/npm/bootstrap@5.0.0-beta3/dist/js/bootstrap.bundle.min.js” integrity=”sha384-JEW9xMcG8R+pH31jmWH6WWP0WintQrMb4s7ZOdauHnUtxwoG2vI5DkLtS3qm9Ekf” crossorigin=”anonymous”></script>
第3步:OpenWeatherMap API获取天气数据:为了获取天气的实时数据,我们将使用openweathemap API。通过创建您的账户获得一个API密钥。
第4步:为WeatherApp开发用户界面:通过运行以下命令创建一个名为weather的angular组件和名为API的angular服务。
ng generate component components/weather
ng generate service services/API
现在,将以下代码粘贴到各自的文件中。
import { Component, OnInit } from '@angular/core';
import { WeatherService }
     from 'src/app/services/weather.service';

@Component({
  selector: 'app-weather',
  templateUrl: './weather.component.html',
  styleUrls: ['./weather.component.css'],
})
export class WeatherComponent implements OnInit {
  city: any = '';
  country: any = '';
  weather: any = null;

  constructor(private
   _weatherService: WeatherService) {}

  ngOnInit(): void {}

  getDate(str: string) {
    return str.split(' ')[0];
  }

  getTime(str: string) {
    return str.split(' ')[1];
  }

  displayWeather() {
    this._weatherService
  .getWeather(this.city, this.country)
  .subscribe(
      (data) => (this.weather = data),
      (err) => console.log(err)
    );
  }
}
<div class="container-fluid">
  <div class="input card">
    <div class="mb-4">
      <label for="city" class="form-label">
        City<span class="text-danger">*
        </span>
      </label>
      <input type="text" class="form-control"
             name="city" id="city" [(ngModel)]="city"/>
    </div>
    <div class="mb-1">
      <label for="country" class="form-label">
        Country<span class="text-danger">*
        </span></label>
      <input type="text" class="form-control"
             name="country" id="country"
             [(ngModel)]="country"/>
    </div>
    <div class="text-center mt-4">
      <button type="submit" class="btn btn-primary"
              (click)="displayWeather()">
        Get Weather</button>
    </div>
  </div>

  <div class="row" *ngIf="weather"
       [(ngModel)]="weather">
    <div class="col-md-3" *ngFor="let wth of weather.list">
      <div class="weather-info">
        <div class="d-flex justify-content-between">
          <div class="info-date">
            <h1>{{ wth.dt_txt | date: "shortTime" }}</h1>
            <span>{{ getDate(wth.dt_txt) | date }}</span>
            <span class="weather-city">{{ city }},
              {{ country }}</span>
          </div>

          <div class="info-weather">
            <div class="weather-wrapper">
              <span class="weather-temperature">
                {{ wth.main.temp - 273.15 | number: "1.1-1" }}°C
              </span>
              <div class="weather-type">
                <img src=
   "https://openweathermap.org/img/wn/{{wth.weather[0].icon}}@2x.png"
                  width="64px" height="64px"
                     alt="Weather Icon"/>
              </div>
              <br />
            </div>
            <span class="weather-description">
              {{ wth.weather[0].description | titlecase }}
            </span>
          </div>
        </div>
        <div class="d-flex justify-content-between mt-3">
          <div class="humidity"><img src="" alt="">
            Humidity {{ wth.main.humidity }}%</div>
          <div class="wind">
            <i class="fas fa-wind"></i>Wind
            {{ wth.wind.speed }} km/h
          </div>
          <div class="pressure">Pressure
            {{ wth.main.pressure }}</div>
        </div>
      </div>
    </div>
  </div>
</div>
.col-md-3 {
  margin: 5px auto;
}

.input {
  margin: 2% 25%;
  padding: 2% 2.5%;
  font-size: 16px;
  box-shadow: 0 4px 8px 0 rgba(0, 0, 0, 0.2);
  transition: 0.3s;
}

input {
  padding: 10px 12px;
}

.weather-info {
  width: 100%;
  height: 100%;
  padding: 20px 20px;
  border-radius: 8px;
  border: 2px solid #fff;
  box-shadow: 0 0 4px rgba(255, 255, 255, 0.3);
  background: linear-gradient(to right, #00a4ff, #0072ff);
  transition: transform 0.2s ease;
  color: whitesmoke;
}

.info-date {
  display: flex;
  flex-direction: column;
  justify-content: center;
}

.info-date h1 {
  margin-bottom: 0.65rem;
  font-size: 2rem;
  letter-spacing: 2px;
}

.info-weather {
  display: flex;
  flex-direction: column;
  align-items: flex-end;
  justify-content: center;
  text-align: right;
}

.weather-wrapper {
  display: flex;
  align-items: center;
  justify-content: flex-end;
  width: 100%;
}
@keyframes animation-icon {
  from {
    transform: scale(1);
  }
  to {
    transform: scale(1.2);
  }
}

.weather-type {
  display: inline-block;
  width: 48px;
  height: 48px;
  transition: all 0.2s ease-in;
  animation: animation-icon 0.8s infinite;
  animation-timing-function: linear;
  animation-direction: alternate;
}
.weather-temperature {
  font-size: 1.5rem;
  font-weight: 800;
}

.weather-description {
  margin-top: 1rem;
  font-size: 20px;
  font-weight: bold;
}

.weather-city {
  margin-top: 0.25rem;
  font-size: 16px;
}

.wind i {
  margin: 10px;
}
import { Injectable } from '@angular/core';
import { HttpClient } from '@angular/common/http';

@Injectable({
  providedIn: 'root',
})
export class WeatherService {
  private readonly apiKey: string = <your API key>;

  constructor(private _http: HttpClient) {}

  getWeather(city: string, country: string) {
    const apiUrl =
 `https://api.openweathermap.org/data/2.5/forecast?q={city},{country}&appid=${this.apiKey}`;
    return this._http.get(apiUrl);
  }
}
现在在app.component.html中调用天气组件
<app-weather></app-weather>
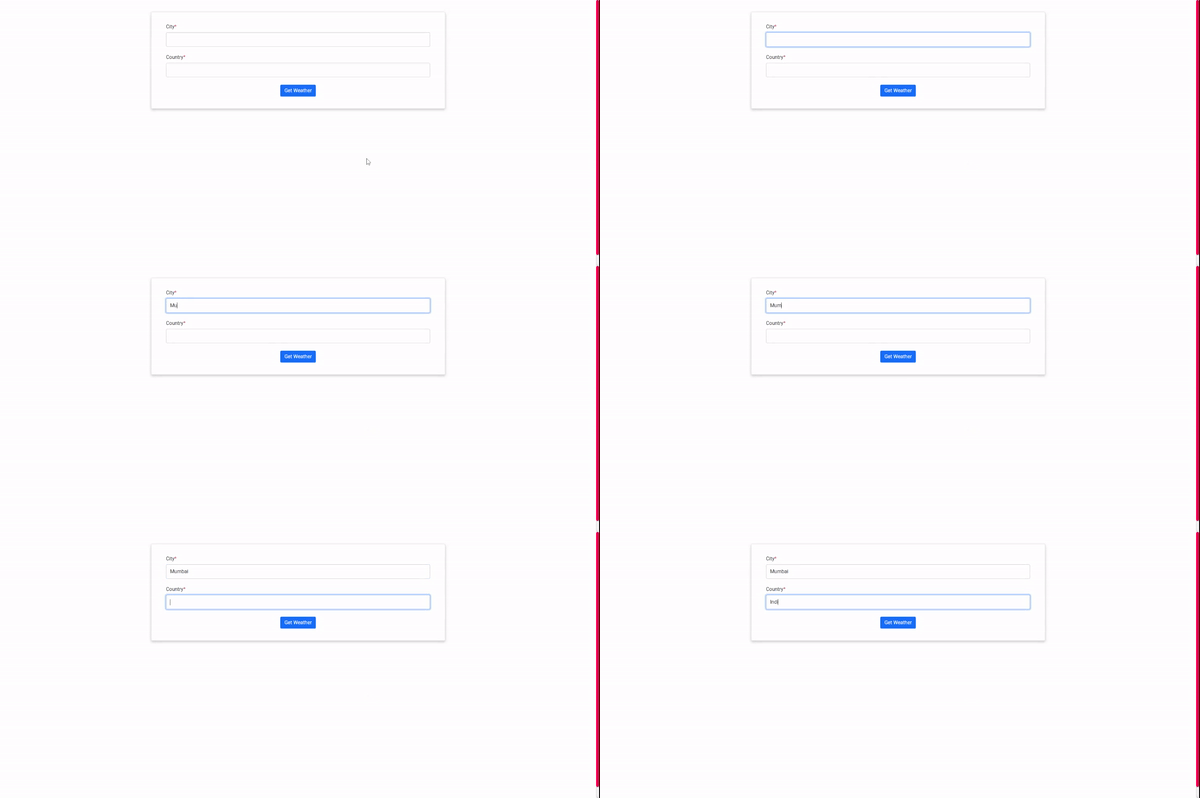
输出:

第5步:将Angular应用程序转换为PWA:使用Angular CLI将你的Angular应用程序转换为PWA很容易。导航到你的项目的文件夹。现在,运行以下命令来添加PWA功能。
ng add @angular/pwa
上述命令添加了以下新文件。
- 命名为manifest.webmanifest的PWA信息文件
-
用于配置服务工作者的ngsw-config.json文件
- 在assets/icons目录下有许多尺寸的默认图标(这些图标以后可以改变)。
- 使用@angular/service-worker软件包的服务工作者
现在,让我们看一下每个文件的作用。
manifest.webmanifest
这个文件包含应用程序的名称、主题和背景颜色,以及各种尺寸的图标。当你把应用程序添加到移动端时,这个配置就会被应用,它通过把名称和图标添加到应用程序列表中来创建一个网络视图,当应用程序运行时,背景和主题颜色就会被应用。
{
  "name": "weather-app",
  "short_name": "weather-app",
  "theme_color": "#1976d2",
  "background_color": "#fafafa",
  "display": "standalone",
  "scope": "./",
  "start_url": "./",
  "icons": [
    {
      "src": "assets/icons/icon-72x72.png",
      "sizes": "72x72",
      "type": "image/png",
      "purpose": "maskable any"
    },
    {
      "src": "assets/icons/icon-96x96.png",
      "sizes": "96x96",
      "type": "image/png",
      "purpose": "maskable any"
    },
    {
      "src": "assets/icons/icon-128x128.png",
      "sizes": "128x128",
      "type": "image/png",
      "purpose": "maskable any"
    },
    {
      "src": "assets/icons/icon-144x144.png",
      "sizes": "144x144",
      "type": "image/png",
      "purpose": "maskable any"
    },
    {
      "src": "assets/icons/icon-152x152.png",
      "sizes": "152x152",
      "type": "image/png",
      "purpose": "maskable any"
    },
    {
      "src": "assets/icons/icon-192x192.png",
      "sizes": "192x192",
      "type": "image/png",
      "purpose": "maskable any"
    },
    {
      "src": "assets/icons/icon-384x384.png",
      "sizes": "384x384",
      "type": "image/png",
      "purpose": "maskable any"
    },
    {
      "src": "assets/icons/icon-512x512.png",
      "sizes": "512x512",
      "type": "image/png",
      "purpose": "maskable any"
    }
  ]
}
ngsw-config 这个文件的存在,人们将能够管理与PWA相关的各种不同的东西。这就是我们缓存API端点的地方。
{
 "$schema": "./node_modules/@angular/service-worker/config/schema.json",
 "index": "/index.html",
 "assetGroups": [
   {
     "name": "app",
     "installMode": "prefetch",
     "resources": {
       "files": [
         "/favicon.ico",
         "/index.html",
         "/manifest.webmanifest",
         "/*.css",
         "/*.js"
       ]
     }
   },
   {
     "name": "assets",
     "installMode": "lazy",
     "updateMode": "prefetch",
     "resources": {
       "files": [
         "/assets/**",
         "/*.(eot|svg|cur|jpg|png|webp|gif|otf|ttf|woff|woff2|ani)"
       ]
     }
   }
 ]
}
第6步:为生产环境建立我们的Angular App:
ng build --prod
运行上述命令后,我们的build文件夹在dist/weather-app中被创建。现在,用cd dist/weather-app移动到构建文件夹中。
cd dist/weather-app
使用NPM全局安装http-server包。
npm install -g http-server
你可以在这里找到这个天气应用程序的代码。
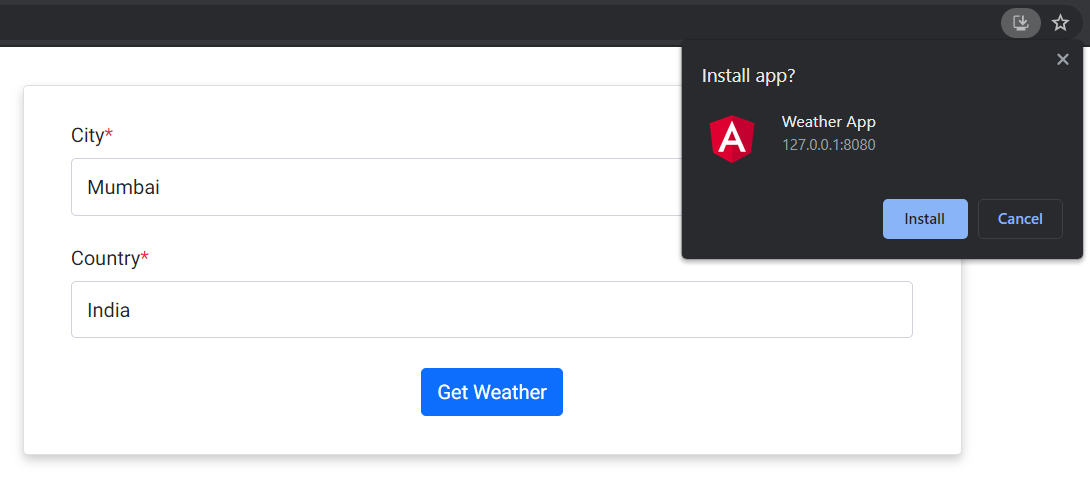
第7步:在桌面上添加我们的天气应用程序图标来启动:一旦你将在浏览器中启动angular应用程序,在URL栏的右侧会出现一个下载图标,如下所示。

安装天气应用程序
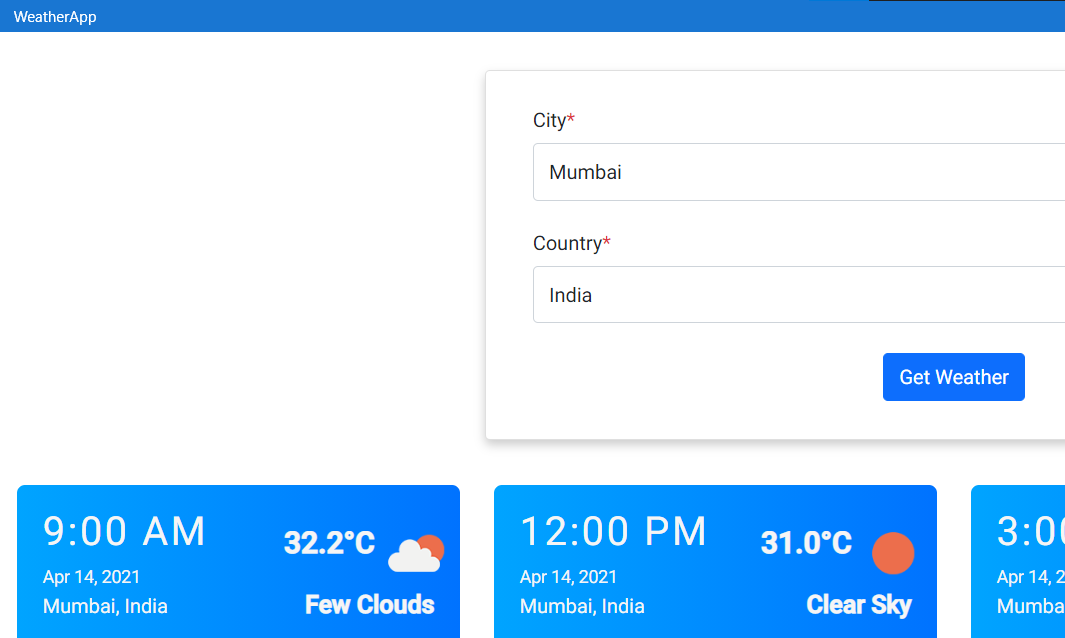
点击 “安装 “按钮,在桌面上添加图标以启动该应用程序。现在,你点击在桌面上创建的应用程序图标。你会看到以下屏幕。(注意:当你点击该图标时,它不会在浏览器中打开。)

从桌面(任何设备)启动应用程序
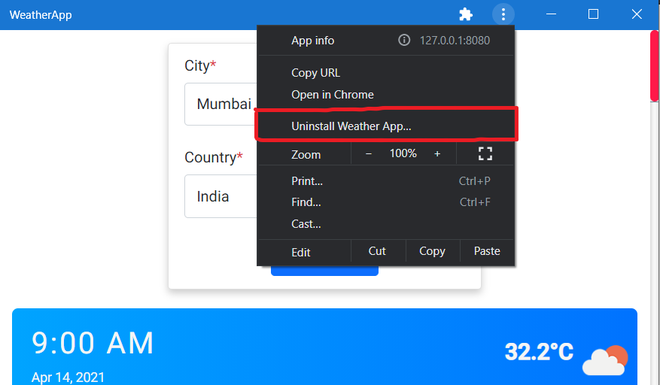
卸载PWA很容易。只要点击顶部导航中的三个点,然后点击 “卸载天气应用程序”。

Uninstalling PWA
 极客教程
极客教程