在Python中,使用weatherstack API创建天气预报GUI
天气预报的需求是什么?
天气预报是人类存在的一个重要方面。近年来,科技进步使得对天气的高准确率预测更加容易。openweathermap是一种流行的API,允许开发人员检索天气数据。在本教程中,我们将使用openweathermap API在Python中创建一个用于天气预报的图形用户界面(GUI),本教程将涵盖构建GUI和从openweathermap API检索数据所需的必要步骤。
先决条件
在我们开始任务之前,需要在您的系统上安装一些东西
建议的设置列表 –
- pip安装tkinter
- 预期用户将访问任何独立的IDE,例如VS-Code、PyCharm、Atom或Sublime文本。
- 甚至可以使用在线的Python编译器,例如Kaggle.com、Google云平台或任何其他平台。
- 更新版本的Python。在撰写本文时,我使用的是3.10.9版本。
- 熟悉使用Jupyter笔记本电脑的方法。
- 认知并应用虚拟环境将是有益的,但并非必需的。
- 还预计该人员将对统计学和数学有良好的理解。
完成任务所需的步骤
步骤1:导入必要的模块
import tkinter as tk
import requests
tkinter模块用于创建GUI窗口、标签和输入框。请求模块用于向weatherstack API发出API请求。
步骤2:设置weatherstack API密钥
API_KEY = “your_weatherstack_api_key”
将your_weatherstack_api_key替换为您的实际API密钥。
步骤3:定义天气预报的URL
API_URL = “http://api.weatherstack.com/current”
这是将用于向weatherstack API发出请求的URL。
步骤4:定义GUI窗口
root = tk.Tk()
root.title("Weather Forecast")
这将创建GUI的主窗口并将其标题设置为“天气预报”。
步骤5:为城市和国家定义标签和输入字段。
city_label = tk.Label(root, text="City:")
city_label.grid(row=0, column=0, padx=5, pady=5)

city_entry = tk.Entry(root)
city_entry.grid(row=0, column=1, padx=5, pady=5)

country_label = tk.Label(root, text="Country:")
country_label.grid(row=1, column=0, padx=5, pady=5)

country_entry = tk.Entry(root)
country_entry.grid(row=1, column=1, padx=5, pady=5)
这将创建标签和输入字段,以供用户输入他们想要获得天气数据的城市和国家。
步骤6:定义从API获取天气数据的功能
def get_weather():
   city = city_entry.get()
   country = country_entry.get()
   url = f"{API_URL}?access_key={API_KEY}&query={city},{country}"

# 发送 API 请求并获取 JSON 响应
response = requests.get(url).json()
# 从 JSON 响应中获取相关的天气数据
temperature = response["current"]["temperature"]
weather_desc = response["current"]["weather_descriptions"][0]
# 在 GUI 中显示天气数据
temperature_label.config(text=f"温度:{temperature}°C")
weather_desc_label.config(text=f"天气描述:{weather_desc}")
这个函数从输入框中获取城市和国家,使用 API 密钥、城市和国家构建 API 请求 URL,向 API 发送请求并从 JSON 响应中提取相关的天气数据。然后在 GUI 中相应的标签中展示温度和天气描述。
步骤 7:定义获取天气数据的按钮
get_weather_button = tk.Button(root, text="获取天气", command=get_weather)
get_weather_button.grid(row=2, column=0, columnspan=2, padx=5, pady=5)
这个函数创建了一个按钮,点击按钮时会调用 get_weather 函数。
步骤 8:定义用于显示天气数据的标签
temperature_label = tk.Label(root, text="")
temperature_label.grid(row=3, column=0, columnspan=2, padx=5, pady=5)

weather_desc_label = tk.Label(root, text="")
weather_desc_label.grid(row=4, column=0, columnspan=2, padx=5, pady=5)
这些函数创建了用于显示温度和天气描述的标签。
步骤 9:运行 GUI 窗口
root.mainloop()
这个函数启动 GUI 并一直运行,直到用户想要关闭它。
最终代码和程序
import tkinter as tk
import requests

# 在这里设置你的 weatherstack API 密钥
API_KEY = "your_weatherstack_api_key"

# 定义 weatherstack API 的 URL
API_URL = "http://api.weatherstack.com/current"

# 定义 GUI 窗口
root = tk.Tk()
root.title("天气预报")

# 定义用于城市和国家的标签和输入框
city_label = tk.Label(root, text="城市:")
city_label.grid(row=0, column=0, padx=5, pady=5)

city_entry = tk.Entry(root)
city_entry.grid(row=0, column=1, padx=5, pady=5)

country_label = tk.Label(root, text="国家:")
country_label.grid(row=1, column=0, padx=5, pady=5)

country_entry = tk.Entry(root)
country_entry.grid(row=1, column=1, padx=5, pady=5)

# 定义从 API 获取天气数据的函数
def get_weather():
   city = city_entry.get()
   country = country_entry.get()
   # 用 API 密钥、城市和国家构建 URL
   url = f"{API_URL}?access_key={API_KEY}&query={city},{country}"
   # 发送 API 请求并获取 JSON 响应
   response = requests.get(url).json()
   # 从 JSON 响应中获取相关的天气数据
   temperature = response["current"]["temperature"]
   weather_desc = response["current"]["weather_descriptions"][0]
   # 在 GUI 中显示天气数据
   temperature_label.config(text=f"温度:{temperature}°C")
   weather_desc_label.config(text=f"天气描述:{weather_desc}")

# 定义获取天气数据的按钮
get_weather_button = tk.Button(root, text="获取天气", command=get_weather)
get_weather_button.grid(row=2, column=0, columnspan=2, padx=5, pady=5)

# 定义用于显示天气数据的标签
temperature_label = tk.Label(root, text="")
temperature_label.grid(row=3, column=0, columnspan=2, padx=5, pady=5)

weather_desc_label = tk.Label(root, text="")
weather_desc_label.grid(row=4, column=0, columnspan=2, padx=5, pady=5)

# 运行 GUI 窗口
root.mainloop()

# 定义获取天气数据的按钮
get_weather_button = tk.Button(root, text="获取天气", command=get_weather)
get_weather_button.grid(row=2, column=0, columnspan=2, padx=5, pady=5)

# 定义显示天气数据的标签
temperature_label = tk.Label(root, text="")
temperature_label.grid(row=3, column=0, columnspan=2, padx=5, pady=5)

weather_desc_label = tk.Label(root, text="")
weather_desc_label.grid(row=4, column=0, columnspan=2, padx=5, pady=5)

# 运行GUI窗口
root.mainloop()
在这个例子中,我们首先导入必要的库:tkinter和requests。然后设置我们的weatherstack API密钥并定义API URL。我们使用tk.Tk()函数创建一个GUI窗口并设置窗口标题。
我们使用tk.Label()和tk.Entry()函数创建两个标签和两个输入字段,用于城市和国家。然后我们定义一个名为get_weather()的函数,从API获取天气数据并在GUI中显示它。该函数使用requests.get()函数向API URL发送带有来自输入字段的城市和国家的GET请求。然后从JSON响应中提取温度和天气描述数据,并更新GUI中的温度和天气描述标签。
我们使用tk.Button()函数创建一个获取天气数据的按钮,将command参数设置为get_weather()函数。我们还创建了两个标签,用于显示温度和天气描述数据。
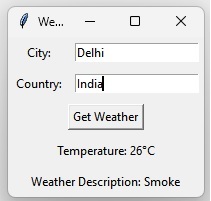
最后,我们使用root.mainloop()函数运行GUI窗口。当用户输入城市和国家并单击“获取天气”按钮时,get_weather()函数将向API发出请求。
输出

这张图片展示了我们输入城市和国家名称后天气应用GUI的输出。API密钥将根据用户自行更改。
结论
在本教程中,我们学习了如何在Python中使用weatherstack API创建天气预报GUI。我们介绍了构建GUI和从weatherstack API检索数据所必需的步骤。我们还解释了每个小节并提供了使用weatherstack API的天气预报应用程序的实际示例。
 极客教程
极客教程