使用PyQt、SQLite和Python创建联系人列表
本教程将教您如何使用Python、PyQt和SQLite创建联系人簿应用程序。这个项目将是学习不同编码技巧的有效方式,因为它需要您应用各种技术,并鼓励您在开发过程中进行研究。
通过本项目,您将拥有一个可存储和管理您的联系信息的工作联系人簿应用程序。您可以搜索、查看、添加、修改和删除联系人。本教程将引导您通过应用程序过程,并帮助您更好地理解如何使用Python和PyQt创建GUI、连接到SQLite数据库以及使用Model-View架构管理数据。通过跟随提供的链接,您可以获取应用程序和每个教程步骤的源代码。
项目概述
要构建一个联系人簿应用程序,您必须将代码组织成模块和包,以给您的项目一个清晰、连贯的结构。在本教程中,您将使用以下目录和文件结构:
- rpcontacts_project/ – 项目的根目录
-
-
rpcontacts/ – 包,其中包含应用程序的主代码
-
__init__.py– 一个空文件,指示Python将此目录视为Python包。
views.py– 包含图形用户界面(GUI)代码的模块database.py– 包含连接到SQLite数据库的代码的模块main.py– 包含运行应用程序的代码的模块-
model.py– 包含使用Model-View架构管理联系人数据的代码的模块 -
requirements.txt – 包含项目依赖项的文件
-
README.md – 包含项目文档的文件
-
rpcontacts.py – 运行应用程序的文件
-
每个文件的使用步骤都将提供逐步说明。
步骤1:使用PyQt创建联系人簿的框架应用程序
在这个初始阶段,您将设计一个简单而有用的PyQt GUI应用程序,它将作为联系人簿的框架。您还将创建项目的最小结构,其中包括项目的核心包和启动程序的脚本。
联系人簿项目的组织
创建一个名为rpcontacts_project/的新目录,以开始编写应用程序。
项目的根目录将是这个。现在,在rpcontacts_project/下创建一个名为rpcontacts/的新子文件夹。这个子文件夹将容纳程序的主包。在根目录中打开您的代码编辑器或集成开发环境。
# -*- coding: utf-8 -*-

"""This module provides the rpcontacts package."""

__version__ = "0.1.0"
这个文件告诉Python rpcontacts包的存在。当您导入包或其模块之一时,文件中的代码会被运行。
在不编写__init__.py文件的情况下,也可以初始化包。使用一个空的__init__.py文件就足够了。为了在这种情况下保持程序的版本号,您需要建立一个名为的模块级常量
创建应用程序的主窗口
现在应该创建联系人簿的主面板。要做到这一点,请向您的rpcontacts包添加一个名为views.py的模块。
然后更新该模块并保存以下代码:
# -*- coding: utf-8 -*-

"""This module provides views to manage the contacts table."""

from PyQt5.QtWidgets import (
    QHBoxLayout,
    QMainWindow,
    QWidget,
)

class Window(QMainWindow):
    """Main Window."""
    def __init__(self, parent=None):
        """Initializer."""
        super().__init__(parent)
        self.setWindowTitle("RP Contacts")
        self.resize(550, 250)
        self.centralWidget = QWidget()
        self.setCentralWidget(self.centralWidget)
        self.layout = QHBoxLayout()
        self.centralWidget.setLayout(self.layout)
首先需要从PyQt5.QtWidgets中导入必要的类。然后,您要创建一个窗口。创建应用程序主窗口的代码由这个class提供,它继承自QMainWindow。将窗口调整为550 x 250像素,将窗口标题更改为”RP Contacts”,并使用QWidget定义和配置中心小部件。然后,使用水平框布局来定义中心小部件的布局。
运行应用程序和编码
联系人簿的主窗口已经创建。因此,现在是用QApplication构建工作的PyQt应用程序的代码的时候了。在rpcontacts包中创建一个名为main.py的新模块,并将以下代码添加到其中以完成这项任务:
# -*- coding: utf-8 -*-
# rpcontacts/main.py

"""This module provides RP Contacts application."""

import sys

from PyQt5.QtWidgets import QApplication

from .views import Window

def main():
    """RP Contacts main function."""
    # Create the application
    app = QApplication(sys.argv)
    # Create the main Window
    win = Window()
    win.show()
    # Run the event loop
    sys.exit(app.exec())
当您将sys导入到此模块中时,您可以访问exit()函数,该函数使您能够在用户退出主窗口时优雅地结束程序。接下来,分别从PyQt5中导入QtWidgets、QApplication和Window。最后一步是将main()定义为应用程序的主函数。
您可以在main()中创建QApplication和Window。然后,在调用show()之前,在Windows上使用exec启动应用程序的主循环或事件循环。
立即在根目录rpcontacts_project中创建一个名为rpcontacts.py的文件。这个文件提供了应用程序的入口脚本。添加以下代码后保存文件:
#!/usr/bin/env python3
# -*- coding: utf-8 -*-
# rpcontacts_project/rpcontacts.py

"""This module provides RP Contacts entry point script."""

from rpcontacts.main import main

if __name__ == "__main__":
    main()
此文件中导入了main.py模块的main()。然后将传统的条件语句付诸实践,如果用户像Python脚本一样运行此模块,则调用main()。在Python环境中运行命令python rpcontacts.py以启动程序。
以下窗口将出现在您的屏幕上:
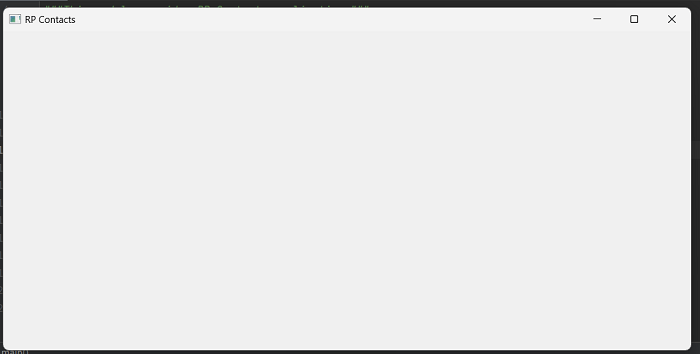
步骤2:使用Python创建联系人簿的GUI
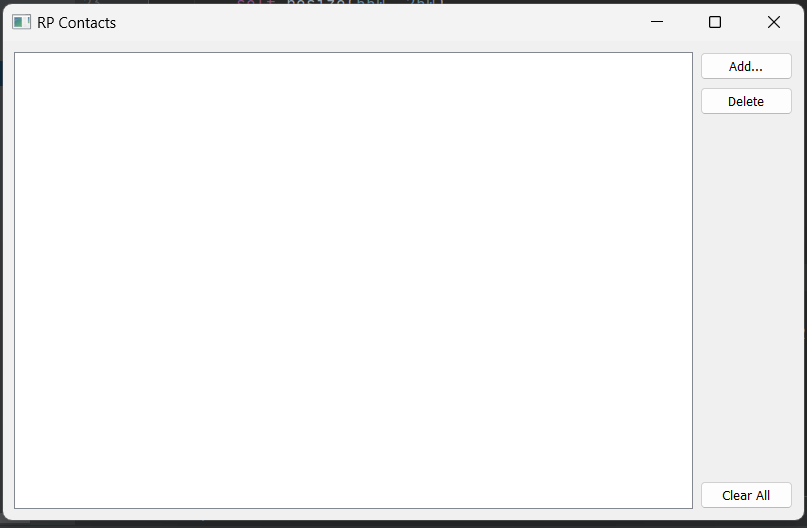
在这一步中,我们需要创建具有添加、删除和清除所有按钮的联系人簿GUI。
返回views.py模块并修改Window代码以生成上述GUI:
# -*- coding: utf-8 -*-

"""This module provides views to manage the contacts table."""

from PyQt5.QtWidgets import (
    QAbstractItemView,
    QHBoxLayout,
    QMainWindow,
    QPushButton,
    QTableView,
    QVBoxLayout,
    QWidget,
)


class Window(QMainWindow):
    """Main Window."""

    def __init__(self, parent=None):
        """Initializer."""
        super().__init__(parent)
        self.setWindowTitle("RP Contacts")
        self.resize(550, 250)
        self.centralWidget = QWidget()
        self.setCentralWidget(self.centralWidget)
        self.layout = QHBoxLayout()
        self.centralWidget.setLayout(self.layout)

        self.setupUI()

    def setupUI(self):
        """Setup the main window's GUI."""
        # Create the table view widget
        self.table = QTableView()
        self.table.setSelectionBehavior(QAbstractItemView.SelectRows)
        self.table.resizeColumnsToContents()
        # Create buttons
        self.addButton = QPushButton("Add...")
        self.deleteButton = QPushButton("Delete")
        self.clearAllButton = QPushButton("Clear All")
        # Lay out the GUI
        layout = QVBoxLayout()
        layout.addWidget(self.addButton)
        layout.addWidget(self.deleteButton)
        layout.addStretch()
        layout.addWidget(self.clearAllButton)
        self.layout.addWidget(self.table)
        self.layout.addLayout(layout)
此代码中对Window的第一个修改是在init()的结尾处调用.setupUI()。
当您启动应用程序时,此调用将创建主窗口的GUI。
以下是内部代码。setupUI()做了什么:
- 创建一个QTableView实例,并用它来显示联系人列表。
- 设置QAbstractItemView作为.selectionBehavior属性的值。SelectRows。联系人列表中每个联系人的数据包含在表视图中的行中。这可以确保当用户点击任何表格视图单元格时,整行将被选中。
- 将Add、Delete和Clear All按钮添加到GUI中。这些按钮目前还没有任何作用。
- 为所有GUI小部件建立一致的布局。
运行代码后,将出现以下屏幕:
步骤3:构建联系人簿的数据库
在本节中,您将创建指定应用程序如何连接到联系人数据库的代码。要完成此步骤,请使用PyQt的SQL支持将应用程序连接到数据库,并使用SQLite和您的联系信息管理数据库。
首先,回到rpcontacts/目录中的main.py并更新代码以创建数据库连接:
# -*- coding: utf-8 -*-

"""This module provides RP Contacts application."""

import sys

from PyQt5.QtWidgets import QApplication

from .database import createConnection
from .views import Window


def main():
    """RP Contacts main function."""
    # Create the application
    app = QApplication(sys.argv)
    # Connect to the database before creating any window
    if not createConnection("contacts.sqlite"):
        sys.exit(1)
    # Create the main Window if the connection succeeded
    win = Window()
    win.show()
    # Run the event loop
    sys.exit(app.exec_())
可以看到,在main()函数的”from .database import createConnection”()一行中尝试使用createConnection建立与数据库的连接。如果应用程序无法建立连接,则调用sys.exit(1)将关闭应用程序而不创建图形元素并指示错误。
因为应用程序依赖于数据库才能正常运行,所以必须以这种方式处理连接。如果您没有一个可工作的连接,您的应用程序将无法运行。
如果出现问题,您可以通过这种方式处理它并关闭应用程序。此外,您还可以向用户提供有关应用程序在连接到数据库时发生错误的相关详细信息。
使用PyQt和SQLite连接到数据库
创建联系人簿应用程序的第一步是将其连接到相应的数据库。为此,必须编写函数createConnection(),以打开并创建到数据库的连接。如果连接成功,该函数将返回True。如果不是这样,它将详细描述连接出了什么问题。返回rpcontacts/目录,并添加一个新的database.py模块。然后将以下代码合并到该模块中:
# -*- coding: utf-8 -*-

"""This module provides a database connection."""

from PyQt5.QtWidgets import QMessageBox
from PyQt5.QtSql import QSqlDatabase, QSqlQuery


def _createContactsTable():
    """Create the contacts table in the database."""
    createTableQuery = QSqlQuery()
    return createTableQuery.exec(
        """
        CREATE TABLE IF NOT EXISTS contacts (
            id INTEGER PRIMARY KEY AUTOINCREMENT UNIQUE NOT NULL,
            name VARCHAR(40) NOT NULL,
            job VARCHAR(50),
            email VARCHAR(40) NOT NULL
        )
        """
    )


def createConnection(databaseName):
    """Create and open a database connection."""
    connection = QSqlDatabase.addDatabase("QSQLITE")
    connection.setDatabaseName(databaseName)

    if not connection.open():
        QMessageBox.warning(
            None,
            "RP Contact",
            f"Database Error: {connection.lastError().text()}",
        )
        return False

    _createContactsTable()
    return True
在这里,首先需要导入一些PyQt类。接下来定义了createConnection()。这个函数的单个参数DatabaseName指定保存在文件系统中的SQLite数据库文件的名称或位置。createConnection已经由您编写好了。现在联系人表的数据库已准备好,可以编写用于创建它们的代码。现在,一旦创建并打开数据库连接的函数就位,就可以编写一个帮助程序函数来创建联系人表。该表将用于跟踪您联系人的信息。
在_createContactsTable()函数中创建了一个QSqlQuery实例。然后,您使用基于字符串的SQL CREATE TABLE语句调用查询对象的exec()方法。
您的数据库的联系人表将包含有关联系人的相关数据。
从createConnection()内部添加对_createContactsTable()的调用,在最后的return语句之前完成了database.py的编码。这确保应用程序在执行数据库操作之前创建联系人表。一旦创建了联系人表,您就可以测试数据库并添加一些示例数据进行额外的测试。
联系人簿的数据库测试
您已经完成了编写管理联系人簿的数据库连接的代码。在本节中,您将运行一些测试,以验证此代码和数据库的功能。稍后在本教程中,您将向数据库添加一些测试数据以进行额外的测试。
现在打开终端或命令提示符,并导航到rpcontacts_project/,根目录。在那里,启动一个交互式Python会话,并输入以下代码:
from rpcontacts.database import createConnection

# Create a connection
createConnection("contacts.sqlite")


# Confirm that contacts table exists
from PyQt5.QtSql import QSqlDatabase
db = QSqlDatabase.database()
db.tables()
# Prepare a query to insert sample data
from PyQt5.QtSql import QSqlQuery

insertDataQuery = QSqlQuery()
insertDataQuery.prepare(
    """
    INSERT INTO contacts (
        name,
        job,
        email
    )
    VALUES (?, ?, ?)
    """
)
# Sample data
data = [
    ("sai", "Technical Lead", "sai@example.com"),
    ("kiran", "Senior Web Developer", "kiran@example.com"),
    ("nitin", "Project Manager", "nitin@example.com"),
    ("sara", "Data Analyst", "sara@example.com"),
    ("nikil", "Senior Python Developer", "nikil@example.com"),
]

# Insert sample data
for name, job, email in data:
    insertDataQuery.addBindValue(name)
    insertDataQuery.addBindValue(job)
    insertDataQuery.addBindValue(email)
    insertDataQuery.exec()
query = QSqlQuery()
query.exec("SELECT name, job, email FROM contacts")


while query.next():
    print(query.value(0), query.value(1), query.value(2))
该代码使用“rpcontacts.database”模块中的“createConnection”函数创建一个名为“contacts.sqlite”的SQLite数据库连接。然后通过在QSqlDatabase对象上调用“tables()”方法来确认数据库中是否存在“contacts”表。
要将数据插入“contacts”表,它创建了一个QSqlQuery对象并准备了一个SQL语句。该语句包括表中“name”、“job”和“email”列的值的占位符。
然后,该代码定义了一个示例数据列表,其中每个元素都是包含“contacts”表中单个行的值的元组。然后它遍历此列表,将值绑定到准备好的查询中的占位符,并执行查询将数据插入表中。
最后,该代码创建另一个QSqlQuery对象,执行SELECT语句以从“contacts”表中检索数据,并打印表中每行的“name”、“job”和“email”列的值。

步骤4:查看和修改当前联系人
在应用程序的主窗口中,您可以使用QTableView显示您的联系人信息。
开发管理联系人数据的模型
对于与SQL数据库进行交互,PyQt提供了各种类。您将使用QSqlTableModel作为联系人簿应用程序,它为单个数据库表提供可编辑的数据模型。鉴于您的数据库仅包含单个表中的联系人,因此非常适合该任务。
返回您的代码编辑器并添加一个名为model.py的新模块到rpcontacts/目录。在添加以下代码后保存文件:
# -*- coding: utf-8 -*-
# rpcontacts/model.py

"""This module provides a model to manage the contacts table."""

from PyQt5.QtCore import Qt
from PyQt5.QtSql import QSqlTableModel

class ContactsModel:
    def __init__(self):
        self.model = self._createModel()

    @staticmethod
    def _createModel():
        """Create and set up the model."""
        tableModel = QSqlTableModel()
        tableModel.setTable("contacts")
        tableModel.setEditStrategy(QSqlTableModel.OnFieldChange)
        tableModel.select()
        headers = ("ID", "Name", "Job", "Email")
        for columnIndex, header in enumerate(headers):
            tableModel.setHeaderData(columnIndex, Qt.Horizontal, header)
        return tableModel
您的数据模型现在已准备就绪。在创建ContactsModel之前,必须在此代码中执行一些必要的导入。类初始化程序指定了一个模型实例属性,用于存储数据模型。您添加了以下静态方法,该方法用于配置模型对象。
现在,如果您将表视图小部件与模型链接起来以显示用户的联系人信息,那将是很有帮助的。
链接视图和模型
您必须链接表视图和数据模型以在联系人簿的主窗口中显示联系人信息。要进行此连接,您必须在表视图对象上调用setModel(),并将模型作为参数传递:
# -*- coding: utf-8 -*-
# rpcontacts/views.py

# Snip...
from .model import ContactsModel

class Window(QMainWindow):
    """Main Window."""
    def __init__(self, parent=None):
        # Snip...
        self.contactsModel = ContactsModel()
        self.setupUI()

    def setupUI(self):
        """Setup the main window's GUI."""
        # Create the table view widget
        self.table = QTableView()
        self.table.setModel(self.contactsModel.model)
        self.table.setSelectionBehavior(QAbstractItemView.SelectRows)
        # Snip...
在此代码的开头,您从model.py中导入ContactsModel。该类提供了管理联系人数据库中信息的模型。
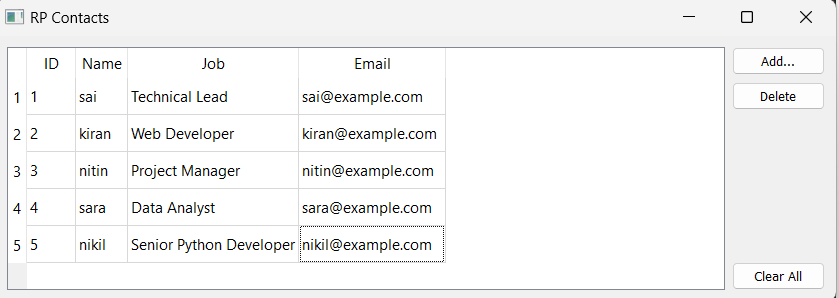
在Window初始化程序中创建了ContactsModel的实例。然后,在.setupUI()中在表对象上调用.setModel()以将模型与表视图链接起来。如果您在此更新之后启动应用程序,则会看到步骤4开头所示的窗口。
您可以双击名称、工作和电子邮件来更改值。
步骤5:更新联系人
现在,您可以使用联系人簿应用程序提供的功能来加载、显示和更新有关您联系人的数据。您可以编辑和更新联系人详细信息,但无法添加或删除联系人列表中的联系人。
创建添加联系人对话框
称为对话框的小窗口允许您与用户进行对话。在本节中,您将编写联系人簿中的添加联系人对话框的代码,以便您的用户可以将新联系人添加到其现有列表中。
您应该从QDialog派生出一个子类来编写Add Contact对话框。该类提供了一个为GUI程序创建对话框的模板。
# -*- coding: utf-8 -*-

"""This module provides views to manage the contacts table."""

from PyQt5.QtCore import Qt
from PyQt5.QtWidgets import (
    QAbstractItemView,
    QDialog,
    QDialogButtonBox,
    QFormLayout,
    QHBoxLayout,
    QLineEdit,
    QMainWindow,
    QMessageBox,
    QPushButton,
    QTableView,
    QVBoxLayout,
    QWidget,
)

from .model import ContactsModel


class Window(QMainWindow):
    """Main Window."""

    def __init__(self, parent=None):
        """Initializer."""
        super().__init__(parent)
        self.setWindowTitle("RP Contacts")
        self.resize(550, 250)
        self.centralWidget = QWidget()
        self.setCentralWidget(self.centralWidget)
        self.layout = QHBoxLayout()
        self.centralWidget.setLayout(self.layout)

        self.contactsModel = ContactsModel()
        self.setupUI()

    def setupUI(self):
        """Setup the main window's GUI."""
        # Create the table view widget
        self.table = QTableView()
        self.table.setModel(self.contactsModel.model)
        self.table.setSelectionBehavior(QAbstractItemView.SelectRows)
        self.table.resizeColumnsToContents()
        # Create buttons
        self.addButton = QPushButton("Add...")
        self.addButton.clicked.connect(self.openAddDialog)
        self.deleteButton = QPushButton("Delete")
        self.clearAllButton = QPushButton("Clear All")
        # Lay out the GUI
        layout = QVBoxLayout()
        layout.addWidget(self.addButton)
        layout.addWidget(self.deleteButton)
        layout.addStretch()
        layout.addWidget(self.clearAllButton)
        self.layout.addWidget(self.table)
        self.layout.addLayout(layout)

    def openAddDialog(self):
        """Open the Add Contact dialog."""
        dialog = AddDialog(self)
        if dialog.exec() == QDialog.Accepted:
            self.contactsModel.addContact(dialog.data)
            self.table.resizeColumnsToContents()


class AddDialog(QDialog):
    """Add Contact dialog."""

    def __init__(self, parent=None):
        """Initializer."""
        super().__init__(parent=parent)
        self.setWindowTitle("Add Contact")
        self.layout = QVBoxLayout()
        self.setLayout(self.layout)
        self.data = None

        self.setupUI()

    def setupUI(self):
        """Setup the Add Contact dialog's GUI."""
        # Create line edits for data fields
        self.nameField = QLineEdit()
        self.nameField.setObjectName("Name")
        self.jobField = QLineEdit()
        self.jobField.setObjectName("Job")
        self.emailField = QLineEdit()
        self.emailField.setObjectName("Email")
        # Lay out the data fields
        layout = QFormLayout()
        layout.addRow("Name:", self.nameField)
        layout.addRow("Job:", self.jobField)
        layout.addRow("Email:", self.emailField)
        self.layout.addLayout(layout)
        # Add standard buttons to the dialog and connect them
        self.buttonsBox = QDialogButtonBox(self)
        self.buttonsBox.setOrientation(Qt.Horizontal)
        self.buttonsBox.setStandardButtons(
            QDialogButtonBox.Ok | QDialogButtonBox.Cancel
        )
        self.buttonsBox.accepted.connect(self.accept)
        self.buttonsBox.rejected.connect(self.reject)
        self.layout.addWidget(self.buttonsBox)

    def accept(self):
        """Accept the data provided through the dialog."""
        self.data = []
        for field in (self.nameField, self.jobField, self.emailField):
            if not field.text():
                QMessageBox.critical(
                    self,
                    "Error!",
                    f"You must provide a contact's {field.objectName()}",
                )
                self.data = None  # Reset .data
                return

            self.data.append(field.text())

        If not self.data:
            return

        super().accept()
该脚本使用PyQt5库提供视图来管理联系人表。主窗口类Window创建一个QTableView小部件以显示联系人数据,并包括添加新联系人、删除联系人和清除整个表的按钮。当单击“添加”按钮时,AddDialog类会创建一个对话框窗口,在该窗口中用户可以输入新联系人的姓名、工作和电子邮件。ContactsModel使用新联系人将其添加到联系人表中。在添加新联系人之前,AddDialog类还具有验证,以确保用户为每个字段提交一个值。
在Add Dialog的模型数据处理中
在您的数据模型ContactsModel中,您将在本节中添加一个名为addContact()的方法。在代码编辑器中转到model.py中ContactsModel的定义并添加以下代码:
# -*- coding: utf-8 -*-
# rpcontacts/model.py

# Snip...
class ContactsModel:
    # Snip...

    def addContact(self, data):
        """Add a contact to the database."""
        rows = self.model.rowCount()
        self.model.insertRows(rows, 1)
        for column, field in enumerate(data):
            self.model.setData(self.model.index(rows, column + 1), field)
        self.model.submitAll()
        self.model.select()
这个脚本是RP Contacts应用程序的“model”模块,它为联系人表提供数据模型。ContactsModel类管理联系人的基础SQLite数据库,并包括添加、删除和检索联系人的方法。addContact方法用于将新联系人添加到数据库中,它接受一个名为“data”的参数,该参数是一个包含要添加的联系人的名称、工作和电子邮件的列表。
该方法首先查找模型中的行数,然后在该位置插入新行。对于数据列表中的每个元素,方法将该元素的相应单元格设置为新行的值,然后提交更改到数据库。最后,在从数据库选择数据后更新模型。

步骤6:删除当前联系人
联系人簿的最终功能是删除簿中的联系人。
要删除联系人簿中的特定联系人,我们需要更改视图和模型文件:
# -*- coding: utf-8 -*-
# rpcontacts/model.py

# Snip...
class ContactsModel:
    # Snip...

    def deleteContact(self, row):
        """Remove a contact from the database."""
        self.model.removeRow(row)
        self.model.submitAll()
        self.model.select()
这个方法由三行代码组成。第一行删除选定的行。第二行将更改提交到数据库。第三行再次将数据加载到模型中。
然后返回views.py模块,并将以下代码添加到Window中的Delete按钮:
# -*- coding: utf-8 -*-
# rpcontacts/views.py

# Snip...
class Window(QMainWindow):
    # Snip...

    def setupUI(self):
        """Setup the main window's GUI."""
        # Snip...
        self.deleteButton = QPushButton("Delete")
        self.deleteButton.clicked.connect(self.deleteContact)
        # Snip...

    def deleteContact(self):
        """Delete the selected contact from the database."""
        row = self.table.currentIndex().row()
        if row < 0:
            return

        messageBox = QMessageBox.warning(
            self,
            "Warning!",
            "Do you want to remove the selected contact?",
            QMessageBox. OK | QMessageBox.Cancel,
        )

        if messageBox == QMessageBox.Ok:
            self.contactsModel.deleteContact(row)
这个脚本是RP Contacts应用程序的“views”模块,它为联系人表提供用户界面。Window类是QMainWindow的子类,负责创建和管理应用程序的主窗口。
在setupUI方法中,创建一个名为“Delete”的按钮,并将deleteContact方法连接到该按钮的clicked信号。
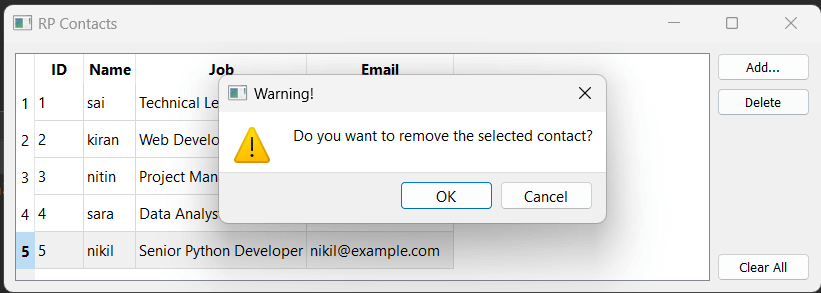
deleteContact方法负责从数据库中删除联系人。调用此函数时,最初确定表视图中当前选择行的索引。如果没有选择行,则该方法退出。然后,它显示一个警告消息框,询问用户确认删除联系人,如果用户确认,则该方法调用ContactsModel类的deleteContact方法,并将所选行的索引传递给它,该索引对应于要从数据库中删除的联系人。
清除数据库
在本节中,我们将添加清空所有按钮的功能。
为此,我们需要对文件进行更改:
# -*- coding: utf-8 -*-
# rpcontacts/model.py

# Snip...
class ContactsModel:
    # Snip...

    def deleteContact(self, row):
        """Remove a contact from the database."""
        self.model.removeRow(row)
        self.model.submitAll()
        self.model.select()
该方法由三行代码组成。第一行删除所选的行。
第二行将更改提交到数据库。第三行再次将数据加载到模型中。接着,在views.py模块中,添加以下代码到Window中的清空按钮:
# -*- coding: utf-8 -*-
# rpcontacts/views.py

# Snip...
class Window(QMainWindow):
    # Snip...

    def setupUI(self):
        """Setup the main window's GUI."""
        # Snip...
        self.clearAllButton = QPushButton("Clear All")
        self.clearAllButton.clicked.connect(self.clearContacts)
        # Snip...

    def clearContacts(self):
        """Remove all contacts from the database."""
        messageBox = QMessageBox.warning(
            self,
            "Warning!",
            "Do you want to remove all your contacts?",
            QMessageBox. OK | QMessageBox.Cancel,
        )

        if messageBox == QMessageBox.OK:
            self.contactsModel.clearContacts()
该方法将提示用户是否要清除所有联系人。如果他们点击“Yes”,那么所有联系人都将被删除。
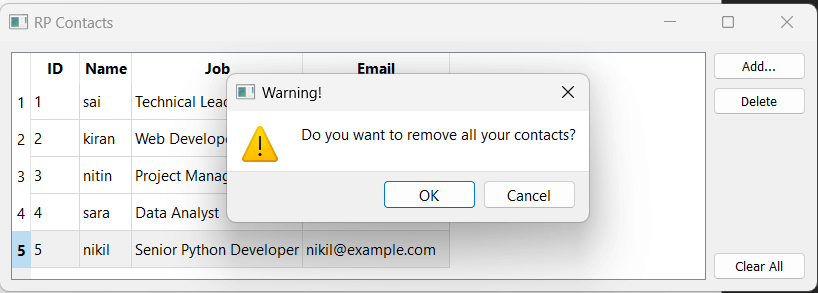
全部完成了!您的联系人簿应用程序已经完成,最后一行代码。使用应用程序提供的功能,您的用户可以显示、添加、更新和删除数据库中的联系人。
 极客教程
极客教程