JavaScript 如何在 HTML 表格中添加、编辑和删除数据
在Web开发中,经常需要处理HTML表格中的数据。JavaScript为动态地插入、修改和删除表格中的数据提供了强大的功能。这些功能使得可以在不刷新整个页面的情况下操纵表格内容,从而实现无缝和高效的用户交互。
HTML表格 用于在网页上表示表格数据。它由以网格格式组织的行和列组成。表格通常用于以结构化方式显示数据,例如财务报告、产品列表和时间表。在本文中,我们将创建一个示例,演示如何在JavaScript中添加、编辑和删除表格行。
方法: 将使用以下方法来创建动态表格以添加或删除行,并修改表格行中的数据:
- addData()方法 从输入字段中获取数据,并在包含所提供信息的表格中创建一个新行。
- 点击“编辑”按钮,触发 editData()函数 ,用预填充的输入字段替换名称和电子邮件表格单元格。按钮的文本更改为“保存”,并在点击时调用 saveData()函数 。
- saveData()函数 通过检索输入值、更新表格单元格、重置按钮和重新调用editData()来保存编辑过的数据。
- 点击“删除”按钮时,deleteData()函数会删除与之相关的行。
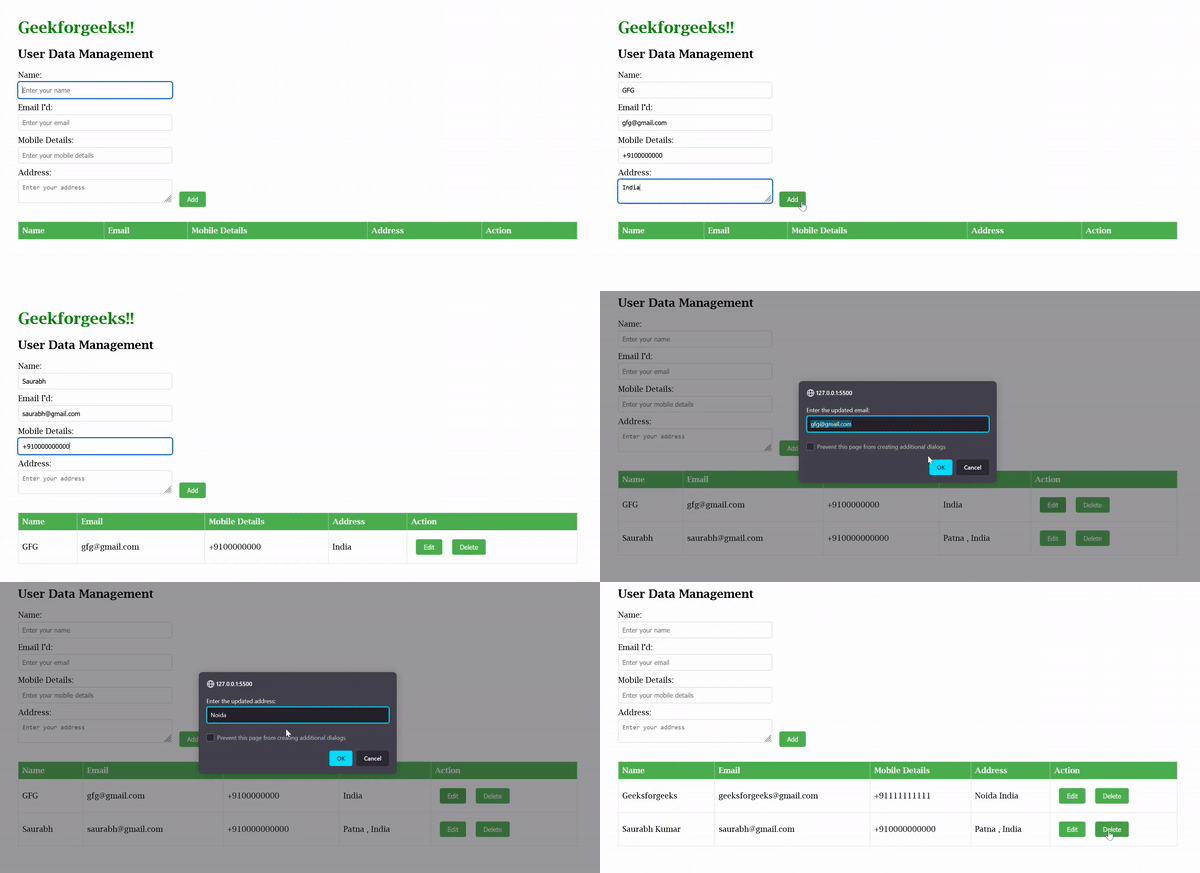
示例: 在此示例中,我们将看到如何使用JavaScript在HTML表格中添加、编辑和删除数据。首先,我们从用户那里获取输入,然后将用户输入的数据显示在表格上。
HTML
<!DOCTYPE html>
<html>

<head>
    <title>
          User Data Management
      </title>
    <style>
        body {
            margin: 4rem;
        }

        #formContainer {
            margin-bottom: 20px;
        }

        label {
            display: block;
            margin-top: 10px;
        }

        input,
        textarea {
            width: 300px;
            padding: 8px;
            margin-top: 5px;
            border: 1px solid #ccc;
            border-radius: 4px;
        }

        button {
            margin: 10px;
            padding: 8px 16px;
            background-color: #4CAF50;
            color: #fff;
            border: none;
            border-radius: 4px;
            cursor: pointer;
        }

        button:hover {
            background-color: #45a049;
        }

        table {
            border-collapse: collapse;
            margin-bottom: 20px;
            width: 100%;
        }

        th,
        td {
            border: 1px solid #ddd;
            padding: 8px;
            text-align: left;
        }

        th {
            background-color: #4CAF50;
            color: #fff;
        }
    </style>
</head>

<body>
    <h1 style="color: green;">
        Geekforgeeks!!
    </h1>
    <h2>User Data Management</h2>

    <div id="formContainer">
        <label for="nameInput">
            Name:
        </label>
        <input type="text"
               id="nameInput"
               placeholder="Enter your name">
        <label for="emailInput">
            Email I'd:
        </label>
        <input type="email"
               id="emailInput"
               placeholder="Enter your email">
        <label for="numberInput">
            Mobile Details:
        </label>
        <input type="text"
               id="numberInput"
               placeholder="Enter your mobile details">
        <label for="addressInput">
            Address:
        </label>
        <textarea id="addressInput"
                  placeholder="Enter your address">
        </textarea>
        <button onclick="addData()">
              Add
          </button>
    </div>
    <table id="outputTable">
        <tr>
            <th>Name</th>
            <th>Email</th>
            <th>Mobile Details</th>
            <th>Address</th>
            <th>Action</th>
        </tr>
    </table>
    <script>
        function addData() {
            // Get input values
            let name =
                document.getElementById("nameInput").value;
            let email =
                document.getElementById("emailInput").value;
            let mobile =
                document.getElementById("numberInput").value;
            let address =
                document.getElementById("addressInput").value;

            // Get the table and insert a new row at the end
            let table = document.getElementById("outputTable");
            let newRow = table.insertRow(table.rows.length);

            // Insert data into cells of the new row
            newRow.insertCell(0).innerHTML = name;
            newRow.insertCell(1).innerHTML = email;
            newRow.insertCell(2).innerHTML = mobile;
            newRow.insertCell(3).innerHTML = address;
            newRow.insertCell(4).innerHTML =
                '<button onclick="editData(this)">Edit</button>'+
                '<button onclick="deleteData(this)">Delete</button>';

            // Clear input fields
            clearInputs();
        }

        function editData(button) {

            // Get the parent row of the clicked button
            let row = button.parentNode.parentNode;

            // Get the cells within the row
            let nameCell = row.cells[0];
            let emailCell = row.cells[1];
            let mobileCell = row.cells[2];
            let addressCell = row.cells[3];

            // Prompt the user to enter updated values
            let nameInput =
                prompt("Enter the updated name:",
                    nameCell.innerHTML);
            let emailInput =
                prompt("Enter the updated email:",
                    emailCell.innerHTML);
            let numberInput =
                prompt("Enter the updated mobile details:",
                    mobileCell.innerHTML
                );
            let addressInput =
                prompt("Enter the updated address:",
                    addressCell.innerHTML
                );

            // Update the cell contents with the new values
            nameCell.innerHTML = nameInput;
            emailCell.innerHTML = emailInput;
            mobileCell.innerHTML = numberInput;
            addressCell.innerHTML = addressInput;
        }
        function deleteData(button) {

            // Get the parent row of the clicked button
            let row = button.parentNode.parentNode;

            // Remove the row from the table
            row.parentNode.removeChild(row);
        }
        function clearInputs() {

            // Clear input fields
            document.getElementById("nameInput").value = "";
            document.getElementById("emailInput").value = "";
            document.getElementById("numberInput").value = "";
            document.getElementById("addressInput").value = "";
        }
    </script>
</body>

</html>
输出:

 极客教程
极客教程