Angular PrimeNG侧边栏尺寸
Angular PrimeNG是一个开源框架,拥有丰富的原生Angular UI组件,可用于出色的造型,这个框架可用于制作响应式网站,非常方便。在这篇文章中,我们将了解如何在Angular PrimeNG中使用侧边栏尺寸。我们还将了解这些属性以及它们在代码中的语法。
侧边栏组件是用来制作一个重叠在屏幕边缘的元素。侧边栏的大小可以使用固定的值来调整侧边栏的大小,或者使用已经定义好的值p-sidebar-sm, p-sidebar-md,和p-sidebar-lg。
语法:
<p-sidebar
    [(visible)]="display"
    styleClass="...."
    [style]="{width:'...'}">
</p-sidebar>

<p-button
    (click)="..."
    label="...">
</p-button>
Angular PrimeNG侧边栏尺寸属性:
- visible:它指定了对话框的可见性。它是布尔数据类型,默认值为false。
- styleClass。它用于设置组件的风格类别。它的数据类型为字符串,默认值为空。
- style。它用于设置组件的内联风格。它的数据类型为字符串,默认值为空。
创建Angular应用程序和模块安装。
第1步:使用以下命令创建一个Angular应用程序。
ng new appname
第2步:创建你的项目文件夹即appname后,使用以下命令移动到它。
cd appname
第3步:在你给定的目录中安装PrimeNG。
npm install primeng --save
npm install primeicons --save
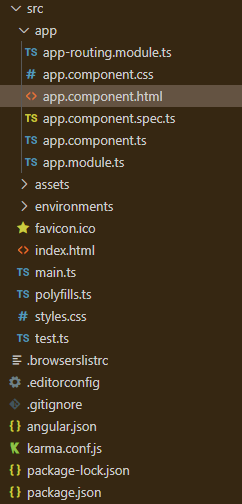
项目结构:它将看起来像如下。
- 运行下面的命令可以看到输出。
ng serve --open
示例1:下面是使用已经定义好的值来说明Angular PrimeNG侧边栏尺寸的示例代码。
<h1 style="color: green">GeeksforGeeks</h1>
<h5>Angular PrimeNG Sidebar Size</h5>

<p-sidebar
    [(visible)]="gfg1"
    styleClass="p-sidebar-sm">
    <h2>This is small sidebar</h2>

    <p-button
          type="button"
          (click)="gfg1 = false"
          label="OK"
          styleClass="p-button-info">
    </p-button>

    <p-button
          type="button"
          (click)="gfg1 = false"
          label="Cancel"
          styleClass="p-button-danger p-ml-2">
    </p-button>
</p-sidebar>


<p-sidebar
   [(visible)]="gfg2"
   styleClass="p-sidebar-md">
  <h2>This is Medium Sidebar</h2>

  <p-button
        type="button"
        (click)="gfg2 = false"
        label="OK"
        styleClass="p-button-info">
  </p-button>

  <p-button
        type="button"
        (click)="gfg2 = false"
        label="Cancel"
        styleClass="p-button-danger p-ml-2">
  </p-button>
</p-sidebar>


<p-sidebar
    [(visible)]="gfg3"
    styleClass="p-sidebar-lg">
    <h2>This is Large Sidebar</h2>

    <p-button
          type="button"
          (click)="gfg3 = false"
          label="OK"
          styleClass="p-button-info">
    </p-button>

    <p-button
          type="button"
          (click)="gfg3 = false"
          label="Cancel"
          styleClass="p-button-danger p-ml-2">
    </p-button>
</p-sidebar>

<p-button
      (click)="gfg1 = true"
      label="Small Sidebar!">
</p-button>

<p-button
      (click)="gfg2 = true"
      label="Medium Sidebar!"
      styleClass="p-mx-2">
</p-button>

<p-button
      (click)="gfg3 = true"
      label="Large Sidebar!">
</p-button>
import { Component } from '@angular/core';

@Component({
    selector: 'app-root',
    templateUrl: './app.component.html',
    styleUrls: ['./app.component.scss']
})

export class AppComponent {}
import { NgModule } from "@angular/core";
import { BrowserModule } from "@angular/platform-browser";
import { BrowserAnimationsModule }
    from "@angular/platform-browser/animations";
import { AppComponent } from "./app.component";
import { ButtonModule } from "primeng/button";
import { SidebarModule } from "primeng/sidebar";

@NgModule({
imports: [
    BrowserModule,
    BrowserAnimationsModule,
    SidebarModule,
    ButtonModule,
],
declarations: [AppComponent],
bootstrap: [AppComponent],
})

export class AppModule {}
输出:

示例2:下面是另一个示例代码,说明了Angular PrimeNG侧边栏尺寸使用固定值的情况。
<h1 style="color: green">GeeksforGeeks</h1>
<h5>Angular PrimeNG Sidebar Size</h5>

<p-sidebar
    [(visible)]="gfg"
    [style]="{width:'60em'}">
    <h2>This is sidebar has 60em size</h2>

    <p-button
          type="button"
          (click)="gfg = false"
          label="OK"
          styleClass="p-button-info">
    </p-button>

    <p-button
          type="button"
          (click)="gfg = false"
          label="Cancel"
          styleClass="p-button-danger p-ml-2">
    </p-button>
</p-sidebar>

<p-button
        (click)="gfg = true"
        label="Small Sidebar!">
</p-button>
import { Component } from '@angular/core';

@Component({
    selector: 'app-root',
    templateUrl: './app.component.html',
    styleUrls: ['./app.component.scss']
})
export class AppComponent {}
import { NgModule } from "@angular/core";
import { BrowserModule } from "@angular/platform-browser";
import { BrowserAnimationsModule }
    from "@angular/platform-browser/animations";
import { AppComponent } from "./app.component";
import { ButtonModule } from "primeng/button";
import { SidebarModule } from "primeng/sidebar";

@NgModule({
  imports: [
    BrowserModule,
    BrowserAnimationsModule,
    SidebarModule,
    ButtonModule,
  ],
  declarations: [AppComponent],
  bootstrap: [AppComponent],
})

export class AppModule {}
输出:

 极客教程
极客教程