Angular PrimeNG图像事件
Angular PrimeNG是一个开源框架,拥有丰富的原生Angular UI组件,可用于出色的造型,该框架可用于制作响应式网站,非常方便。在这篇文章中,我们将了解如何使用Angular PrimeNG图像事件。
图像组件用于显示一个带有预览和转换选项的单一图像。图像组件有3个事件,分别是onShow, onHide,和onImageError,下面列出。
Angular PrimeNG图像事件:
- onShow。当图像预览叠加显示时,该事件被触发。
- onHide。当图像预览覆盖层被隐藏时,该事件被触发。
- onImageError。如果浏览器加载图像文件失败,该事件将被触发。这个事件是在PrimeNg v14.1.2中添加的。
语法:
<p-image src="..."
         [preview]="true"
         (image-event)="callbackFunction()"
         width="...">
</p-image>
创建Angular应用程序和模块安装。
第1步:使用以下命令创建一个Angular应用程序。
ng new newapp
第2步:在创建你的项目文件夹即newapp后,使用以下命令移动到它。
cd newapp
第3步:在你的项目目录中安装PrimeNG和PrimeIcons。
npm install primeng --save
npm install primeicons --save
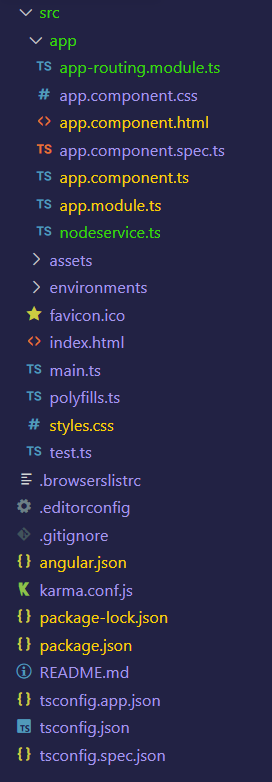
项目结构:完成安装后,项目结构将如下所示。

例子1:这个例子说明了PrimeNG图像组件的onImageError事件的使用,该事件在图像加载失败时被触发。这里我们传递了一个不存在的图像文件的链接,所以图像不会被加载而触发onImageError事件。
- app.component.html
<h2 style="color: green">GeeksforGeeks</h2>
<h3>Angular PrimeNG Image Events Component</h3>

<!-- Image does not exist at the given source -->
<p-image src="./fakeImage.jpg"
         (onImageError)="imageErr()"
         width="200">
</p-image>
<p-toast></p-toast>
- app.component.ts
import { Component } from '@angular/core';
import { MessageService } from 'primeng/api';

@Component({
    selector: 'app-root',
    templateUrl: './app.component.html',
    styleUrls: ['./app.component.css'],
    providers: [MessageService]
})

export class AppComponent {
    constructor(private msgs: MessageService) { }

    imageErr() {
        setTimeout(() => {
            this.msgs.add({
                severity: 'success',
                summary: 'Failed to load Image',
                detail: 'onImageError Event Fired'
            });
        }, 1000);
    }
}
- app.module.ts
import { NgModule } from '@angular/core';
import { BrowserModule } from '@angular/platform-browser';
import { BrowserAnimationsModule }
    from '@angular/platform-browser/animations';
import { AppComponent } from './app.component';
import { FormsModule } from '@angular/forms';
import { ImageModule } from 'primeng/image';
import { ToastModule } from 'primeng/toast';

@NgModule({
    imports: [
        BrowserModule,
        BrowserAnimationsModule,
        FormsModule,
        ImageModule,
        ToastModule
    ],
    declarations: [AppComponent],
    bootstrap: [AppComponent],
})
export class AppModule { }
输出:

例子2:在这个例子中,我们使用图像的onShow和onHide事件来显示一个使用消息服务的敬酒信息。
- app.component.html
<h2 style="color: green">GeeksforGeeks</h2>
<h3>Angular PrimeNG Image Events Component</h3>

<p-image src=
"https://media.geeksforgeeks.org/wp-content/uploads/20221023092911/gfglogo-200x200.png"
         [preview]="true"
         (onShow)="imageShow()"
         (onHide)="imageHide()"
         width="200">
</p-image>
<p-toast></p-toast>
- app.component.ts
import { Component } from '@angular/core';
import { MessageService } from 'primeng/api';

@Component({
    selector: 'app-root',
    templateUrl: './app.component.html',
    styleUrls: ['./app.component.css'],
    providers: [MessageService]
})

export class AppComponent {
    constructor(private msgs: MessageService) { }

    imageShow() {
        this.msgs.add({
            severity: 'success',
            summary: 'Preview Shown',
            detail: 'onShow Event Fired'
        });
    }

    imageHide() {
        this.msgs.add({
            severity: 'error',
            summary: 'Preview Hidden',
            detail: 'onHide Event Fired'
        });
    }
}
- app.module.ts:
import { NgModule } from '@angular/core';
import { BrowserModule }
    from '@angular/platform-browser';
import { BrowserAnimationsModule }
    from '@angular/platform-browser/animations';
import { AppComponent } from './app.component';
import { FormsModule } from '@angular/forms';
import { ImageModule } from 'primeng/image';
import { ToastModule } from 'primeng/toast';

@NgModule({
    imports: [
        BrowserModule,
        BrowserAnimationsModule,
        FormsModule,
        ImageModule,
        ToastModule
    ],
    declarations: [AppComponent],
    bootstrap: [AppComponent],
})
export class AppModule { }
输出:

 极客教程
极客教程