Angular PrimeNG卡高级卡
Angular PrimeNG是一个开源框架,拥有丰富的原生Angular UI组件,可以用来做很好的造型,这个框架用来制作响应式网站非常方便。本文将告诉我们如何在Angular PrimeNG中使用卡高级卡。我们还将学习属性,以及它们在代码中使用的语法。
卡片组件用于显示灵活和可扩展的内容容器。
语法:
<p-card header="...." subheader="...."
    [style]="{ .... }" styleClass="....">
    <ng-template pTemplate="header">
        ....
    </ng-template>

    <p>...</p>

    <ng-template pTemplate="footer">
        .....
    </ng-template>
</p-card>
Angular PrimeNG卡的简单卡片属性:
- header。它指定了卡片的标题。它是字符串数据类型,默认值为空。
- subheader。它指定了卡片的副标题。它是字符串数据类型,默认值为空。
- style。它用于设置组件的内联风格。它的数据类型为字符串,默认值为空。
- styleClass。它用于设置组件的风格类别。它的数据类型为字符串,默认值为空。
创建Angular应用程序和模块安装。
第1步:使用以下命令创建一个Angular应用程序。
ng new appname
第2步:创建你的项目文件夹即appname后,使用以下命令移动到它。
cd appname
第3步:在你给定的目录中安装PrimeNG。
npm install primeng --save
npm install primeicons --save
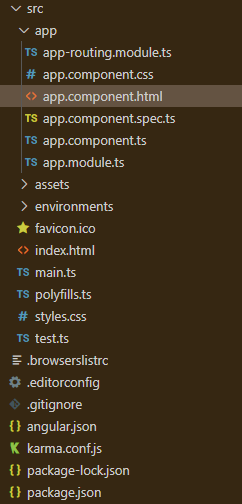
项目结构:它将看起来像如下。
运行应用程序的步骤:运行以下命令以查看输出。
ng serve --open
示例1:这是一个基本的示例代码,说明了Angular PrimeNG Card Advanced Card的使用,使用了图片、标题、副标题和footer按钮。
- app.component.html:
<h1 style="color: green">GeeksforGeeks</h1>
<h5>Angular PrimeNG Card Advanced Card</h5>

<p-card header="GeeksforGeeks"
    subheader="Angular PrimeNG Card Advanced Card"
    [style]="{ width: '360px', height: '600px' }"
    styleClass="shadow-2">
    <ng-template pTemplate="header">
        <img alt="Card" height="300" src=
"https://media.geeksforgeeks.org/img-practice/banner/system-design-live-course-overview-image.png?v=1665305530" />
    </ng-template>
    <p>
        This course helped me a lot in achieving
          new heights in my career. I have cracked multiple
          product-based companies including Amazon,
          Flipkart, and Walmart.
    </p>

    <ng-template pTemplate="footer">
        <p-button label="Login"
            styleClass="p-button-success">
          </p-button>
    </ng-template>
</p-card>
- app.component.ts:
import { Component } from '@angular/core';

@Component({
   selector: 'app-root',
   templateUrl: './app.component.html',
   providers: []
})

export class AppComponent {}
- app.module.ts:
import { NgModule } from '@angular/core';
import { BrowserModule } from '@angular/platform-browser';
import { BrowserAnimationsModule }
    from '@angular/platform-browser/animations';
import { AppComponent } from './app.component';
import { ButtonModule } from 'primeng/button';
import { CardModule, } from 'primeng/card';

@NgModule({
    imports: [
        BrowserModule,
        BrowserAnimationsModule,
        CardModule,
        ButtonModule,
    ],
    declarations: [AppComponent],
    bootstrap: [AppComponent]
})

export class AppModule { }
输出:

示例2:这是另一个示例代码,说明了Angular PrimeNG Card Advanced Card的使用,使用了图片、标题和_副标题。
- app.component.html:
<h1 style="color: green">GeeksforGeeks</h1>
<h5>Angular PrimeNG Card Advanced Card</h5>

<p-card header="GeeksforGeeks"
    subheader="Angular PrimeNG Card Advanced Card"
    [style]="{ width: '360px', height: '600px' }"
    styleClass="shadow-2">
    <ng-template pTemplate="header">
        <img alt="Card" height="300" src=
"https://media.geeksforgeeks.org/img-practice/banner/cpp-stl-course-overview-image.png?v=1665307466" />
    </ng-template>
    <p>
        Initially, I was not comfortable with coding.
        I kind of guess the logic for the problem but
          am not able to implement it. So I took a C++ STL course,
        which makes the implementation much easier.
    </p>

    <ng-template pTemplate="footer">
        <p-button label="Logout"
            styleClass="p-button-danger">
          </p-button>
    </ng-template>
</p-card>
- app.component.ts:
import { Component } from '@angular/core';

@Component({
    selector: 'app-root',
    templateUrl: './app.component.html',
    providers: []
})

export class AppComponent { }
- app.module.ts:
import { NgModule } from '@angular/core';
import { BrowserModule } from '@angular/platform-browser';
import { BrowserAnimationsModule }
    from '@angular/platform-browser/animations';
import { AppComponent } from './app.component';
import { ButtonModule } from 'primeng/button';
import { CardModule, } from 'primeng/card';

@NgModule({
    imports: [
        BrowserModule,
        BrowserAnimationsModule,
        CardModule,
        ButtonModule,
    ],
    declarations: [AppComponent],
    bootstrap: [AppComponent]
})

export class AppModule { }
输出:

 极客教程
极客教程