Angular PrimeNG Button Severities组件
Angular PrimeNG是一个开源框架,它有丰富的原生Angular UI组件,可以用来做很好的造型,这个框架用来做响应式网站,非常方便。在这篇文章中,我们将看到Angular PrimeNG中的Button Severities组件。
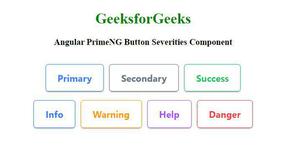
一个按钮通常用于在点击时执行一些动作。PrimeNG库中的按钮有不同的颜色,以表示通过点击事件执行该动作的_严重程度。
Angular PrimeNG按钮严重性类:
- p-button : 它以默认的主色调显示按钮。
- p-button-secondary: 它显示具有辅助颜色的按钮。
- p-button-success : 它显示绿色的按钮。
- p-button-info。它以蓝色显示按钮。
- p-button-warning : 它以黄色显示按钮。
- p-button-help。它显示的按钮是紫色的。
- p-button-danger: 它显示的按钮是红色的。
语法:
<button pButton type="button" class="Severities Class"></button>
创建Angular应用程序和模块安装。
第1步:要创建一个angular应用程序,你需要通过npm命令安装angular命令行接口。
npm install -g angular-cli
第二步:现在,我们将创建一个angular项目。
ng new project_name
第3步:在创建你的angular项目后,进入文件夹执行不同的操作。
cd project_name
第四步:创建Angular应用程序后,使用以下命令安装所需的模块。
npm install primeng --save
npm install primeicons --save
项目结构:安装成功后,将出现以下项目结构。
Project Structure
- 运行应用程序的步骤。在项目的根目录下使用以下命令运行该应用程序。
ng serve --open
例子1:这个例子描述了Angular PrimeNG中不同的Button Severity组件的使用。
- app.component.html
<div style="margin:100px; text-align: center;">
    <h1 style="color: green">GeeksforGeeks</h1>
    <h3>Angular PrimeNG Button Severities Component</h3>
    <button pButton type="button"
                    label="Primary"
                    class="p-button-lg p-button-raised
                           p-button-outlined">
    </button>
    <button pButton type="button"
                    label="Secondary"
                    class="p-button-lg p-button-raised
                           p-button-outlined p-button-secondary">
    </button>
    <button pButton type="button"
                    label="Success"
                    class="p-button-lg p-button-raised
                           p-button-outlined p-button-success">
    </button>
    <button pButton type="button"
                    label="Info"
                    class="p-button-lg p-button-raised
                           p-button-outlined p-button-info">
    </button>
    <button pButton type="button"
                    label="Warning"
                    class="p-button-lg p-button-raised
                           p-button-outlined p-button-warning">
    </button>
    <button pButton type="button"
                    label="Help"
                    class="p-button-lg p-button-raised
                           p-button-outlined p-button-help">
    </button>
    <button pButton type="button"
                    label="Danger"
                    class="p-button-lg p-button-raised
                           p-button-outlined p-button-danger">
    </button>
</div>
- app.component.ts
import { Component } from '@angular/core';

@Component({
    selector: 'my-app',
    templateUrl: './app.component.html',
})
export class AppComponent { }
- app.module.ts
import { NgModule } from '@angular/core';
import { BrowserModule } from '@angular/platform-browser';
import { AppComponent } from './app.component';
import { ButtonModule } from "primeng/button";
@NgModule({
    declarations: [
        AppComponent
    ],
    imports: [
        BrowserModule,
        ButtonModule,
    ],
    providers: [],
    bootstrap: [AppComponent]
})
export class AppModule { }
输出:
例子2:这是另一个例子,描述了Angular PrimeNG中不同的Button Severity组件的使用。
- app.component.html
<div style="margin:100px; text-align: center;">
    <h1 style="color: green">GeeksforGeeks</h1>
    <h3>Angular PrimeNG Button Severities Component</h3>
    <button pButton type="button"
                    label="Success"
                    class="p-button-lg p-button-rounded
                           p-button-success">
    </button>
    <button pButton type="button"
                    label="Warning"
                    class="p-button-lg p-button-rounded
                           p-button-warning">
    </button>
    <button pButton type="button"
                    label="Help"
                    class="p-button-lg p-button-rounded
                           p-button-help">
    </button>
    <button pButton type="button"
                    label="Danger"
                    class="p-button-lg p-button-rounded
                           p-button-danger">
    </button>
</div>
- app.component.ts
import { Component } from '@angular/core';

@Component({
    selector: 'my-app',
    templateUrl: './app.component.html',
})
export class AppComponent { }
- app.module.ts
import { NgModule } from '@angular/core';
import { BrowserModule }
    from '@angular/platform-browser';
import { AppComponent } from './app.component';
import { ButtonModule } from "primeng/button";
@NgModule({
    declarations: [
        AppComponent
    ],
    imports: [
        BrowserModule,
        ButtonModule,
    ],
    providers: [],
    bootstrap: [AppComponent]
})
export class AppModule { }
输出 :
 极客教程
极客教程

