PyQt5 – 试管式进度条
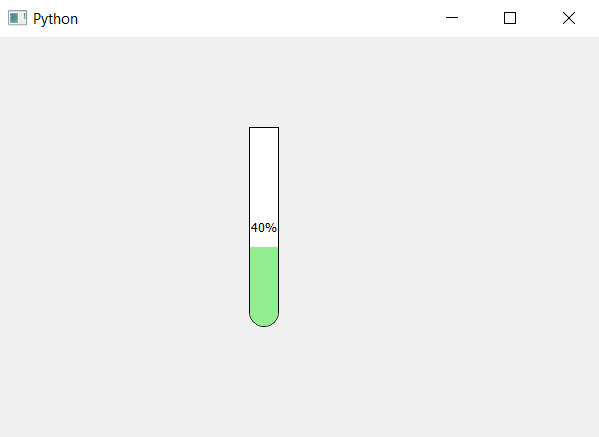
在这篇文章中,我们将看到如何创建试管状的进度条。基本上,试管形状的进度条是在底部有圆边的垂直进度条。下面是试管进度条的表示方法。

为了 做到这一点,我们必须做到以下几点 –
- 将进度条的方向从水平改为垂直
-
在底部的进度条上创建圆角
-
在底部的进度条上创建圆角。
为了给进度条和进度条的条形图创建圆角,下面是样式表代码。
QProgressBar
{
border: 1px solid black;
border-bottom-right-radius: 15px;
border-bottom-left-radius: 15px;
}
QProgressBar::chunk
{
border-bottom-right-radius: 14px;
border-bottom-left-radius: 14px;
background : lightgreen;
}
以下是实施情况。
# importing libraries
from PyQt5.QtWidgets import *
from PyQt5 import QtCore, QtGui
from PyQt5.QtGui import *
from PyQt5.QtCore import *
import sys


class Window(QMainWindow):

    def __init__(self):
        super().__init__()

        # setting title
        self.setWindowTitle("Python ")

        # setting geometry
        self.setGeometry(100, 100, 600, 400)

        # calling method
        self.UiComponents()

        # showing all the widgets
        self.show()

    # method for widgets
    def UiComponents(self):
        # creating progress bar
        bar = QProgressBar(self)

        # setting geometry to progress bar
        bar.setGeometry(250, 90, 30, 200)

        # set value to progress bar
        bar.setValue(40)

        # setting alignment to center
        bar.setAlignment(Qt.AlignCenter)

        # setting orientation to vertical
        bar.setOrientation(QtCore.Qt.Vertical)

        # setting rounded border at the bottom
        # setting rounded border to the bottom of bar of progress bar
        # and color
        bar.setStyleSheet("QProgressBar"
                          "{"
                          "border : 1px solid black;"
                          "border-bottom-right-radius: 15px;"
                          "border-bottom-left-radius: 15px;"
                          "}"
                          "QProgressBar::chunk"
                          "{"

                          "border-bottom-right-radius: 14px;"
                          "border-bottom-left-radius: 14px;"
                          "background : lightgreen"
                          "}"
                          )


# create pyqt5 app
App = QApplication(sys.argv)

# create the instance of our Window
window = Window()

# start the app
sys.exit(App.exec())
输出 :

 极客教程
极客教程