如何在Protractor中分片测试文件
Protractor 是为Angular和AngularJS应用程序开发的端到端测试框架。它以真实用户的方式与应用程序交互,在真实浏览器中运行测试。在本文中,我们将讨论如何在Protractor中分片测试套件。
先决条件: 安装和设置Protractor
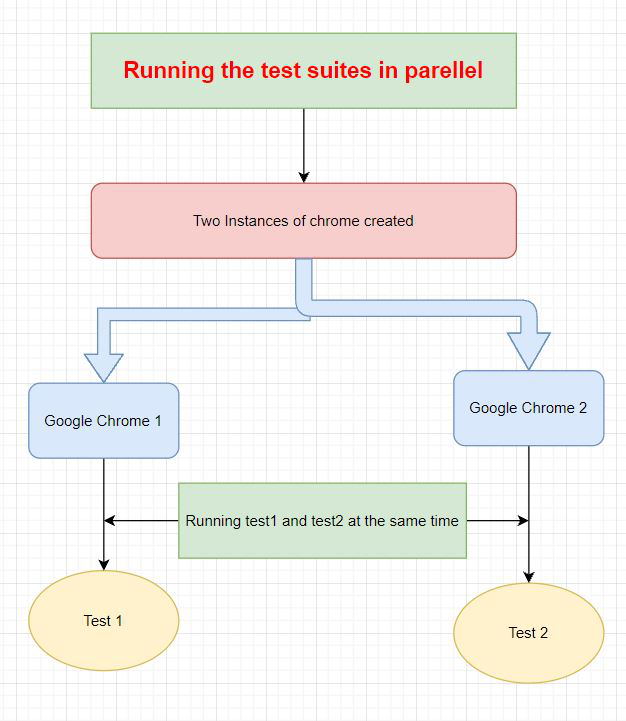
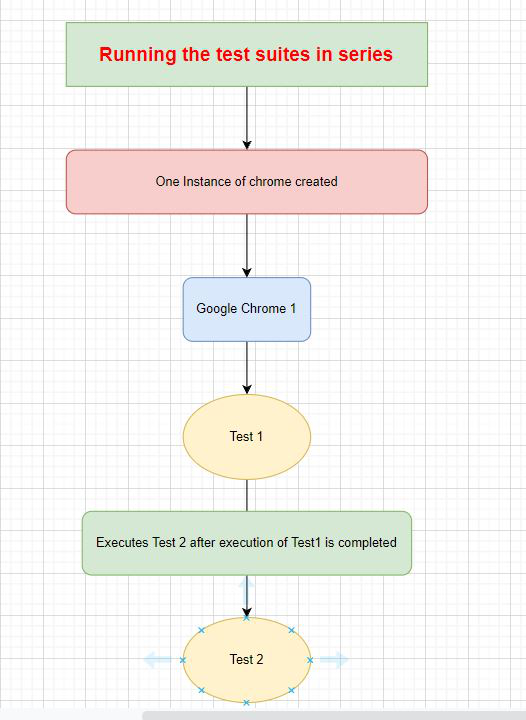
分片 测试套件意味着并行运行测试套件。假设有两个测试套件,则将这两个测试套件分片并行运行意味着会创建两个Chrome实例,这两个测试套件将在两个不同的Chrome实例上分别运行(即,它们将独立运行),而如果这两个测试套件按顺序运行,那么只会创建一个Chrome实例,然后第二个测试套件必须等待第一个测试套件完成后再运行(即它们无法独立运行)。现在,由于分片可以帮助测试套件并行运行,它将减少执行时间并提高测试的效率。
下面是上述解释的流程图表示:
并行运行测试
连续运行测试
方法:
- 我们将创建一个基本的测试程序,在其中我们将看到如何分片测试套件。
- 所有Protractor测试将有一个包含配置的文件,这将是启动测试的初始文件。
- 让我们创建一个名为conf.js的文件。
- 为了进行分片,可以在conf.js文件的capabilities块中声明两个能力。
- shardTestFiles – 允许不同的规格并行运行。如果此设置为true,则规格将按文件分片(即由此组能力运行的所有文件将并行运行)。默认值为false。
- maxInstances – 此组能力并行运行的最大浏览器实例数。仅在shardTestFiles为true时需要。默认值为1。
步骤1: 我们必须首先创建一个conf.js文件,其中包含用于Protractor的配置。
conf.js
// An example configuration file to
// illustrate sharding
exports.config = {
  directConnect: true,

  // Capabilities to be passed to the
  // webdriver instance for sharding
  capabilities: {
    'browserName': 'chrome',

    // Sharding
    'shardTestFiles': true,
    'maxInstances': 2,
  },

  // Framework to use. Jasmine is
  // recommended
  framework: 'jasmine',

  // Spec patterns are relative to the
  // current working directory when
  // protractor is called.
  specs: ['test1.js','test2.js'],
  SELENIUM_PROMISE_MANAGER: false,
  // Options to be passed to Jasmine.
  jasmineNodeOpts: {
    defaultTimeoutInterval: 30000
  }
};
步骤2: 我们将创建两个名为 index1.html 和 index2.html 的HTML文件。
index1.html
<!DOCTYPE html>
<html>

<head>
    <title>
        fade-in effect on page load using JavaScript
    </title>

    <script type="text/javascript">
        var opacity = 0;
        var intervalID = 0;
        window.onload = fadeIn;

        function fadeIn() {
            setInterval(show, 200);
        }

        function show() {
            var body = document.getElementById("fade-in");
            opacity = Number(window.getComputedStyle(body)
                .getPropertyValue("opacity"));
            if (opacity < 1) {
                opacity = opacity + 0.1;
                body.style.opacity = opacity
            } else {
                clearInterval(intervalID);
            }
        }
    </script>
</head>

<body>

    <!-- The element to be tested -->
    <div id="fade-in" style="opacity: 0;">
        Inner text
    </div>
</body>

</html>
index2.html
<!DOCTYPE html>
<html>

<body>
    <!-- The element to be tested -->
    <div id="hidden-div" style="display: none;">
        Inner text
    </div>
</body>

</html>
步骤3: 我们将创建test1.js文件。在这个文件中,我们将访问index1.html文件,然后等待元素完全淡入。浏览器是由Protractor创建的全局对象,用于浏览器级别的命令,如使用browser.get()方法进行导航。describe和it语法来自Jasmine框架,其中describe是测试的描述,而it定义了测试的步骤。
test1.js
describe('Protractor Demo App', function () {
  it('should have a title', async function () {

    // Disable waiting for Angular render update
    await browser.waitForAngularEnabled(false)

    // Get the HTML file that has to be tested
    await browser.get('index1.html');

    // Get the fade in element
    let fadeIn = element(by.id('fade-in'));

    // Wait for the fade in process to complete
    await browser.driver.wait(async function() {
      return await fadeIn.getCssValue('opacity') === '1';
    }, 30000, "Taking too long to fade in");
  });
});
同样,我们将创建test2.js文件。在这个文件中,我们将访问index2.html文件,然后检查该元素是否隐藏。浏览器是由Protractor创建的全局对象,用于浏览器级别的命令,例如使用browser.get()方法进行导航。describe和它的语法来自Jasmine框架,其中describe是您的测试描述,定义了测试的步骤。
test2.js
describe('Protractor Demo App', function () {
  it('should have a title', async function () {

      // Disable waiting for Angular render update
      await browser.waitForAngularEnabled(false)

      // Get the HTML file that has to be tested
      await browser.get('index2.html');

      // Test if the element is hidden
      let hiddenDiv = element(by.id('hidden-div'));

      // This test will pass only when
      // element is hidden
      expect(hiddenDiv.isDisplayed()).toBe(false);
  });
});
步骤4: 最后,我们将使用下面的命令运行配置文件。这将运行配置文件,并且测试结果将如下输出所示。
protractor conf.js
输出:
 极客教程
极客教程

