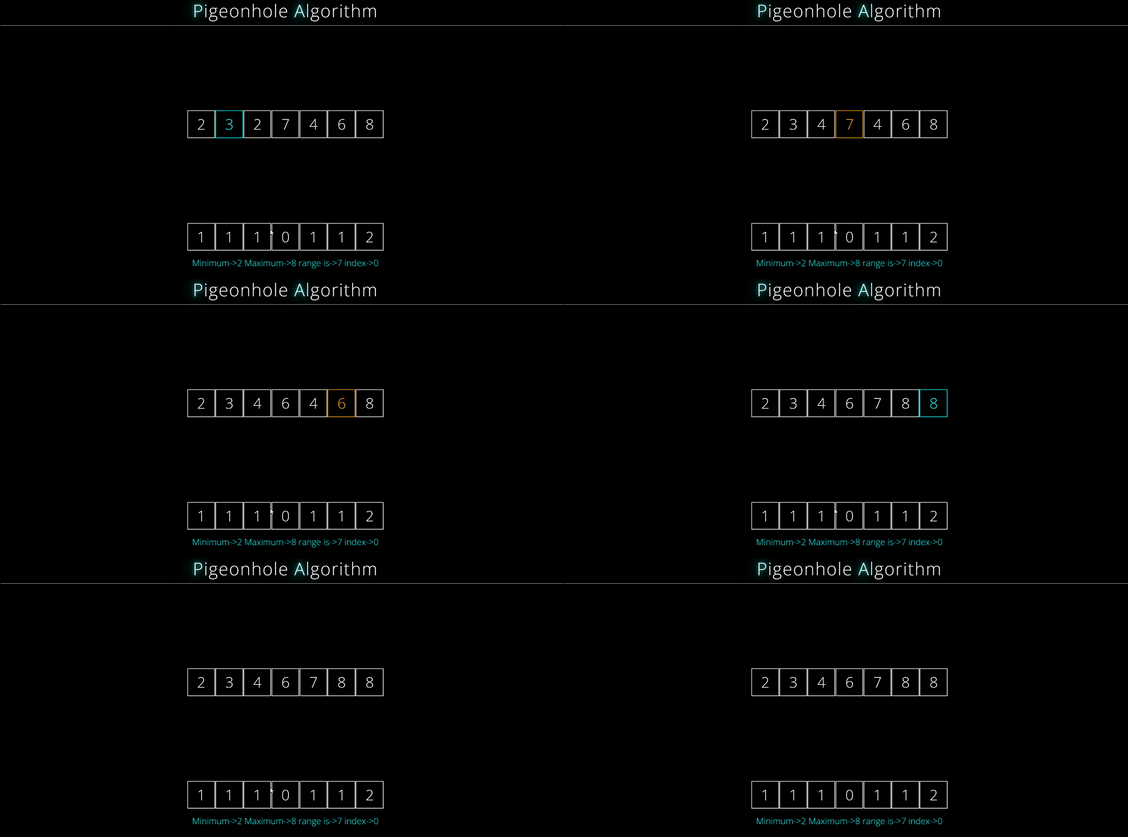
JavaScript 使用鸽巢排序可视化器
鸽巢排序 是一种用于对有限范围内的元素进行排序的简单算法。它是一个有趣的算法,可以很容易地理解和实现。在本文中,我们将探讨什么是鸽巢排序,它是如何工作的,以及在何时可以有效地使用它。我们还将研究算法的时间复杂度和空间复杂度,并将其与其他流行的排序算法进行比较。所以让我们深入了解鸽巢排序的世界吧。
鸽巢排序首先创建一组鸽巢或桶,每个桶对应于一个特定的值或值范围。然后将输入数组中的每个元素放入其对应的鸽巢中。最后,以特定顺序从鸽巢中提取元素,获得排序后的输出。
在这里,我们将制作一个鸽巢排序的可视化,您可以在下面的文章中阅读应用程序和算法的其他部分:
先决知识: HTML,CSS,JavaScript,鸽巢排序
鸽巢排序的步骤实现:
第一步:HTML
这是我们的网页实现鸽巢排序算法的HTML代码。它包括一个标题为“鸽巢排序算法”的标题、一个用于显示排序后数字的容器div、一个用于显示整个数组的container_2 div、一个用于显示用户反馈信息的消息div,以及一个用于触发排序算法的start div。
HTML
<!DOCTYPE html>
<html lang="en">

<head>
    <meta charset="UTF-8">
    <meta http-equiv="X-UA-Compatible"
        content="IE=edge">
    <meta name="viewport" content=
        "width=device-width, initial-scale=1.0">
    <link href=
"https://fonts.googleapis.com/css2?family=Open+Sans:wght@300&display=swap"
        rel="stylesheet" />
    <script src="script.js"></script>
    <link rel="stylesheet" href="style.css">
    <title>Document</title>
</head>

<body>
    <div class="header"><span id="span">P</span>
        igeonhole
        <span id="span">A</span>lgorithm
    </div>
    <div id="container"></div>
    <div id="container_2" class="container_2"></div>
    <div id="message"></div>
    <div id="start">Start</div>
</body>

</html>
第二步:CSS: 这是用于样式化网页的CSS代码。
CSS
/* Write CSS Here */
* {
    color: white;
}

#span {
    font-weight: normal;
    text-shadow: 0 0 10px cyan,
        0 0 40px cyan,
        0 0 80px cyan;
}

html {
    background-color: black;
    font-family: "Open sans", sans-serif;
}

body {
    display: flex;
    flex-direction: column;
    align-items: center;
    height: 100vmin;
}

.container_2 {
    display: flex;
    flex-direction: column;
}

#container,
.container_2 {
    width: 100%;
    margin-top: 15%;
    display: flex;
    justify-content: center;
    flex-direction: row;
    font-size: 5vmin;
    letter-spacing: 2vmin;
    font-weight: normal;
    letter-spacing: normal;
}

.tile {
    /* width: 5vmin; */
    height: 5vmin;
    margin: 10px;
    text-align: center;
    height: fit-content;
}

.onover {
    color: cyan;
}

#answer {
    font-size: 5vmin;
}

#message {
    color: cyan;
    font-size: 3vmin;
    text-align: center;
    display: flex;
    flex-direction: column;
    margin: 1vmin;
}

#start {
    align-self: center;
    background-color: black;
    font-size: 3vmin;
    box-sizing: border-box;
    padding: 1vmin;
    color: white;
    cursor: pointer;
    border: none;
    margin-top: 2vmin;
    transition: 0.5s ease-in-out;
    font-weight: bold;
    letter-spacing: 4px;
}

#start:hover {
    transform: scale(1.5);
    text-shadow: 0 0 10px cyan,
        0 0 20px cyan,
        0 0 40px cyan;
}

#odd {
    text-shadow: 0 0 10px red,
        0 0 20px red,
        0 0 40px red;
}

#even {
    text-shadow: 0 0 10px orange,
        0 0 20px orange,
        0 0 40px orange;
}

#array {
    display: flex;
    font-size: 10vmin;
}

#currentsum,
#answer {
    padding: 1vmin;
    font-size: 3vmin;
    letter-spacing: 2px;
}

.header {
    text-align: center;
    padding: 1vmin;
    width: 100%;
    font-size: 6vmin;
    letter-spacing: 2px;
    border-bottom: 1px solid white;
}

input {
    margin-top: 2vmin;
}
第三步:JavaScript: 代码以名为id的函数开始,该函数从HTML文档返回具有给定id的元素。此函数后来在代码中用于访问和修改网页上的元素。
主算法是在pigeonhole_sort函数中实现的,该函数接受两个参数:要排序的数组arr和其长度n。函数首先将两个变量min和max初始化为输入数组的最小和最大元素。然后它在网页上创建一个消息元素,显示当前的最小和最大值,并在继续之前等待一秒。这样做是为了让用户在排序过程开始之前看到输入数组的初始状态。然后函数循环遍历输入数组的每个元素,并在必要时更新最小和最大值。它还将网页上与当前数组索引对应的元素的颜色和边框颜色更改为橙色,等待一秒,然后将颜色改回白色。
找到最小和最大值后,函数计算输入数组中值的范围,并创建一组空的“信鸽洞”来容纳元素。然后它再次循环遍历输入数组,并为每个元素增加相应信鸽洞中的计数。一旦信鸽洞填满,函数就按顺序循环遍历它们,并通过重复将计数大于零的最小元素添加到输出数组中来重构排序后的数组。
最后,返回排序后的数组。
Javascript
// Function to get the instance of the element
// with the id
function id(id) {
return document.getElementById(id);
}
// This sorts the array using pigeonhole sort
const pigeonhole_sort = async (arr, n) => {
// Find min and max in an array
let min = arr[0];
let max = arr[0];
let range, i, j, index, fake_index;
let isSort = document.createElement('div')
isSort.id = "message";
isSort.classList.add("message");
id("message").appendChild(isSort)
// Displaying message which will keep on
// informing user about the parameters
// which are changing
isSort.innerText = `Minimum->{min} Maximum->{max}`
// Using await to stop the code so that
// visualization appears to the user
await new Promise((resolve) =>
setTimeout(() => {
resolve();
}, 1000)
)
for (let i = 0; i < n; i++) {
// Iterating over the array
id(i).style.color = "orange"
id(i).style.borderColor = "orange"
await new Promise((resolve) =>
setTimeout(() => {
resolve();
}, 1000)
)
if (arr[i] > max) {
// Finding max
max = arr[i];
await new Promise((resolve) =>
setTimeout(() => {
resolve();
}, 1000)
)
isSort.innerText = `Minimum->{min} Maximum->{max}`
}
if (arr[i] < min) {
// Finding min
min = arr[i];
await new Promise((resolve) =>
setTimeout(() => {
resolve();
}, 1000)
)
// Displaying message since min changed
isSort.innerText = `Minimum->{min} Maximum->{max}`
}
await new Promise((resolve) =>
setTimeout(() => {
resolve();
}, 1000)
)
// Removing the iteration of box of orange
// since iteration on that elment is complete
id(i).style.color = "white"
id(i).style.borderColor = "white"
}
range = max - min + 1;
isSort.innerText =
`Minimum->{min} Maximum->{max} range is->{range}`
await new Promise((resolve) =>
setTimeout(() => {
resolve();
}, 1000)
)
let phole = [];
// Defining the pigeonhole array
for (let i = 0; i0`
isSort.innerText =
`Minimum-> {min} Maximum->{max} range is->{range} index->${index}`
for (j = 0; j < range; j++) {
id(j).style.color = "orange"
id(j).style.borderColor = "orange"
// Iterating over the array
await new Promise((resolve) =>
setTimeout(() => {
resolve();
}, 1000)
)
while (phole[j]-- > 0) {
id(j).style.color = "cyan"
id(j).style.borderColor = "cyan"
arr[index++] = j + min;
id(fake_index++).innerText = j + min;
await new Promise((resolve) =>
setTimeout(() => {
resolve();
}, 1000)
)
id(j).style.color = "white"
id(j).style.borderColor = "white"
}
id(j).style.color = "white"
id(j).style.borderColor = "white"
}
console.log(arr)
}
// Defining parameters array idcount for tiles
let idcount = 0;
var array = [8, 3, 2, 7,
4, 6, 8];
window.onload = () => {
// Sets message for user to understand major things
id("message").innerText = "In this algorithm we will "
+ "visualize Pigeohole sort First array displayed "
+ "is main array and second array is PHOLE array"
//when button start is clicked adding event to that
id("start").addEventListener('click', () => {
id("start").style.display = "none";
id("message").innerText = ""
console.log(array);
let idcount = 0;
// Creating a tile in an container id div to showcase
// array elements and adding tile css to it
for (let i = 0; i < array.length; i++) {
let tile = document.createElement('span');
tile.id = idcount;
tile.classList.add("tile");
tile.innerText = array[i];
tile.style.margin = "0.5px";
tile.style.padding = "7px"
tile.style.border = "2px solid white"
tile.style.width = "7vmin"
tile.style.height = "7vmin"
id("container").appendChild(tile);
idcount++;
}
// Calling sorting function
pigeonhole_sort(array, array.length);
})
}
输出:

 极客教程
极客教程