如何使用TensorFlow为Android创建自定义模型
Tensorflow是一个机器学习的开源库。在安卓系统中,我们的计算能力和资源都很有限。因此,我们使用TensorFlow light,它是专门设计用来在功率有限的设备上运行的。在这篇文章中,我们将看到一个叫做虹膜数据集的分类例子。该数据集包含3个类,每个类有50个实例,其中每个类指的是虹膜植物的类型。
属性信息:
- 萼片长度(厘米)
- 萼片宽度(厘米)
- 花瓣长度(厘米)
- 花瓣宽度(厘米)
根据输入的信息,我们将预测该植物是鸢尾花,鸢尾花,还是鸢尾花。你可以参考这个链接以了解更多信息。
分步实现
Step 1:
从这个( https://archive.ics.uci.edu/ml/machine-learning-databases/iris/ )链接下载虹膜数据集(文件名:iris.data)。
Step 2:
在Jupyter笔记本中创建一个名为iris的新的python文件。将iris.data文件放在iris.ipynb所在的同一目录中。在Jupyter笔记本文件中复制以下代码。
iris.ipynb
import pandas as pd
import numpy as np
import tensorflow as tf
from sklearn.preprocessing import LabelEncoder
from keras.utils import to_categorical

# reading the csb into data frame
df = pd.read_csv('iris.data')

# specifying the columns values into x and y variable
# iloc range based selecting 0 to 4 (4) values
X = df.iloc[:, :4].values
y = df.iloc[:, 4].values

# normalizing labels
le = LabelEncoder()

# performing fit and transform data on y
y = le.fit_transform(y)

y = to_categorical(y)

from tensorflow.keras.layers import Dense
from tensorflow.keras.models import Sequential

model = Sequential()

# input layer
# passing number neurons =64
# relu activation
# shape of neuron 4
model.add(Dense(64, activation='relu', input_shape=[4]))

# processing layer
# adding another denser layer of size 64
model.add(Dense(64))

# creating 3 output neuron
model.add(Dense(3, activation='softmax'))


# compiling model
model.compile(optimizer='sgd', loss='categorical_crossentropy',
              metrics=['acc'])

# training the model for fixed number of iterations (epoches)
model.fit(X, y, epochs=200)

from tensorflow import lite
converter = lite.TFLiteConverter.from_keras_model(model)

tfmodel = converter.convert()

open('iris.tflite', 'wb').write(tfmodel)
Step 3:
在执行open(‘iris.tflite’,’wb’).write(tfmodel)这一行后,一个名为iris.tflite的新文件将在iris.data所在的同一目录中被创建。
A) 打开Android Studio。创建一个新的kotlin-android项目。(你可以参考这里来创建一个项目)。
B) 右键单击应用程序>新建>其他>TensorFlow Lite模型
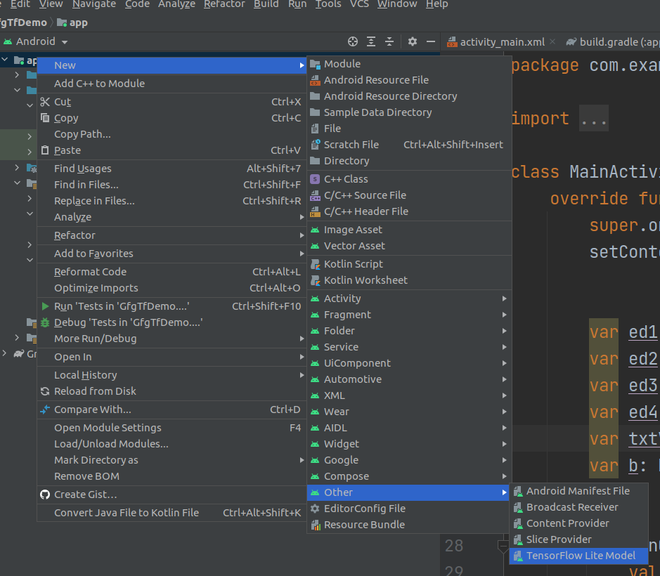
C)点击文件夹图标。
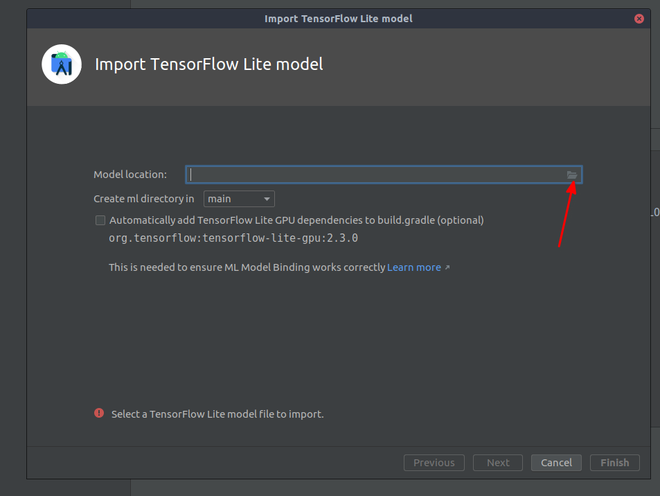
D)导航到iris.tflite文件
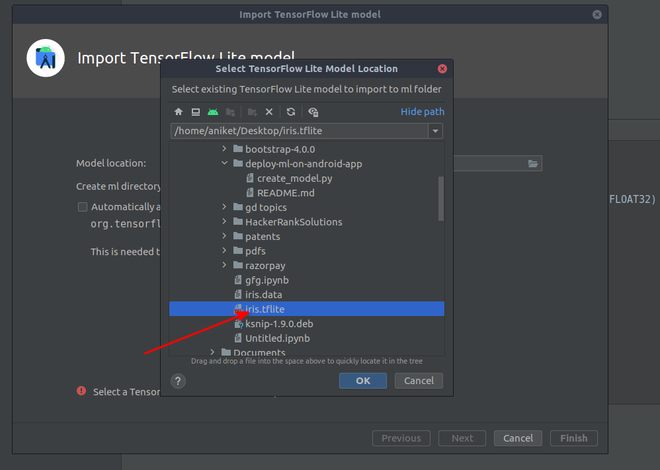
E) 单击 “确定
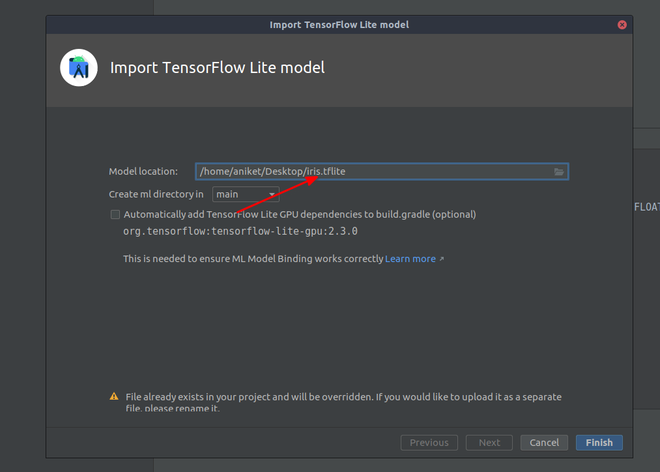
F)你的模型在点击完成后会是这样的。(它可能需要一些时间来加载)。
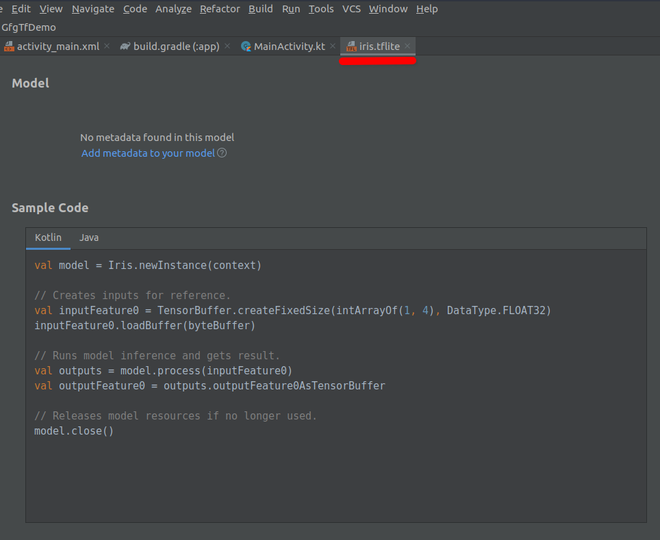
复制代码并把它粘贴到MainActivity.kt.的一个按钮的点击监听器中(如下所示)。
第5步:为预测创建XML布局。
导航到应用程序 > res > layout > activity_main.xml,并在该文件中添加以下代码。下面是 activity_main.xml 文件的代码。
<?xml version="1.0" encoding="utf-8"?>
<androidx.constraintlayout.widget.ConstraintLayout
    xmlns:android="http://schemas.android.com/apk/res/android"
    xmlns:app="http://schemas.android.com/apk/res-auto"
    xmlns:tools="http://schemas.android.com/tools"
    android:layout_width="match_parent"
    android:layout_height="match_parent"
    tools:context=".MainActivity">

    <ScrollView
        android:layout_width="match_parent"
        android:layout_height="match_parent"
        android:layout_marginBottom="50dp">

        <LinearLayout
            android:layout_width="match_parent"
            android:layout_height="match_parent"
            android:orientation="vertical">

            <!-- creating  edittexts for input-->
            <EditText
                android:id="@+id/tf1"
                android:layout_width="175dp"
                android:layout_height="wrap_content"
                android:layout_gravity="center"
                android:layout_marginTop="70dp"
                android:ems="10"
                android:inputType="numberDecimal" />

            <EditText
                android:id="@+id/tf2"
                android:layout_width="175dp"
                android:layout_height="wrap_content"
                android:layout_gravity="center"
                android:layout_marginTop="20dp"
                android:ems="10"
                android:inputType="numberDecimal" />

            <EditText
                android:id="@+id/tf3"
                android:layout_width="175dp"
                android:layout_height="wrap_content"
                android:layout_gravity="center"
                android:layout_marginTop="20dp"
                android:ems="10"
                android:inputType="numberDecimal" />

            <EditText
                android:id="@+id/tf4"
                android:layout_width="175dp"
                android:layout_height="wrap_content"
                android:layout_gravity="center"
                android:layout_marginTop="20dp"
                android:ems="10"
                android:inputType="numberDecimal" />

            <!-- creating  Button for input-->
            <!-- after clicking on button we will see prediction-->
            <Button
                android:id="@+id/button"
                android:layout_width="wrap_content"
                android:layout_height="wrap_content"
                android:layout_gravity="center"
                android:layout_marginTop="100dp"
                android:text="Button"
                app:layout_constraintBottom_toTopOf="@+id/textView"
                app:layout_constraintEnd_toEndOf="parent"
                app:layout_constraintHorizontal_bias="0.0"
                app:layout_constraintStart_toStartOf="parent" />

            <!-- creating  textview on which we will see prediction-->
            <TextView
                android:id="@+id/textView"
                android:layout_width="wrap_content"
                android:layout_height="wrap_content"
                android:layout_gravity="center"
                android:layout_marginTop="50dp"
                android:text="TextView"
                android:textSize="20dp"
                app:layout_constraintEnd_toEndOf="parent" />
        </LinearLayout>
    </ScrollView>
</androidx.constraintlayout.widget.ConstraintLayout>
第6步:使用 MainActivity.kt文件。
转到MainActivity.kt文件,参考以下代码。下面是MainActivity.kt文件的代码。为了更详细地了解代码,在代码内部添加了注释。
import androidx.appcompat.app.AppCompatActivity
import android.os.Bundle
import android.view.View
import android.widget.Button
import android.widget.EditText
import android.widget.TextView
import com.example.gfgtfdemo.ml.Iris
import org.tensorflow.lite.DataType
import org.tensorflow.lite.support.tensorbuffer.TensorBuffer
import java.nio.ByteBuffer

class MainActivity : AppCompatActivity() {
    override fun onCreate(savedInstanceState: Bundle?) {
        super.onCreate(savedInstanceState)
        setContentView(R.layout.activity_main)

        // getting the object edit texts
        var ed1: EditText = findViewById(R.id.tf1);
        var ed2: EditText = findViewById(R.id.tf2);
        var ed3: EditText = findViewById(R.id.tf3);
        var ed4: EditText = findViewById(R.id.tf4);

        // getting the object of result textview
        var txtView: TextView = findViewById(R.id.textView);
        var b: Button = findViewById<Button>(R.id.button);

        // registering listener
        b.setOnClickListener(View.OnClickListener {

            val model = Iris.newInstance(this)

            // getting values from edit text and converting to float
            var v1: Float = ed1.text.toString().toFloat();
            var v2: Float = ed2.text.toString().toFloat();
            var v3: Float = ed3.text.toString().toFloat();
            var v4: Float = ed4.text.toString().toFloat();

            /*************************ML MODEL CODE STARTS HERE******************/

              // creating byte buffer which will act as input for model
            var byte_buffer: ByteBuffer = ByteBuffer.allocateDirect(4 * 4)
            byte_buffer.putFloat(v1)
            byte_buffer.putFloat(v2)
            byte_buffer.putFloat(v3)
            byte_buffer.putFloat(v4)

            // Creates inputs for reference.
            val inputFeature0 = TensorBuffer.createFixedSize(intArrayOf(1, 4), DataType.FLOAT32)
            inputFeature0.loadBuffer(byte_buffer)

            // Runs model inference and gets result.
            val outputs = model.process(inputFeature0)
            val outputFeature0 = outputs.outputFeature0AsTensorBuffer.floatArray


            // setting the result to the output textview
            txtView.setText(
                "Iris-setosa : =" + outputFeature0[0].toString() + "\n" +
                "Iris-versicolor : =" + outputFeature0[1].toString() + "\n" +
                "Iris-virginica: =" +  outputFeature0[2].toString()
            )

            // Releases model resources if no longer used.
            model.close()
        })
    }
}
 极客教程
极客教程