在Python中使用TensorFlow进行脸部面具检测
在这篇文章中,我们将讨论我们的两阶段COVID-19面罩检测器,详细说明我们的计算机视觉/深度学习管道将如何实现。
我们将使用这个Python脚本来训练一个人脸面具检测器,并审查其结果。考虑到训练好的COVID-19人脸面具检测器,我们将继续实现另外两个Python脚本,用于。
- 检测图像中的COVID-19面罩
- 检测实时视频流中的面罩
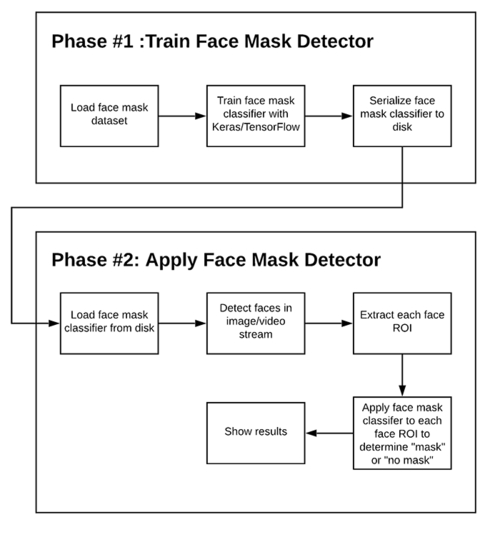
面罩检测系统的流程图

为了训练一个自定义的人脸面具检测器,我们需要将我们的项目分成两个不同的阶段,每个阶段都有各自的子步骤(如上图1所示)。
- 训练。在这里,我们将专注于从磁盘加载我们的人脸面具检测数据集,在这个数据集上训练一个模型(使用Keras/TensorFlow),然后将人脸面具检测器序列化到磁盘上。
- 部署。一旦脸部面具检测器被训练好,我们就可以继续加载面具检测器,进行脸部检测,然后将每张脸分类为有面具或无面具。

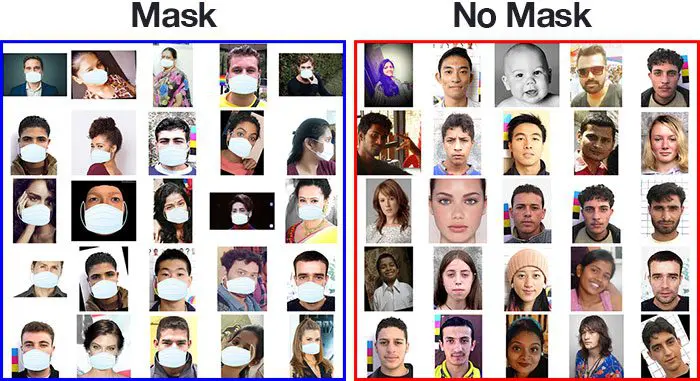
我们将使用这些图像,使用TensorFlow建立一个CNN模型,通过你的PC的网络摄像头来检测你是否戴了面罩。此外,你也可以使用你的手机摄像头来做同样的事情!
一步一步实现
第1步:数据可视化
第一步,让我们直观地看到我们的数据集中两个类别的图像总数。我们可以看到,”是 “类中有690张图片,”否 “类中有686张图片。
面罩上标有 “是 “字样的图片数量:690张
面罩被标记为 “不 “的图像数量:686张
第2步:数据扩增
在下一步,我们增加我们的数据集,以包括更多数量的图像用于我们的训练。在这一步的数据增强中,我们旋转和翻转数据集中的每一张图片。我们看到,在数据增强之后,我们总共有2751张图片,其中1380张图片属于 “是 “类,1371张图片属于 “否 “类。
Number of examples: 2751
Percentage of positive examples: 50.163576881134134%, number of pos examples: 1380
Percentage of negative examples: 49.836423118865866%, number of neg examples: 1371
第3步:拆分数据
在这一步,我们将数据分成训练集和测试集,前者包含CNN模型将被训练的图像,后者包含我们模型将被测试的图像。在这里,我们采用split_size=0.8,这意味着80%的图像将进入训练集,其余20%的图像将进入测试集。
The number of images with facemask in the training set labelled ‘yes’: 1104
The number of images with facemask in the test set labelled ‘yes’: 276
The number of images without facemask in the training set labelled ‘no’: 1096
The number of images without facemask in the test set labelled ‘no’: 275
分割后,我们看到,如上所述,所需比例的图像已被分配到训练集和测试集。
第4步:建立模型。
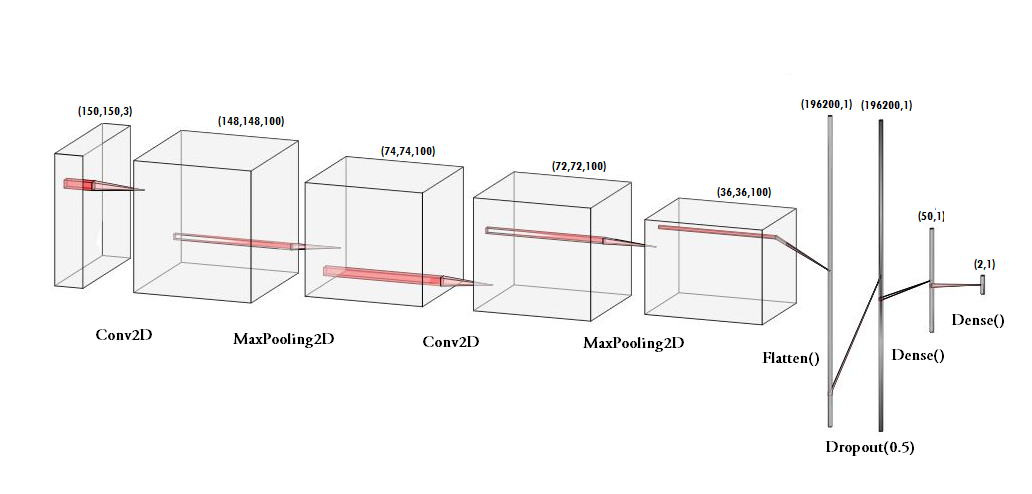
在下一步,我们用Conv2D、MaxPooling2D、Flatten、Dropout和Dense等不同层建立我们的序列CNN模型。在最后的密集层中,我们使用 “softmax “函数来输出一个向量,该向量给出了两类中每一类的概率。
model = tf.keras.models.Sequential([
    tf.keras.layers.Conv2D(100, (3, 3), activation='relu',
                           input_shape=(150, 150, 3)),
    tf.keras.layers.MaxPooling2D(2, 2),

    tf.keras.layers.Conv2D(100, (3, 3), activation='relu'),
    tf.keras.layers.MaxPooling2D(2, 2),

    tf.keras.layers.Flatten(),
    tf.keras.layers.Dropout(0.5),
    tf.keras.layers.Dense(50, activation='relu'),
    tf.keras.layers.Dense(2, activation='softmax')
])
model.compile(optimizer='adam', loss='binary_crossentropy', metrics=['acc'])
这里,我们使用’adam’优化器和’binary_crossentropy’作为我们的损失函数,因为只有两个类。此外,你甚至可以使用MobileNetV2来获得更好的准确性。

第5步:预训练CNN模型
在建立了我们的模型之后,让我们创建’train_generator’和’validation_generator’,以便在下一步将它们与我们的模型相适应。我们看到,训练集里共有2200张图片,测试集里有551张图片。
Found 2200 images belonging to 2 classes.
Found 551 images belonging to 2 classes.
第6步:训练CNN模型
这一步是主要步骤,我们将训练集和测试集中的图像与我们使用keras库建立的序列模型相匹配。我已经对模型进行了30个epochs(迭代)的训练。然而,我们可以训练更多的epochs以达到更高的精度,以免出现过度拟合。
history = model.fit_generator(train_generator,
epochs=30,
validation_data=validation_generator,
callbacks=[checkpoint])Epoch 30/30
220/220 [==============================] – 231s 1s/step – loss: 0.0368 – acc: 0.9886 – val_loss: 0.1072 – val_acc: 0.9619
我们看到,在第30个历时后,我们的模型在训练集上的准确率为98.86%,在测试集上的准确率为96.19%。这意味着该模型训练有素,没有任何过度拟合。
第7步:给信息贴标签
在建立模型之后,我们为我们的结果标注两个概率。[‘0’为’without_mask’,’1’为’with_mask’] 。我也在使用RGB值设置边界矩形的颜色。[‘RED’代表’without_mask’,’GREEN’代表’with_mask’] 。
labels_dict={0:’without_mask’,1:’with_mask’}
color_dict={0:(0,0,255),1:(0,255,0)}
第8步:导入面部检测程序
在这之后,我们打算用它来检测我们是否使用PC的网络摄像头佩戴了面罩。为此,首先,我们需要实现人脸检测。在这方面,我们使用基于Haar特征的级联分类器来检测面部特征。
face_clsfr=cv2.CascadeClassifier(‘haarcascade_frontalface_default.xml’)
这个级联分类器是由OpenCV设计的,通过训练数以千计的图像来检测正面的脸。这方面的.xml文件需要下载并用于检测人脸。我们已经将该文件上传到GitHub仓库。
第9步:检测有面具和无面具的面孔
在最后一步,我们使用OpenCV库来运行一个无限循环,以使用我们的网络摄像头,其中我们使用级联分类器检测人脸。代码webcam = cv2.VideoCapture(0) 表示使用webcam。
该模型将预测两个类别([without_mask, with_mask])中每个类别的可能性。基于较高的概率,标签将被选择并显示在我们的脸上。
main.py
# import the necessary packages
from tensorflow.keras.applications.mobilenet_v2 import preprocess_input
from tensorflow.keras.preprocessing.image import img_to_array
from tensorflow.keras.models import load_model
from imutils.video import VideoStream
import numpy as np
import imutils
import time
import cv2
import os


def detect_and_predict_mask(frame, faceNet, maskNet):

    # grab the dimensions of the frame and
    # then construct a blob from it
    (h, w) = frame.shape[:2]
    blob = cv2.dnn.blobFromImage(frame, 1.0, (224, 224),
                                 (104.0, 177.0, 123.0))

    # pass the blob through the network
    # and obtain the face detections
    faceNet.setInput(blob)
    detections = faceNet.forward()
    print(detections.shape)

    # initialize our list of faces, their
    # corresponding locations, and the list
    # of predictions from our face mask network
    faces = []
    locs = []
    preds = []

    # loop over the detections
    for i in range(0, detections.shape[2]):

        # extract the confidence (i.e.,
        # probability) associated with
        # the detection
        confidence = detections[0, 0, i, 2]

        # filter out weak detections by
        # ensuring the confidence is
        # greater than the minimum confidence
        if confidence > 0.5:

            # compute the (x, y)-coordinates
            # of the bounding box for
            # the object
            box = detections[0, 0, i, 3:7] * np.array([w, h, w, h])
            (startX, startY, endX, endY) = box.astype("int")

            # ensure the bounding boxes fall
            # within the dimensions of
            # the frame
            (startX, startY) = (max(0, startX), max(0, startY))
            (endX, endY) = (min(w - 1, endX), min(h - 1, endY))

            # extract the face ROI, convert it
            # from BGR to RGB channel
            # ordering, resize it to 224x224,
            # and preprocess it
            face = frame[startY:endY, startX:endX]
            face = cv2.cvtColor(face, cv2.COLOR_BGR2RGB)
            face = cv2.resize(face, (224, 224))
            face = img_to_array(face)
            face = preprocess_input(face)

            # add the face and bounding boxes
            # to their respective lists
            faces.append(face)
            locs.append((startX, startY, endX, endY))

    # only make a predictions if at least one
    # face was detected
    if len(faces) > 0:

        # for faster inference we'll make
        # batch predictions on *all*
        # faces at the same time rather
        # than one-by-one predictions
        # in the above `for` loop
        faces = np.array(faces, dtype="float32")
        preds = maskNet.predict(faces, batch_size=32)

    # return a 2-tuple of the face locations
    # and their corresponding locations
    return (locs, preds)


# load our serialized face detector model from disk
prototxtPath = r"face_detector\deploy.prototxt"
weightsPath = r"face_detector\res10_300x300_ssd_iter_140000.caffemodel"
faceNet = cv2.dnn.readNet(prototxtPath, weightsPath)

# load the face mask detector model from disk
maskNet = load_model("mask_detector.model")

# initialize the video stream
print("[INFO] starting video stream...")
vs = VideoStream(src=0).start()

# loop over the frames from the video stream
while True:
    # grab the frame from the threaded
    # video stream and resize it
    # to have a maximum width of 400 pixels
    frame = vs.read()
    frame = imutils.resize(frame, width=400)

    # detect faces in the frame and
    # determine if they are wearing a
    # face mask or not
    (locs, preds) = detect_and_predict_mask(frame, faceNet, maskNet)

    # loop over the detected face
    # locations and their corresponding
    # locations
    for (box, pred) in zip(locs, preds):

        # unpack the bounding box and predictions
        (startX, startY, endX, endY) = box
        (mask, withoutMask) = pred

        # determine the class label and
        # color we'll use to draw
        # the bounding box and text
        label = "Mask" if mask > withoutMask else "No Mask"
        color = (0, 255, 0) if label == "Mask" else (0, 0, 255)

        # include the probability in the label
        label = "{}: {:.2f}%".format(label, max(mask, withoutMask) * 100)

        # display the label and bounding box
        # rectangle on the output frame
        cv2.putText(frame, label, (startX, startY - 10),
                    cv2.FONT_HERSHEY_SIMPLEX, 0.45, color, 2)
        cv2.rectangle(frame, (startX, startY), (endX, endY), color, 2)

    # show the output frame
    cv2.imshow("Frame", frame)
    key = cv2.waitKey(1) & 0xFF

    # if the `q` key was pressed, break from the loop
    if key == ord("q"):
        break

# do a bit of cleanup
cv2.destroyAllWindows()
vs.stop()
输出:

 极客教程
极客教程