PyTorch 序列处理与卷积
在本章中,我们提出了一种替代方法,该方法依赖于一个2D卷积神经网络在两个序列之间。我们网络的每一层基于到目前为止产生的输出序列重新编码源标记。因此,注意力类似的属性在整个网络中普遍存在。
在这里,我们将专注于使用数据集中包含的值创建具有特定池化的序列网络。该过程在“图像识别模块”中也适用。

创建使用PyTorch的卷积序列处理模型的步骤如下:
第1步
导入使用卷积进行序列处理的必要模块。
import keras
from keras.datasets import mnist
from keras.models import Sequential
from keras.layers import Dense, Dropout, Flatten
from keras.layers import Conv2D, MaxPooling2D
import numpy as np
第2步
使用下面的代码执行必要的操作,以相应的顺序创建一个模式。
batch_size = 128
num_classes = 10
epochs = 12
# input image dimensions
img_rows, img_cols = 28, 28
# the data, split between train and test sets
(x_train, y_train), (x_test, y_test) = mnist.load_data()
x_train = x_train.reshape(60000,28,28,1)
x_test = x_test.reshape(10000,28,28,1)
print('x_train shape:', x_train.shape)
print(x_train.shape[0], 'train samples')
print(x_test.shape[0], 'test samples')
y_train = keras.utils.to_categorical(y_train, num_classes)
y_test = keras.utils.to_categorical(y_test, num_classes)
第3步
编译模型并按照下面显示的传统神经网络模型中的模式进行拟合 –
model.compile(loss =
keras.losses.categorical_crossentropy,
optimizer = keras.optimizers.Adadelta(), metrics =
['accuracy'])
model.fit(x_train, y_train,
batch_size = batch_size, epochs = epochs,
verbose = 1, validation_data = (x_test, y_test))
score = model.evaluate(x_test, y_test, verbose = 0)
print('Test loss:', score[0])
print('Test accuracy:', score[1])
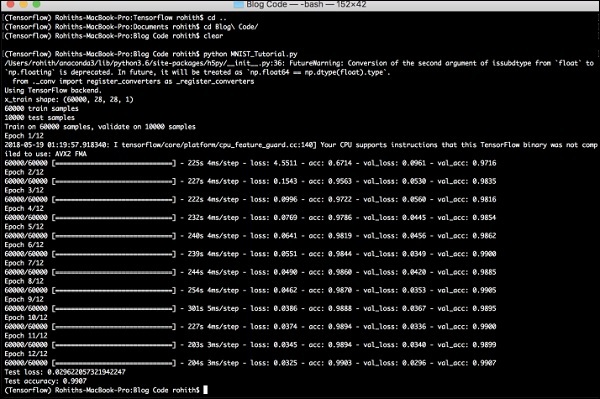
生成的输出如下所示−

PyTorch 教程目录
- PyTorch 简介
- PyTorch 安装
- PyTorch 神经网络的数学基本构建模块
- PyTorch 神经网络基础
- PyTorch 机器学习的通用工作流程
- PyTorch 机器学习 vs. 深度学习
- PyTorch 实现第一个神经网络
- PyTorch 神经网络到功能块
- PyTorch 术语
- PyTorch 加载数据
- PyTorch 线性回归
- PyTorch 卷积神经网络
- PyTorch 循环神经网络
- PyTorch 数据集
- PyTorch 卷积神经网络介绍
- PyTorch 从头训练一个卷积神经网络
- PyTorch 卷积神经网络中的特征提取
- PyTorch 卷积神经网络的可视化
- PyTorch 序列处理与卷积
- PyTorch 词嵌入
- PyTorch 递归神经网络
 极客教程
极客教程