React MUI 理解 MUI 包
MUI 是“Material-UI”的缩写,是一款流行的基于 React 的 UI 库,提供了一套具有广泛规格的 React 组件。MUI 包提供了一系列实现 Material Design 指南的组件。这些组件包括按钮、表单和导航元素等 UI 元素,旨在实现与 Google 的 Material Design 相同的外观和感觉。MUI 提供了一种简单的方式,让开发人员在其 Web 应用程序中轻松添加一致且现代的设计,并提供了一系列强大的功能和自定义选项。
理解 MUI 包:
- 概述: 它指的是对包或组件的摘要或一般描述。它提供了对包或组件的功能、特性以及如何在应用程序中使用的高级视图。例如 @mui/material,@mui/base 等。
- MUI 包: MUI 包是组成 MUI 库的组件和样式集合。它提供了一系列遵循 Material Design 原则的 React 组件,使开发人员能够轻松创建美观、响应式和可访问的用户界面。
- 组件库: 组件库是一组可以在项目中轻松重用的预构建 UI 组件。在 MUI 的上下文中,组件库指的是作为 MUI 框架的一部分提供的一组 React 组件。
- 样式: 它指的是定义库中组件的视觉外观的过程。MUI 提供了一组可以应用于其组件的 CSS 类,以控制它们的外观,如颜色、排版、间距等。
创建一个 React 应用程序:
步骤1: 通过在任何命令行中编写下面的代码来创建一个 React 应用程序。
npx create-react-app app_name
步骤2: 然后,我们要进入我们要工作的文件夹。
cd project_name
步骤3: 我们将安装 @mui/material 库来进行项目开发。
npm install @mui/material @emotion/react @emotion/styled
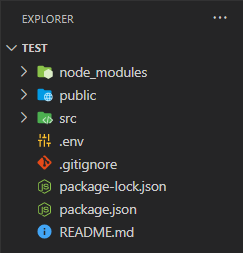
项目结构: 在创建了React应用并安装了所有依赖项之后,文件夹结构将类似于下面给出的示意图。

运行应用的步骤: 在终端中输入以下代码以运行服务器:
npm start
示例1: 下面是使用“unstyled”按钮组件和“styled”CSS的代码。
- App.js
import { styled } from '@mui/material/styles';
import ButtonUnstyled, { buttonUnstyledClasses }
    from "@mui/base/ButtonUnstyled";
import { red, grey } from '@mui/material/colors';

const Root = styled(ButtonUnstyled)(({ theme }) => `
  font-weight: bold;
  font-size: 20px;
  background-color: white;
  padding: 10px 20px;
  border-radius: 8px;
  color: {red[500]};
  cursor: pointer;
  border: 1px solid red;
  margin: 20px;

  &:hover {
    background-color:{red[600]};
    color: white;
  }

  &.{buttonUnstyledClasses.active} {
    background-color:{red[700]};
  }

  &.{buttonUnstyledClasses.focusVisible} {
    box-shadow: 0 4px 20px 0 rgba(61, 71, 82, 0.1),
    0 0 0 5px rgba(0, 127, 255, 0.5);
    outline: none;
  }

  &.{buttonUnstyledClasses.disabled} {
    opacity: 0.5;
    background-color: ${grey[600]};
    color: black;
    border: 1px solid grey;
    cursor: initial;
  }
  `,
);


const CustomButton = () => {
    const label = { slotProps: { input: { 'aria-label': 'button' } } };

    return (
        <div>
            <div>
                <ButtonUnstyled component={Root} {...label}>
                    Unstyled Button with Styling</ButtonUnstyled>
                <ButtonUnstyled>Unstyled Button</ButtonUnstyled>
            </div>
            <div>
                <ButtonUnstyled component={Root} {...label}
                    disabled>Unstyled Disabled Button with Styling
                </ButtonUnstyled>
                <ButtonUnstyled disabled>
                    Unstyled Disabled Button
                </ButtonUnstyled>
            </div>
        </div>
    )
}

export default CustomButton;
输出:

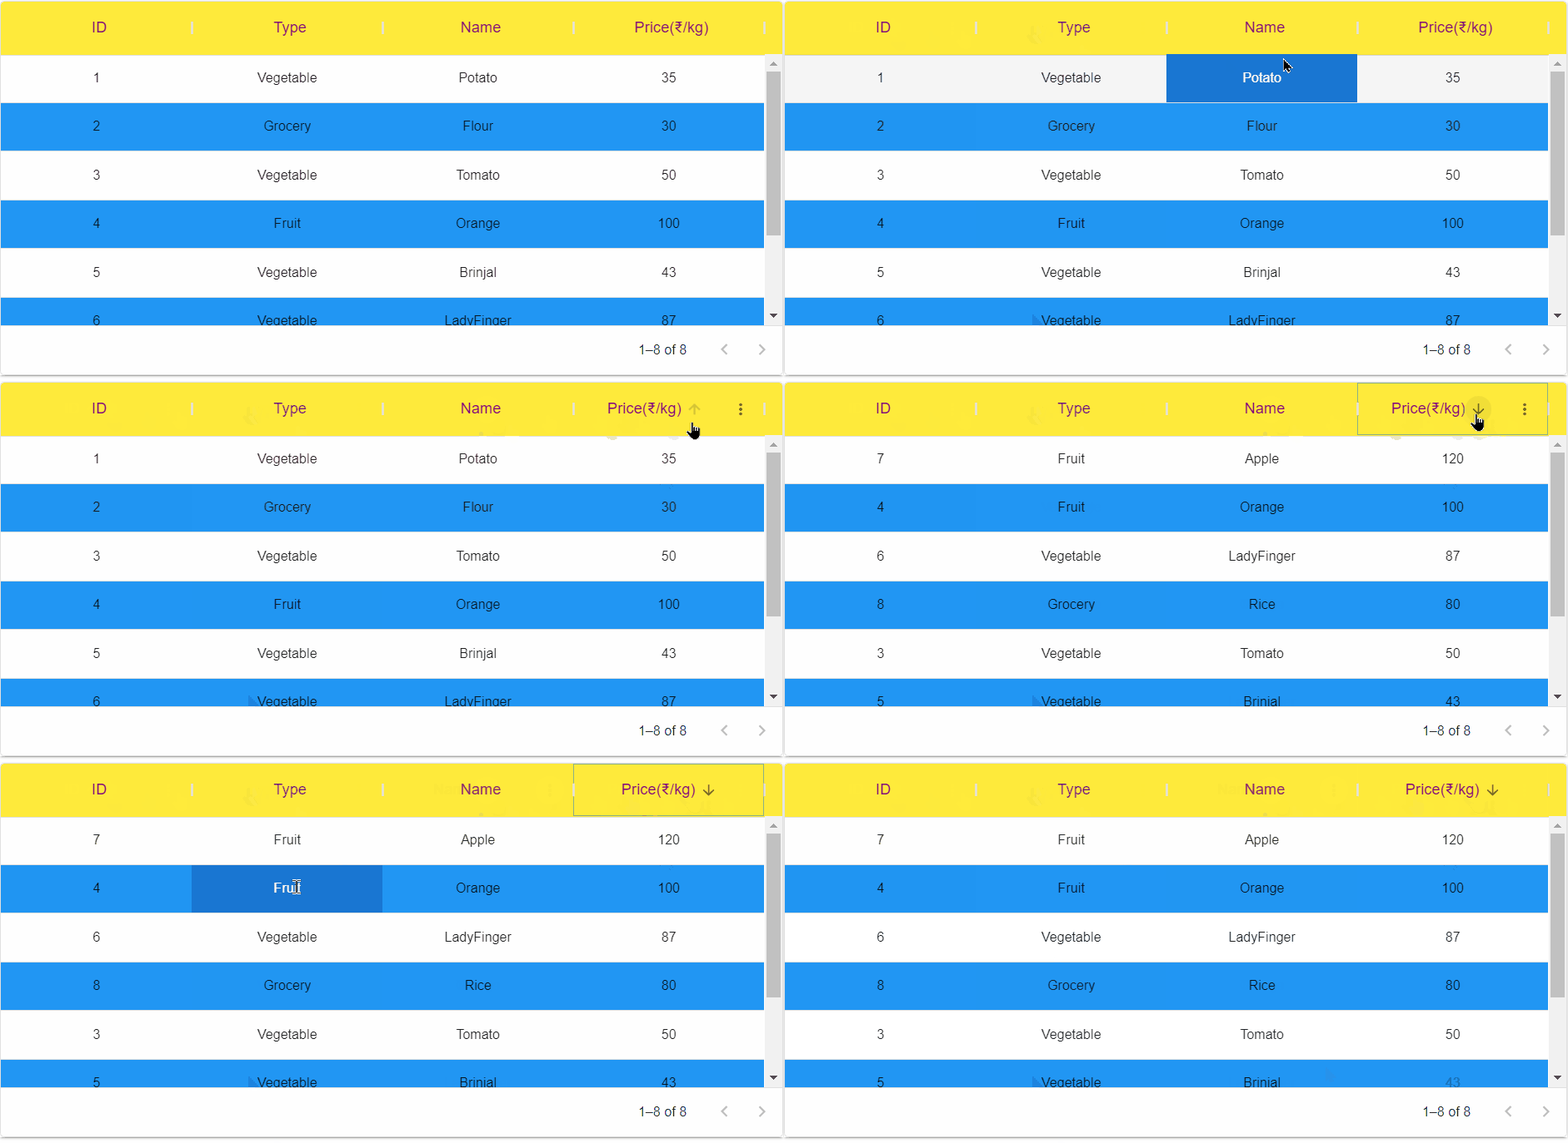
示例2: 下面的代码使用自定义CSS和高级组件(如数据表格)。
- App.js
import * as React from 'react';
import Box from '@mui/material/Box';
import { DataGrid } from '@mui/x-data-grid';
import { yellow, blue } from '@mui/material/colors';

const columns = [
    {
        field: 'id', headerName: 'ID', minWidth: 100, align: 'center',
        headerAlign: 'center', flex: 1
    },
    {
        field: 'type',
        headerName: 'Type',
        editable: true,
        minWidth: 150,
        align: 'center',
        headerAlign: 'center',
        flex: 1
    },
    {
        field: 'name',
        headerName: 'Name',
        editable: true,
        minWidth: 150,
        align: 'center',
        headerAlign: 'center',
        flex: 1
    },
    {
        field: 'price',
        headerName: 'Price(₹/kg)',
        type: 'number',
        editable: true,
        minWidth: 150,
        align: 'center',
        headerAlign: 'center',
        flex: 1
    },
];

const rows = [
    { id: 1, type: 'Vegetable', name: 'Potato', price: 35 },
    { id: 2, type: 'Grocery', name: 'Flour', price: 30 },
    { id: 3, type: 'Vegetable', name: 'Tomato', price: 50 },
    { id: 4, type: 'Fruit', name: 'Orange', price: 100 },
    { id: 5, type: 'Vegetable', name: 'Brinjal', price: 43 },
    { id: 6, type: 'Vegetable', name: 'LadyFinger', price: 87 },
    { id: 7, type: 'Fruit', name: 'Apple', price: 120 },
    { id: 8, type: 'Grocery', name: 'Rice', price: 80 },
];

const DataGridDemo = () => {
    return (
        <Box sx={{ height: 400, width: '98%',
            boxShadow: 2, margin: '10px' }}>
            <DataGrid
                rows={rows}
                columns={columns}
                pageSize={10}
                rowsPerPageOptions={[5]}
                disableSelectionOnClick
                sx={{
                    '& .MuiDataGrid-cell:hover': {
                        color: 'white',
                        backgroundColor: blue[700]
                    },
                    "& .MuiDataGrid-columnHeaders": {
                        backgroundColor: yellow[500],
                        fontSize: 16,
                        color: 'purple'
                    },
                    "& .MuiDataGrid-virtualScrollerRenderZone": {
                        "& .MuiDataGrid-row": {
                            "&:nth-child(2n)":
                                { backgroundColor: blue[500] }
                        }
                    }
                }}
            />
        </Box>
    );
}

export default DataGridDemo;
输出:

参考: https://mui.com/material-ui/guides/understand-mui-packages/
 极客教程
极客教程