React-Native 创建一个图像转文本的应用
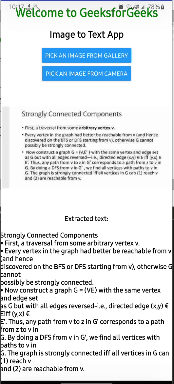
在本文中,我们将逐步构建一个 使用React-Native的图像转文本应用。 这个应用程序将允许用户使用OCR(光学字符识别)从图像中提取文本,并将其复制到剪贴板或与他人分享。这个应用程序是React Native作为应用程序开发的完美框架的完美应用。该应用程序将允许用户从画廊中选择图像,或者使用应用程序中实现的相机拍摄照片。然后,图像将显示出来,并显示提取的文本的文本组件。
预览图像

前提条件
- React Native介绍
- React Native组件介绍
- React Native状态
- React Native属性
- Expo CLI
- Node.js和npm (Node Package Manager)
项目设置
步骤 1: 创建项目
npx create-expo-app image-to-text-app
步骤2: 转到项目
cd image-to-text-app
步骤3: 安装expo-location软件包。
npx expo install expo-image-picker
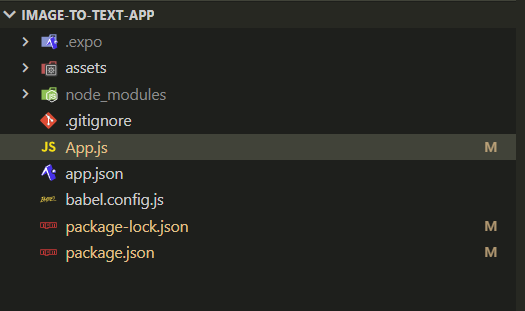
项目结构

这是 package.json 文件中的依赖项和相应的版本。
{
    "name": "image-to-text-app",
    "version": "1.0.0",
    "main": "node_modules/expo/AppEntry.js",
    "scripts": {
        "start": "expo start",
        "android": "expo start --android",
        "ios": "expo start --ios",
        "web": "expo start --web"
    },
    "dependencies": {
        "expo": "~49.0.11",
        "expo-status-bar": "~1.6.0",
        "react": "18.2.0",
        "react-native": "0.72.4",
        "expo-image-picker": "~14.3.2"
    },
    "devDependencies": {
        "@babel/core": "^7.20.0"
    },
    "private": true
}
方法
- 在本应用中,我们使用一个图像转文本的API。创建一个免费账户并获取API密钥。
- 接下来,我们使用 expo-image-picker 从相册中选择图像并发送文件进行OCR处理。
- performOCR 函数以文件作为参数,执行 fetch POST 操作,将文本保存到一个变量中。
- 图像和文本被显示出来。
示例: 这个示例演示了上述解释的方法的使用。
// App.js file

import { StatusBar } from "expo-status-bar";
import { useState } from "react";
import {
    Button,
    StyleSheet,
    Text,
    Image,
    SafeAreaView,
} from "react-native";
import * as ImagePicker from "expo-image-picker";

export default function App() {

    // State to hold the selected image
    const [image, setImage] = useState(null);

    // State to hold extracted text
    const [extractedText, setExtractedText] =
        useState("");

    // Function to pick an image from the
    // device's gallery
    const pickImageGallery = async () => {
        let result =
            await ImagePicker.launchImageLibraryAsync({
                mediaTypes:
                    ImagePicker.MediaTypeOptions.Images,
                allowsEditing: true,
                base64: true,
                allowsMultipleSelection: false,
            });
        if (!result.canceled) {

            // Perform OCR on the selected image
            performOCR(result.assets[0]);

            // Set the selected image in state
            setImage(result.assets[0].uri);
        }
    };

    // Function to capture an image using the
    // device's camera
    const pickImageCamera = async () => {
        let result = await ImagePicker.launchCameraAsync({
            mediaTypes: ImagePicker.MediaTypeOptions.Images,
            allowsEditing: true,
            base64: true,
            allowsMultipleSelection: false,
        });
        if (!result.canceled) {

               // Perform OCR on the captured image
            // Set the captured image in state
            performOCR(result.assets[0]);
            setImage(result.assets[0].uri);
        }
    };

    // Function to perform OCR on an image
    // and extract text
    const performOCR = (file) => {
        let myHeaders = new Headers();
        myHeaders.append(
            "apikey",

            // ADDD YOUR API KEY HERE
            "FEmvQr5uj99ZUvk3essuYb6P5lLLBS20"
        );
        myHeaders.append(
            "Content-Type",
            "multipart/form-data"
        );

        let raw = file;
        let requestOptions = {
            method: "POST",
            redirect: "follow",
            headers: myHeaders,
            body: raw,
        };

        // Send a POST request to the OCR API
        fetch(
            "https://api.apilayer.com/image_to_text/upload",
            requestOptions
        )
            .then((response) => response.json())
            .then((result) => {

                // Set the extracted text in state
                setExtractedText(result["all_text"]);
            })
            .catch((error) => console.log("error", error));
    };

    return (
        <SafeAreaView style={styles.container}>
            <Text style={styles.heading}>
                Welcome to GeeksforGeeks
            </Text>
            <Text style={styles.heading2}>
                Image to Text App
            </Text>
            <Button
                title="Pick an image from gallery"
                onPress={pickImageGallery}
            />
            <Button
                title="Pick an image from camera"
                onPress={pickImageCamera}
            />
            {image && (
                <Image
                    source={{ uri: image }}
                    style={{
                        width: 400,
                        height: 300,
                        objectFit: "contain",
                    }}
                />
            )}

            <Text style={styles.text1}>
                Extracted text:
            </Text>
            <Text style={styles.text1}>
                {extractedText}
            </Text>
            <StatusBar style="auto" />
        </SafeAreaView>
    );
}

const styles = StyleSheet.create({
    container: {
        display: "flex",
        alignContent: "center",
        alignItems: "center",
        justifyContent: "space-evenly",
        backgroundColor: "#fff",
        height: "100%",
    },
    heading: {
        fontSize: 28,
        fontWeight: "bold",
        marginBottom: 10,
        color: "green",
        textAlign: "center",
    },
    heading2: {
        fontSize: 22,
        fontWeight: "bold",
        marginBottom: 10,
        color: "black",
        textAlign: "center",
    },
    text1: {
        fontSize: 16,
        marginBottom: 10,
        color: "black",
        fontWeight: "bold",
    },
});
步骤4: 运行应用程序
npx expo start
步骤4(可选): 在Web上运行,您需要安装以下软件包:
npx expo install react-dom react-native-web @expo/webpack-config
步骤5: 在 Web 上运行,按下终端上的 w 键,应用程序正在运行。对于 Android / IOS,安装 Expo 应用并扫描 QR 码或在终端中输入 Metro 的链接。
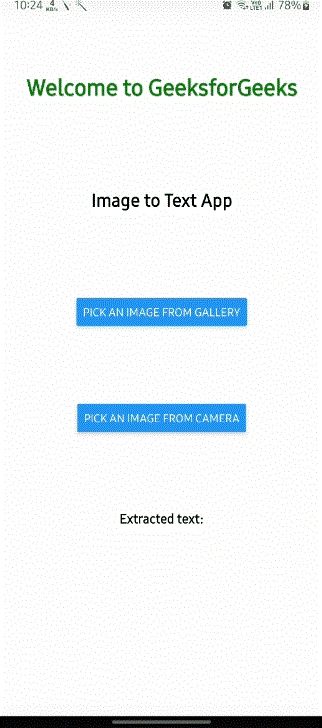
输出:

 极客教程
极客教程