React Native 如何使用Z-Index
CSS属性z-Index允许我们控制网页中元素的堆叠顺序。在React Native中,这个概念的工作方式类似,在其中z-Index属性允许指定元素在屏幕上的显示顺序。通过将更高的值赋给元素的z-index,具有更高z-index值的元素将显示在具有较低值的元素的上面。在本文中,我们将看到在React Native中Z-index属性的工作原理。
语法
<Component style={{ zIndex: value }} />
在这里, Component 是您要应用zIndex的组件, value 是表示堆叠顺序的整数。
先决条件
- React Native简介
- React Native组件
- Expo CLI
- Node.js和npm
创建React Native应用的步骤
步骤1:使用以下命令创建一个React Native应用
npx create-expo-app <Project-Name>
步骤2:在创建项目文件夹(例如zindexApp)后,使用以下命令进行导航:
cd <Project-Name>
项目结构
项目结构将会如下所示:

目录
- 使用内联样式
- 使用外部CSS
方法1:使用内联样式
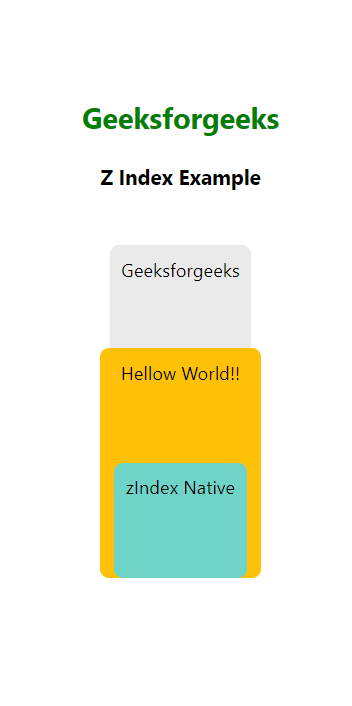
在这种方法中,应用程序展示了一个标题(“Geeksforgeeks”),一个描述目的的段落(“Z Index Example”)和三个样式化的卡片。每张卡片都有自己独特的背景颜色和文本内容。为了控制这些卡片的堆叠顺序,应用了z-Index属性,将最低值分配给第一张卡片,并将其逐渐增加到第三张卡片的最高值。
示例: 假设在此代码中,如果我们将z-Index值更改为5,则卡片一(其背景色为白色)将覆盖卡片二和卡片三。
import React from "react";
import { View, Text, StyleSheet } from "react-native";

export default function App() {
    return (
        <View style={styles.container}>
            <Text style={styles.heading}>
                Geeksforgeeks
            </Text>
            <Text style={styles.paragraph}>
                Z Index Example
            </Text>
            <View style={styles.card}>
                <Text style={styles.cardText}>
                    Geeksforgeeks
                </Text>
            </View>
            <View style={styles.card2}>
                <Text style={styles.cardText}>
                    Hellow World!!
                </Text>
            </View>
            <View style={styles.card3}>
                <Text style={styles.cardText}>
                    zIndex Native
                </Text>
            </View>
        </View>
    );
}

const styles = StyleSheet.create({
    container: {
        flex: 1,
        justifyContent: "center",
        alignItems: "center",
    },
    heading: {
        fontSize: 25,
        color: "green",
        fontWeight: "bold",
        textAlign: "center",
    },
    paragraph: {
        margin: 24,
        fontSize: 18,
        fontWeight: "bold",
        textAlign: "center",
    },
    card: {
        backgroundColor: "#EAEAEA",
        margin: 24,
        marginBottom: 0,
        height: 240,
        borderRadius: 8,
        zIndex: 1, // zIndex applied here
    },
    card2: {
        backgroundColor: "#FFC107",
        margin: 24,
        marginBottom: 0,
        height: 200,
        width: 140,
        marginTop: -150,
        borderRadius: 8,
        zIndex: 2, // zIndex applied here
    },
    card3: {
        backgroundColor: "#6ED4C8",
        margin: 24,
        marginBottom: 12,
        height: 100,
        marginTop: -100,
        borderRadius: 8,
        zIndex: 3, // zIndex applied here
    },
    cardText: {
        fontSize: 16,
        padding: 10,
        textAlign: "center",
    },
});
步骤3:要运行React Native应用程序,请打开命令提示符或终端,并输入以下命令。
npx expo start
- 在Android上运行:
npx react-native run-android
- 在iOS上运行:
npx react-native run-ios
输出:

方法2:使用外部CSS
“z-index属性”标题通过利用其较高的zIndex值(1),显示在图片之上,而图片以较低的zIndex值(-1)定位在标题之下。
示例: 这个示例展示了上述解释的方法的使用。
import React from "react";
import { View, Text, Image,StyleSheet} from "react-native";

function App() {
    return (
        <View style={styles.container}>
            <Text style={styles.heading}>
                The z-index Property
            </Text>
            <Image
                source={{
                    uri:
"https://media.geeksforgeeks.org/wp-content/uploads/20230816223829/geeksgforgeeks-logo-1.png",
                }}
                style={styles.img}
            />
        </View>
    );
}

const styles = StyleSheet.create({
    container: {
        flex: 1,
        justifyContent: "center",
        alignItems: "center",
        position: "absolute",
        margin: 40,
    },
    heading: {
        zIndex: 1, // The heading will be shown on the top of the image
        padding: 10,
        borderRadius: 5,
        fontSize: 20,
        margin: 0,
        color: "crimson",
        fontWeight: "bold",
    },
    img: {
        position: "absolute",
        left: 0,
        top: 0,
        // The image will be shown on the
        // bottom of the heading
        zIndex: -1,
        width: 200,
        height: 200,
        borderRadius: 10,
    },
});

export default App;
输出:

 极客教程
极客教程