R语言 绘制不同颜色的点和线的图例
在这篇文章中,我们将看到如何在基础R编程语言中绘制不同颜色的点和线。
创建一个数据集进行演示。
A <- matrix( c( c(0,1,2,3,5), c(1,3,4,2,4)), ncol=2 )
B <- matrix( c( c(3,1,2,3,4), c(4,2,1,1,2)), ncol=2 )
C <- matrix( c( c(1,1,2,4,5), c(4,4,0,1,2)), ncol=2 )
data <- data.frame(A,B)
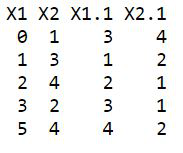
data
输出
让我们看看在上面的代码中,’A’,’B’,’C’是一个矩阵的名称,其中c()内的向量输入由数值组成。它还包含行的数量,即和’ncol’为2。
在图形上用不同的颜色绘制直线和点
创建完矩阵后,现在我们将绘制线和点。
语法:
plot(x, y, type = “l”, lty = 1)
lines(x, y, type = “l”, lty = 1)
参数
- x, y:要连接的点的坐标向量
- type:表示绘图类型的字符。允许的值是:”p “表示点
- lty:线条类型。线条类型可以指定为一个整数(0=空白,1=实线(默认),2=虚线,3=点线,4=点线,5=长线,6=双线),或者指定为一个字符串 “空白”、”实线”、”虚线”、”点线”、”长线 “或 “双线”,其中 “空白 “使用 “隐形线”(即,不画线)。
# Plotting the lines and points
# here type b means we are plotting
# both points and line
plot( 0, type = "b", xlim = c(0,5),
     ylim = c(0,5) )

# defining the line column and colour
lines( A, col = "red" )

# defining the point column and colour
# here pch means the type of symbol
# we can choose from 1 to 25
points( A, col = "yellow", pch = 16 )
lines( C, col = "green" )
points( C, col = "pink", pch = 15 )
lines( B, col = "blue" )
points( B, col = "violet", pch = 17 )
输出

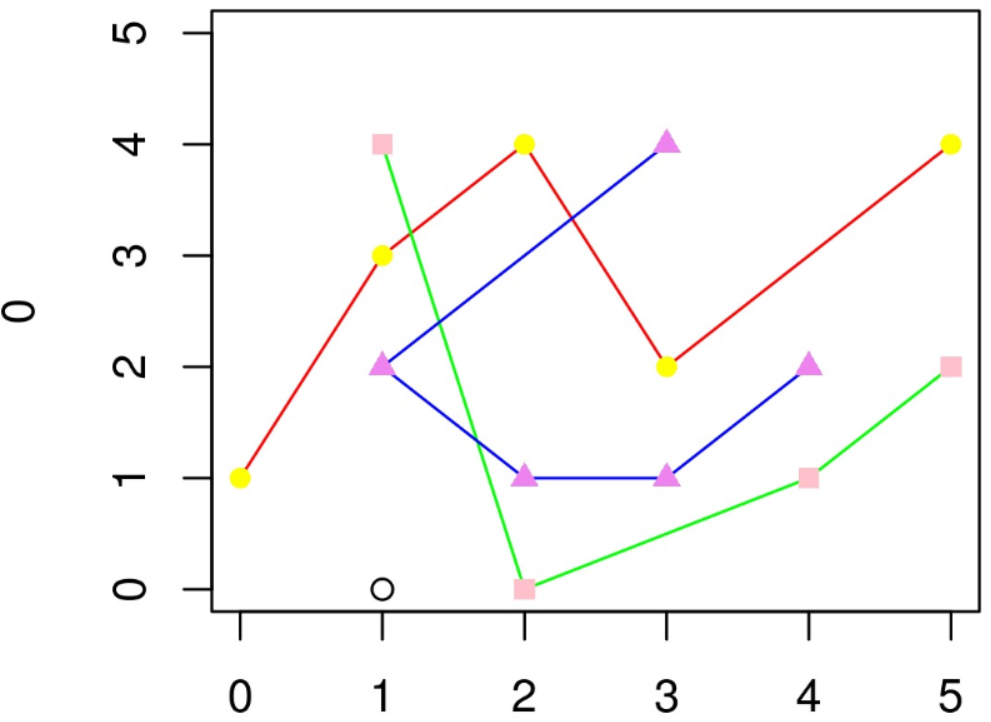
在上面这个图中,我们有线条和点的绘制。没有说明哪条线代表什么,为了做到这一点,我们将使用图例函数给他们相同的标签。
添加图例
在给图谱添加图例时,主要是通过修改图例的位置来实现的。 你可以将参数x设置为 “top”、”topleft”、”topright”、”bottom”、”bottomleft”、”bottomright”、”left”、”right “或 “center”,在这种情况下你不需要设置参数y。
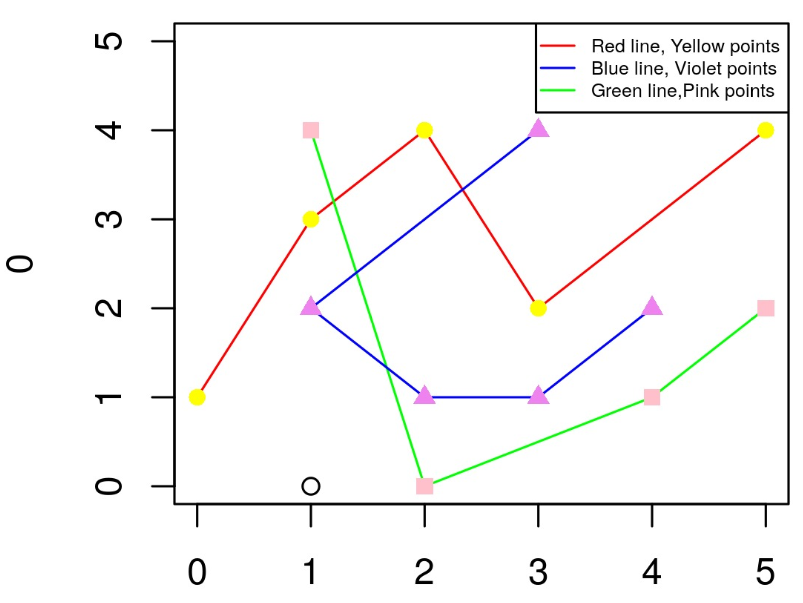
在下面的代码中,在绘制图形后,我们现在添加一个图例,pch=c(NA, NA),这意味着图例部分没有显示’pch’,即点数符号,我们可以根据用户的选择从1到25变化。
A <- matrix( c( c(0,1,2,3,5), c(1,3,4,2,4)), ncol=2 )
B <- matrix( c( c(3,1,2,3,4), c(4,2,1,1,2)), ncol=2 )
C <- matrix( c( c(1,1,2,4,5), c(4,4,0,1,2)), ncol=2 )
data <- data.frame(A,B)

plot( 0, type = "b", xlim = c(0,5),
     ylim = c(0,5) )
lines( A, col = "red" )
points( A, col = "yellow",
       pch = 16 )
lines( C, col = "green" )
points( C, col = "pink", pch = 15 )
lines( B, col = "blue" )
points( B, col = "violet", pch = 17 )

legend( x = "topright",
        legend = c("Red line, Yellow points","Blue line,
                  iolet points","Green line,Pink points"),
        col = c("red","blue","green"), lwd=1, lty=c(1,1,1),
        pch=c(NA,NA), cex = 0.5 )
输出

通过重叠将点符号添加到图例中
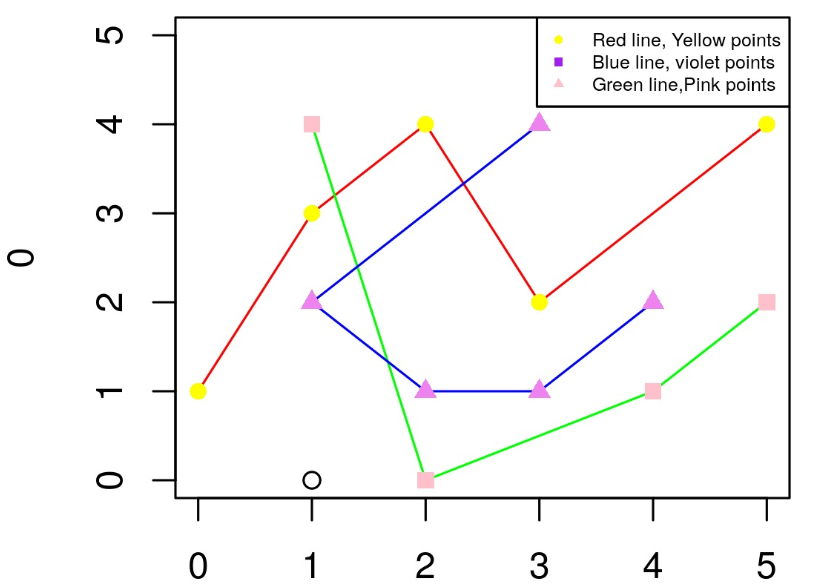
现在,我们将只是重叠图例,符号,正如我们之前观察到的,线条,是可见的图例线,而不是点符号。
因此,我们要做的是,将数值分配给 “pch”,我们可以根据用户的选择从1到25变化,每个数字代表一个点的形状,即pch=1,这是一个空的圆,pch=19(实心圆),pch=21(填充圆),等等。
# data
A <- matrix( c( c(0,1,2,3,5), c(1,3,4,2,4)), ncol=2 )
B <- matrix( c( c(3,1,2,3,4), c(4,2,1,1,2)), ncol=2 )
C <- matrix( c( c(1,1,2,4,5), c(4,4,0,1,2)), ncol=2 )
data <- data.frame(A,B)

# plot
plot( 0, type = "b", xlim=c(0,5), ylim=c(0,5) )
lines( A, col = "red" )
points( A, col = "yellow", pch=16 )
lines( C, col = "green" )
points( C, col = "pink", pch=15 )
lines( B, col = "blue" )
points( B, col = "violet", pch=17 )

# legend
legend( x="topright",
        legend=c("Red line, Yellow points","Blue line,
                iolet points","Green line,Pink points"),
        col=c("red","blue","green"), lwd=1, lty=c(1,1,1),
        pch=c(NA,NA),cex=0.5 )

legend( x="topright",
        legend=c("Red line, Yellow points","Blue line,
                violet points","Green line,Pink points"),
        col=c("yellow","purple","pink"), lwd=1, lty=c(0,0,0),
        pch=c(16,15,17),cex=0.5 )
输出

.
 极客教程
极客教程