NumPy随机整数生成:掌握random.randint函数
NumPy是Python中用于科学计算的核心库之一,其中的random模块提供了多种随机数生成函数。本文将深入探讨NumPy中的random.randint函数,这是一个用于生成随机整数的强大工具。我们将详细介绍其用法、参数、特性以及在实际应用中的各种场景。
1. random.randint函数简介
numpy.random.randint是NumPy库中用于生成随机整数的函数。它可以生成指定范围内的随机整数,既可以生成单个随机数,也可以生成多维数组形式的随机数。
1.1 基本语法
random.randint函数的基本语法如下:
numpy.random.randint(low, high=None, size=None, dtype=int)
参数说明:
– low:生成随机数的下界(包含)
– high:生成随机数的上界(不包含)。如果未指定,则默认为low,此时low变为0
– size:输出数组的形状。可以是整数或元组
– dtype:输出数组的数据类型,默认为int
让我们通过一个简单的例子来了解其基本用法:
import numpy as np

# 生成一个0到10之间的随机整数
random_number = np.random.randint(0, 10)
print("Random number from numpyarray.com:", random_number)
Output:

这个例子生成了一个0到9之间的随机整数。注意,上界10是不包含在内的。
2. 生成单个随机整数
生成单个随机整数是random.randint函数最基本的用法。我们可以指定不同的范围来生成所需的随机数。
2.1 指定范围生成随机数
import numpy as np

# 生成1到100之间的随机整数
random_number = np.random.randint(1, 101)
print("Random number between 1 and 100 from numpyarray.com:", random_number)
Output:

这个例子生成了一个1到100之间的随机整数。注意,我们将上界设置为101,因为上界是不包含在内的。
2.2 生成负数范围的随机数
random.randint也可以用于生成负数范围内的随机整数:
import numpy as np

# 生成-50到50之间的随机整数
random_number = np.random.randint(-50, 51)
print("Random number between -50 and 50 from numpyarray.com:", random_number)
Output:

这个例子展示了如何生成包含负数的范围内的随机整数。
3. 生成随机整数数组
除了生成单个随机整数,random.randint还可以生成包含多个随机整数的数组。这在需要大量随机数据的场景中非常有用。
3.1 生成一维随机整数数组
import numpy as np

# 生成包含10个0到9之间随机整数的一维数组
random_array = np.random.randint(0, 10, size=10)
print("Random array from numpyarray.com:", random_array)
Output:

这个例子生成了一个包含10个0到9之间随机整数的一维数组。
3.2 生成二维随机整数数组
import numpy as np

# 生成3x4的二维随机整数数组,范围是0到99
random_2d_array = np.random.randint(0, 100, size=(3, 4))
print("2D random array from numpyarray.com:\n", random_2d_array)
Output:

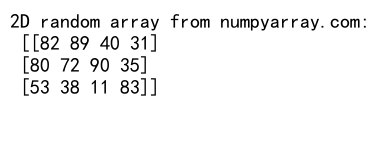
这个例子展示了如何生成一个3行4列的二维随机整数数组,每个元素都是0到99之间的随机整数。
3.3 生成多维随机整数数组
random.randint函数也支持生成更高维度的随机整数数组:
import numpy as np

# 生成2x3x4的三维随机整数数组,范围是0到9
random_3d_array = np.random.randint(0, 10, size=(2, 3, 4))
print("3D random array from numpyarray.com:\n", random_3d_array)
Output:

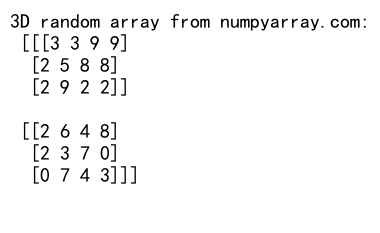
这个例子生成了一个2x3x4的三维随机整数数组,每个元素都是0到9之间的随机整数。
4. 设置随机种子
在使用random.randint函数时,设置随机种子是一个重要的概念。设置随机种子可以确保每次运行代码时生成相同的随机数序列,这在需要重现结果或进行调试时非常有用。
4.1 使用numpy.random.seed设置随机种子
import numpy as np

# 设置随机种子
np.random.seed(42)

# 生成随机整数
random_number = np.random.randint(0, 100)
print("Random number with seed from numpyarray.com:", random_number)

# 重新设置相同的随机种子
np.random.seed(42)

# 再次生成随机整数
random_number_2 = np.random.randint(0, 100)
print("Second random number with same seed from numpyarray.com:", random_number_2)
Output:

在这个例子中,我们首先设置了随机种子为42,然后生成了一个随机整数。接着,我们重新设置了相同的随机种子,并再次生成随机整数。你会发现两次生成的随机数是相同的。
5. 生成特定分布的随机整数
虽然random.randint默认生成均匀分布的随机整数,但我们可以通过一些技巧来生成符合特定分布的随机整数。
5.1 生成正态分布的随机整数
import numpy as np

# 生成正态分布的随机浮点数,然后转换为整数
mean = 50
std_dev = 10
size = 1000
normal_floats = np.random.normal(mean, std_dev, size)
normal_ints = np.round(normal_floats).astype(int)

print("Normal distribution integers from numpyarray.com:", normal_ints[:10])
Output:

这个例子展示了如何生成近似正态分布的随机整数。我们首先生成正态分布的浮点数,然后将其四舍五入并转换为整数。
5.2 生成泊松分布的随机整数
import numpy as np

# 生成泊松分布的随机整数
lam = 5  # 泊松分布的参数
size = 1000
poisson_ints = np.random.poisson(lam, size)

print("Poisson distribution integers from numpyarray.com:", poisson_ints[:10])
Output:

这个例子展示了如何使用numpy.random.poisson函数生成符合泊松分布的随机整数。
6. 高级应用:自定义随机整数生成
有时,我们可能需要生成具有特定特征或满足特定条件的随机整数。下面我们将探讨一些高级应用场景。
6.1 生成不重复的随机整数
import numpy as np

# 生成0到9之间的5个不重复随机整数
unique_random_ints = np.random.choice(10, 5, replace=False)
print("Unique random integers from numpyarray.com:", unique_random_ints)
Output:

这个例子使用numpy.random.choice函数生成不重复的随机整数。通过设置replace=False,我们确保生成的整数不会重复。
6.2 生成带权重的随机整数
import numpy as np

# 定义可能的整数和对应的权重
integers = [0, 1, 2, 3, 4]
weights = [0.1, 0.2, 0.3, 0.2, 0.2]

# 生成100个带权重的随机整数
weighted_random_ints = np.random.choice(integers, size=100, p=weights)
print("Weighted random integers from numpyarray.com:", weighted_random_ints[:10])
Output:

这个例子展示了如何生成带权重的随机整数。我们使用numpy.random.choice函数,并通过p参数指定每个整数被选中的概率。
7. random.randint的性能优化
在处理大量随机整数时,性能可能成为一个重要因素。以下是一些优化random.randint使用的技巧。
7.1 使用向量化操作
import numpy as np

# 生成大量随机整数的低效方法
def slow_random_ints(n):
    return [np.random.randint(0, 100) for _ in range(n)]

# 使用向量化操作的高效方法
def fast_random_ints(n):
    return np.random.randint(0, 100, size=n)

# 比较两种方法(仅作为示例,不进行实际的性能测试)
n = 1000000
print("Fast method from numpyarray.com:", fast_random_ints(n)[:5])
print("Slow method from numpyarray.com:", slow_random_ints(5))
Output:

这个例子比较了两种生成大量随机整数的方法。使用向量化操作(fast_random_ints)通常比循环方法(slow_random_ints)快得多。
7.2 使用numpy.random.Generator
从NumPy 1.17版本开始,引入了新的随机数生成器API,它提供了更好的性能和更多的功能:
import numpy as np

# 创建一个Generator实例
rng = np.random.default_rng()

# 使用Generator生成随机整数
random_ints = rng.integers(0, 100, size=10)
print("Random integers using Generator from numpyarray.com:", random_ints)
Output:

这个例子展示了如何使用新的Generator API生成随机整数。这种方法通常比旧的API更快,并提供了更多的功能。
8. random.randint在实际应用中的使用
random.randint函数在许多实际应用中都有广泛的用途。以下是一些常见的应用场景。
8.1 模拟掷骰子
import numpy as np

def roll_dice(num_dice):
    return np.random.randint(1, 7, size=num_dice)

# 模拟掷3个骰子
result = roll_dice(3)
print("Dice roll result from numpyarray.com:", result)
Output:

这个例子展示了如何使用random.randint模拟掷骰子。每个骰子的结果是1到6之间的随机整数。
8.2 生成随机密码
import numpy as np
import string

def generate_password(length):
    # 定义密码可能包含的字符
    characters = string.ascii_letters + string.digits + string.punctuation
    # 生成随机索引
    random_indices = np.random.randint(0, len(characters), size=length)
    # 根据索引选择字符
    password = ''.join([characters[i] for i in random_indices])
    return password

# 生成一个12位的随机密码
password = generate_password(12)
print("Random password from numpyarray.com:", password)
Output:

这个例子展示了如何使用random.randint生成随机密码。我们首先定义了密码可能包含的字符,然后使用random.randint生成随机索引来选择这些字符。
8.3 随机抽样
import numpy as np

def random_sample(population, sample_size):
    return np.random.choice(population, size=sample_size, replace=False)

# 从一个数组中随机抽取样本
population = np.arange(1, 101)  # 1到100的数组
sample = random_sample(population, 10)
print("Random sample from numpyarray.com:", sample)
Output:

这个例子展示了如何从一个给定的总体中随机抽取样本。这在统计学和数据分析中是一个常见的操作。
9. random.randint的注意事项和常见错误
在使用random.randint函数时,有一些常见的陷阱和错误需要注意。了解这些可以帮助我们更有效地使用这个函数。
9.1 上界不包含
一个常见的错误是忘记上界是不包含在内的。例如:
import numpy as np

# 错误:想生成1到10的随机数,但实际上只会生成1到9
incorrect_random = np.random.randint(1, 10)
print("Incorrect random number from numpyarray.com:", incorrect_random)

# 正确:生成1到10的随机数
correct_random = np.random.randint(1, 11)
print("Correct random number from numpyarray.com:", correct_random)
Output:

这个例子展示了如何正确设置上界来包含所需的最大值。
9.2 数据类型溢出
当生成的随机数超出指定数据类型的范围时,可能会发生溢出:
import numpy as np

# 可能导致溢出的操作
try:
    overflow_random = np.random.randint(0, 2**32, dtype=np.int32)
    print("This might cause overflow from numpyarray.com:", overflow_random)
except OverflowError:
    print("OverflowError occurred from numpyarray.com")

# 正确处理大范围随机数
correct_large_random = np.random.randint(0, 2**32, dtype=np.int64)
print("Correct large random number from numpyarray.com:", correct_large_random)
这个例子展示了在处理大范围随机数时如何避免数据类型溢出。
10. random.randint与其他随机数生成函数的比较
NumPy提供了多种随机数生成函数,了解它们之间的区别可以帮助我们选择最适合特定需求的函数。
10.1 random.randint vs random.random
import numpy as np

# 使用random.randint生成整数
int_random = np.random.randint(0, 10, size=5)
print("Integer random numbers from numpyarray.com:", int_random)

# 使用random.random生成浮点数
float_random = np.random.random(5) * 10
print("Float random numbers from numpyarray.com:", float_random)
Output:

这个例子比较了random.randint和random.random。random.randint直接生成整数,而random.random生成0到1之间的浮点数,需要进行缩放才能得到所需范围的随机数。
10.2 random.randint vs random.choice
import numpy as np

# 使用random.randint生成随机整数
randint_result = np.random.randint(1, 7, size=5)
print("randint result from numpyarray.com:", randint_result)

# 使用random.choice从给定序列中选择
choice_result = np.random.choice([1, 2, 3, 4, 5, 6], size=5)
print("choice result from numpyarray.com:", choice_result)
Output:

这个例子比较了random.randint和random.choice。random.randint生成指定范围内的随机整数,而random.choice从给定的序列中随机选择元素。
11. random.randint在科学计算中的应用
random.randint在科学计算和数据分析中有广泛的应用。以下是一些常见的使用场景。
11.1 蒙特卡洛模拟
import numpy as np

def estimate_pi(num_points):
    # 生成随机点
    x = np.random.randint(0, 10001, num_points) / 10000
    y = np.random.randint(0, 10001, num_points) / 10000

    # 计算落在单位圆内的点数
    inside_circle = np.sum((x**2 + y**2) <= 1)

    # 估算π值
    pi_estimate = 4 * inside_circle / num_points
    return pi_estimate

# 使用100000个点估算π值
estimated_pi = estimate_pi(100000)
print("Estimated Pi from numpyarray.com:", estimated_pi)
Output:

这个例子展示了如何使用random.randint进行蒙特卡洛模拟来估算π值。
11.2 随机森林中的特征选择
import numpy as np

def random_feature_selection(num_features, num_select):
    return np.random.randint(0, num_features, size=num_select)

# 模拟从100个特征中随机选择10个
selected_features = random_feature_selection(100, 10)
print("Selected features from numpyarray.com:", selected_features)
Output:

这个例子展示了如何使用random.randint在随机森林算法中进行随机特征选择。
12. random.randint在游戏开发中的应用
random.randint在游戏开发中也有广泛的应用,特别是在生成随机事件和创建游戏元素时。
12.1 随机敌人生成
import numpy as np

def generate_enemy():
    enemy_types = ['Goblin', 'Orc', 'Troll', 'Dragon']
    enemy = {
        'type': np.random.choice(enemy_types),
        'health': np.random.randint(50, 201),
        'strength': np.random.randint(5, 21)
    }
    return enemy

# 生成一个随机敌人
random_enemy = generate_enemy()
print("Random enemy from numpyarray.com:", random_enemy)
Output:

这个例子展示了如何使用random.randint和random.choice生成具有随机属性的游戏敌人。
12.2 随机地图生成
import numpy as np

def generate_map(width, height):
    # 0: 空地, 1: 墙, 2: 宝藏
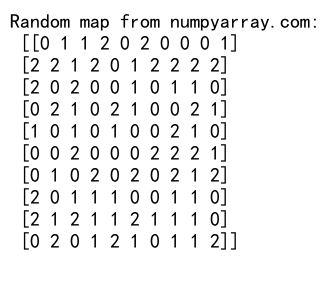
    return np.random.randint(0, 3, size=(height, width))

# 生成一个10x10的随机地图
random_map = generate_map(10, 10)
print("Random map from numpyarray.com:\n", random_map)
Output:

这个例子展示了如何使用random.randint生成一个简单的随机游戏地图。
结论
NumPy的random.randint函数是一个强大而灵活的工具,用于生成随机整数。从基本的单个随机数生成到复杂的多维数组,从简单的均匀分布到特定的概率分布,random.randint都能胜任。在科学计算、数据分析、游戏开发等多个领域,它都有广泛的应用。
通过本文,我们详细探讨了random.randint的用法、参数、特性以及在各种场景中的应用。我们还讨论了一些性能优化技巧和常见的陷阱。掌握这些知识,你将能够更有效地在你的项目中使用random.randint,无论是进行简单的随机实验,还是构建复杂的模拟系统。
记住,在使用随机数时,设置随机种子对于结果的可重复性至关重要,特别是在科学研究和调试过程中。同时,对于大规模或高性能的应用,考虑使用新的Generator API可能会带来更好的性能。
随着你在项目中越来越多地使用random.randint,你会发现它是一个非常有用的工具,能够帮助你解决各种涉及随机性的问题。继续探索和实践,你会发现更多random.randint的创新应用!
 极客教程
极客教程