NumPy中的concatenate和indices函数:数组连接与索引生成的强大工具
NumPy是Python中用于科学计算的核心库,它提供了大量用于处理多维数组的强大工具。在这篇文章中,我们将深入探讨NumPy中的两个重要函数:concatenate和indices。这两个函数分别用于数组的连接和索引生成,它们在数据处理和科学计算中扮演着关键角色。我们将通过详细的解释和丰富的示例来展示这些函数的用法和应用场景。
1. NumPy中的concatenate函数
numpy.concatenate函数是NumPy库中用于连接数组的核心函数之一。它允许我们沿着指定的轴将两个或多个数组连接在一起,形成一个新的数组。这个函数在数据处理、特征工程和模型构建等多个领域都有广泛的应用。
1.1 基本用法
让我们从一个简单的例子开始,了解concatenate函数的基本用法:
import numpy as np

# 创建两个一维数组
arr1 = np.array([1, 2, 3])
arr2 = np.array([4, 5, 6])

# 使用concatenate函数连接这两个数组
result = np.concatenate((arr1, arr2))

print("numpyarray.com - Concatenated array:", result)
Output:

在这个例子中,我们创建了两个一维数组arr1和arr2,然后使用concatenate函数将它们连接在一起。由于我们没有指定轴,默认情况下,函数会沿着第一个轴(axis=0)进行连接。
1.2 指定轴进行连接
concatenate函数允许我们指定沿着哪个轴进行连接。这在处理多维数组时特别有用:
import numpy as np

# 创建两个二维数组
arr1 = np.array([[1, 2], [3, 4]])
arr2 = np.array([[5, 6], [7, 8]])

# 沿着第0轴(行)连接
result_axis0 = np.concatenate((arr1, arr2), axis=0)

# 沿着第1轴(列)连接
result_axis1 = np.concatenate((arr1, arr2), axis=1)

print("numpyarray.com - Concatenated along axis 0:\n", result_axis0)
print("numpyarray.com - Concatenated along axis 1:\n", result_axis1)
Output:
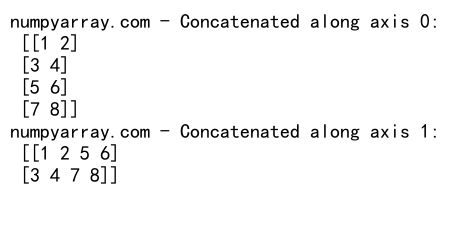
在这个例子中,我们创建了两个2×2的二维数组,然后分别沿着第0轴(行)和第1轴(列)进行连接。这展示了concatenate函数在处理多维数组时的灵活性。
1.3 连接多个数组
concatenate函数不仅可以连接两个数组,还可以同时连接多个数组:
import numpy as np

# 创建三个一维数组
arr1 = np.array([1, 2, 3])
arr2 = np.array([4, 5, 6])
arr3 = np.array([7, 8, 9])

# 连接三个数组
result = np.concatenate((arr1, arr2, arr3))

print("numpyarray.com - Concatenated multiple arrays:", result)
Output:

这个例子展示了如何使用concatenate函数同时连接三个或更多的数组。这在处理大量小数组时特别有用。
1.4 处理不同维度的数组
当连接不同维度的数组时,我们需要确保在连接轴上的维度匹配:
import numpy as np

# 创建一个二维数组和一个一维数组
arr1 = np.array([[1, 2], [3, 4]])
arr2 = np.array([5, 6])

# 将一维数组重塑为二维数组,然后连接
arr2_reshaped = arr2.reshape(1, -1)
result = np.concatenate((arr1, arr2_reshaped), axis=0)

print("numpyarray.com - Concatenated arrays with different dimensions:\n", result)
Output:

在这个例子中,我们首先将一维数组arr2重塑为二维数组,使其与arr1在连接轴上的维度匹配,然后进行连接。这展示了如何处理不同维度的数组。
1.5 使用concatenate进行数据增强
concatenate函数在数据增强中也有重要应用。例如,我们可以使用它来创建镜像图像数据:
import numpy as np

# 假设我们有一个表示图像的3D数组
image = np.array([[[1, 2], [3, 4]], [[5, 6], [7, 8]]])

# 创建镜像图像
mirrored_image = np.flip(image, axis=1)

# 连接原始图像和镜像图像
augmented_image = np.concatenate((image, mirrored_image), axis=1)

print("numpyarray.com - Augmented image:\n", augmented_image)
Output:
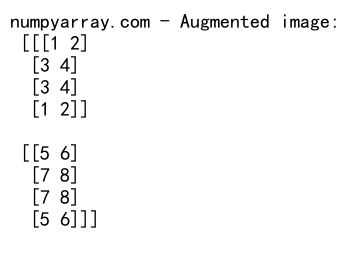
这个例子展示了如何使用concatenate函数来创建一个增强的图像数据集,包含原始图像和其镜像版本。
2. NumPy中的indices函数
numpy.indices函数是另一个强大的工具,用于生成表示多维数组索引的数组。这个函数在图像处理、网格计算和坐标变换等领域有广泛的应用。
2.1 基本用法
让我们从一个简单的例子开始,了解indices函数的基本用法:
import numpy as np

# 生成2x3的网格索引
indices = np.indices((2, 3))

print("numpyarray.com - Grid indices:\n", indices)
Output:
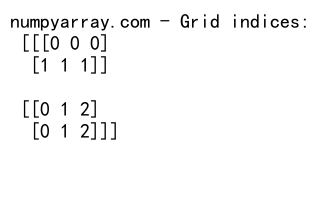
在这个例子中,indices函数生成了一个表示2×3网格索引的数组。结果是一个3D数组,其中第一个维度表示坐标轴(行和列),后两个维度表示网格的形状。
2.2 使用indices生成坐标网格
indices函数常用于生成坐标网格,这在许多科学计算和图像处理任务中非常有用:
import numpy as np

# 生成5x5的坐标网格
x, y = np.indices((5, 5))

print("numpyarray.com - X coordinates:\n", x)
print("numpyarray.com - Y coordinates:\n", y)
Output:
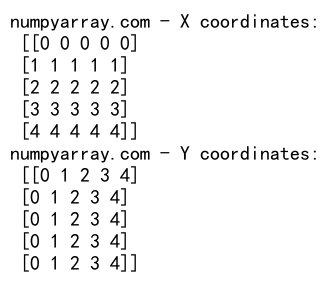
这个例子展示了如何使用indices函数生成一个5×5的坐标网格。结果包含两个2D数组,分别表示x坐标和y坐标。
2.3 在图像处理中使用indices
indices函数在图像处理中有广泛的应用,例如创建径向渐变:
import numpy as np

# 创建一个100x100的径向渐变
x, y = np.indices((100, 100))
r = np.sqrt((x - 50)**2 + (y - 50)**2)
gradient = 1 - r / np.max(r)

print("numpyarray.com - Radial gradient shape:", gradient.shape)
Output:

这个例子展示了如何使用indices函数创建一个径向渐变图像。我们首先生成坐标网格,然后计算每个点到中心的距离,最后创建渐变效果。
2.4 多维indices
indices函数不仅限于二维网格,它可以生成任意维度的索引数组:
import numpy as np

# 生成3D网格索引
indices_3d = np.indices((3, 4, 5))

print("numpyarray.com - 3D grid indices shape:", indices_3d.shape)
print("numpyarray.com - First dimension (depth):\n", indices_3d[0])
Output:
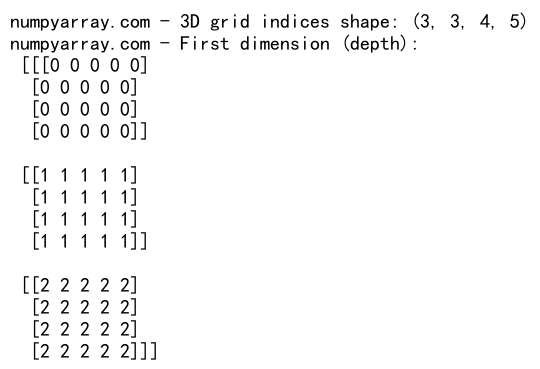
这个例子展示了如何使用indices函数生成三维网格索引。结果是一个4D数组,其中第一个维度表示三个坐标轴(深度、行和列),后三个维度表示3D网格的形状。
2.5 使用indices进行坐标变换
indices函数在坐标变换中也非常有用,例如在极坐标和笛卡尔坐标之间进行转换:
import numpy as np

# 创建极坐标网格
r, theta = np.indices((10, 36))
r = r / 9.0  # 归一化半径
theta = theta * 10 * np.pi / 180  # 将角度转换为弧度

# 转换为笛卡尔坐标
x = r * np.cos(theta)
y = r * np.sin(theta)

print("numpyarray.com - Cartesian coordinates (x):\n", x)
print("numpyarray.com - Cartesian coordinates (y):\n", y)
Output:

这个例子展示了如何使用indices函数创建极坐标网格,然后将其转换为笛卡尔坐标。这在处理极坐标系统或创建圆形图案时非常有用。
3. 结合使用concatenate和indices
concatenate和indices函数可以结合使用,以创建更复杂的数据结构和进行高级数据处理。
3.1 创建复合网格
我们可以使用indices生成多个网格,然后用concatenate将它们组合:
import numpy as np

# 创建两个不同大小的网格
grid1 = np.indices((3, 3))
grid2 = np.indices((2, 2))

# 调整grid2的形状以匹配grid1
grid2_reshaped = np.zeros((2, 3, 3))
grid2_reshaped[:, :2, :2] = grid2

# 连接两个网格
combined_grid = np.concatenate((grid1, grid2_reshaped), axis=0)

print("numpyarray.com - Combined grid shape:", combined_grid.shape)
print("numpyarray.com - Combined grid:\n", combined_grid)
Output:
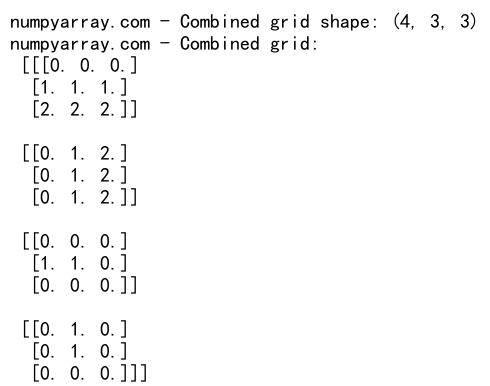
这个例子展示了如何创建两个不同大小的网格,然后将它们组合成一个更大的复合网格。
3.2 创建滑动窗口索引
结合使用indices和concatenate可以创建滑动窗口索引,这在图像处理和信号分析中非常有用:
import numpy as np

# 创建一个长度为10的一维数组
arr = np.arange(10)

# 创建滑动窗口索引
window_size = 3
indices = np.arange(len(arr) - window_size + 1)[:, None] + np.arange(window_size)

# 使用这些索引创建滑动窗口
windows = arr[indices]

print("numpyarray.com - Sliding windows:\n", windows)
Output:
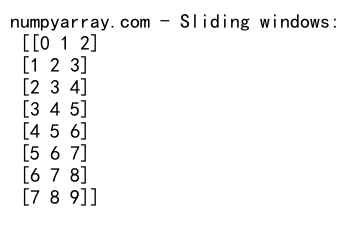
这个例子展示了如何使用indices和concatenate的思想创建滑动窗口索引,然后用这些索引从原始数组中提取滑动窗口。
3.3 创建网格采样点
我们可以使用indices和concatenate来创建网格采样点,这在插值和数值积分中很有用:
import numpy as np

# 创建2D网格
x, y = np.indices((5, 5))

# 将x和y坐标连接成一个数组
grid_points = np.concatenate((x.reshape(-1, 1), y.reshape(-1, 1)), axis=1)

print("numpyarray.com - Grid sampling points:\n", grid_points)
Output:
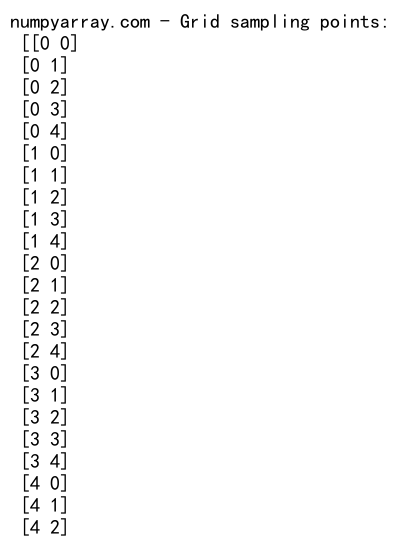
这个例子展示了如何使用indices创建2D网格,然后使用concatenate将x和y坐标组合成一个表示采样点的数组。
3.4 创建多维特征矩阵
在机器学习中,我们经常需要创建包含多个特征的矩阵。indices和concatenate可以帮助我们实现这一点:
import numpy as np

# 创建基础特征
x, y = np.indices((10, 10))

# 创建派生特征
z = np.sqrt(x**2 + y**2)

# 将所有特征连接成一个特征矩阵
features = np.concatenate((x.reshape(-1, 1), y.reshape(-1, 1), z.reshape(-1, 1)), axis=1)

print("numpyarray.com - Feature matrix shape:", features.shape)
print("numpyarray.com - First few rows of the feature matrix:\n", features[:5])
Output:
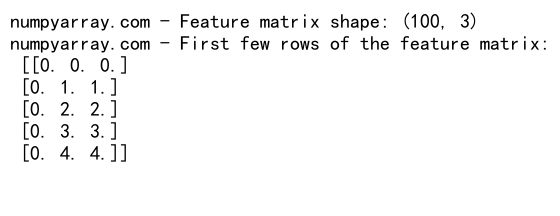
这个例子展示了如何使用indices创建基础特征,然后创建派生特征,最后使用concatenate将所有特征组合成一个特征矩阵。
3.5 创建图像块
在图像处理中,我们经常需要将图像分割成小块进行处理。indices和concatenate可以帮助我们实现这一点:
import numpy as np

# 创建一个模拟的4x4图像
image = np.arange(16).reshape(4, 4)

# 创建2x2的图像块索引
block_shape = (2, 2)
i, j = np.indices(block_shape)

# 创建所有可能的块起始位置
starts = np.array([(x, y) for x in range(0, image.shape[0] - block_shape[0] + 1)
                          for y in range(0, image.shape[1] - block_shape[1] + 1)])

# 创建块索引
block_indices = starts[:, None, None, :] + np.array([i, j]).transpose(1, 2, 0)

# 使用这些索引提取图像块
image_blocks = image[block_indices[:, :, :, 0], block_indices[:, :, :, 1]]

print("numpyarray.com - Image blocks shape:", image_blocks.shape)
print("numpyarray.com - First image block:\n", image_blocks[0])
Output:
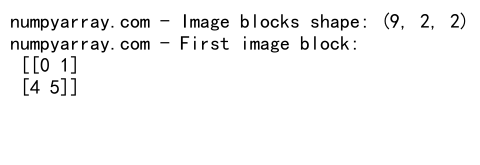
这个例子展示了如何使用indices和concatenate的思想来创建图像块索引,然后使用这些索引从原始图像中提取小块。这种技术在图像处理、计算机视觉和深度学习中经常使用。
4. 高级应用
现在我们已经深入了解了concatenate和indices函数的基本用法,让我们探索一些更高级的应用场景。
4.1 创建复杂的数据增强管道
在机器学习中,数据增强是一种常用的技术,用于增加训练数据的多样性。我们可以结合使用concatenate和indices来创建复杂的数据增强管道:
import numpy as np

# 创建一个模拟的3x3图像
image = np.arange(9).reshape(3, 3)

# 创建翻转和旋转的版本
flipped = np.flip(image, axis=1)
rotated = np.rot90(image)

# 使用indices创建随机裁剪
x, y = np.indices((2, 2))
crop_starts = np.array([(0, 0), (0, 1), (1, 0), (1, 1)])
random_start = crop_starts[np.random.choice(len(crop_starts))]
crop_indices = x + random_start[0], y + random_start[1]
cropped = image[crop_indices]

# 连接所有增强后的图像
augmented_images = np.concatenate([image.flatten(), flipped.flatten(),
                                   rotated.flatten(), cropped.flatten()])

print("numpyarray.com - Augmented images:", augmented_images)
Output:

这个例子展示了如何使用indices创建随机裁剪,并使用concatenate将原始图像及其各种变换版本组合在一起,形成一个增强的数据集。
4.2 实现滑动窗口卷积
卷积是深度学习中的一个核心操作。我们可以使用indices和concatenate来实现一个简单的滑动窗口卷积:
import numpy as np

# 创建一个1D信号
signal = np.array([1, 2, 3, 4, 5])

# 创建一个卷积核
kernel = np.array([1, 0, -1])

# 使用indices创建滑动窗口
window_size = len(kernel)
indices = np.arange(len(signal) - window_size + 1)[:, None] + np.arange(window_size)

# 提取滑动窗口
windows = signal[indices]

# 执行卷积
convolution = np.sum(windows * kernel, axis=1)

print("numpyarray.com - Convolution result:", convolution)
Output:

这个例子展示了如何使用indices创建滑动窗口,然后实现一个简单的1D卷积操作。这种方法可以扩展到2D或更高维度的卷积。
4.3 创建网格搜索参数空间
在机器学习中,网格搜索是一种常用的超参数调优技术。我们可以使用indices和concatenate来创建复杂的参数空间:
import numpy as np

# 定义参数范围
learning_rates = np.logspace(-4, -2, 3)
batch_sizes = np.array([32, 64, 128])
num_layers = np.array([1, 2, 3])

# 使用indices创建参数网格
grid = np.array(np.meshgrid(learning_rates, batch_sizes, num_layers)).T.reshape(-1, 3)

print("numpyarray.com - Parameter grid:")
for params in grid:
    print(f"Learning rate: {params[0]:.4f}, Batch size: {params[1]}, Num layers: {params[2]}")
Output:
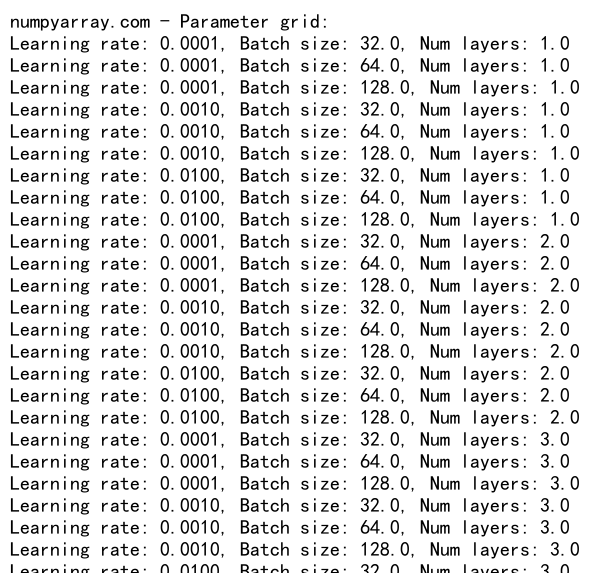
这个例子展示了如何使用indices的思想(通过meshgrid函数)创建一个参数网格,用于网格搜索。这种方法可以轻松扩展到更多的超参数。
4.4 实现图像拼接
在计算机视觉中,图像拼接是一种常见的操作。我们可以使用concatenate和indices来实现简单的图像拼接:
import numpy as np

# 创建两个模拟的图像
image1 = np.random.rand(4, 4)
image2 = np.random.rand(4, 4)

# 创建重叠区域的索引
overlap = 2
i, j = np.indices((4, overlap))

# 计算重叠区域的平均值
overlap_region = (image1[:, -overlap:] + image2[:, :overlap]) / 2

# 使用concatenate拼接图像
stitched_image = np.concatenate([image1[:, :-overlap], overlap_region, image2[:, overlap:]], axis=1)

print("numpyarray.com - Stitched image shape:", stitched_image.shape)
print("numpyarray.com - Stitched image:\n", stitched_image)
Output:

这个例子展示了如何使用indices创建重叠区域的索引,然后使用concatenate将两个图像拼接在一起,同时平滑重叠区域。
4.5 实现数据批处理
在处理大型数据集时,批处理是一种常用的技术。我们可以使用indices和concatenate来实现高效的批处理:
import numpy as np

# 创建一个大型数据集
data = np.random.rand(1000, 10)

# 定义批大小
batch_size = 32

# 使用indices创建批索引
num_batches = len(data) // batch_size
batch_indices = np.arange(num_batches)[:, None] * batch_size + np.arange(batch_size)

# 提取批数据
batches = data[batch_indices]

print("numpyarray.com - Number of batches:", num_batches)
print("numpyarray.com - Shape of each batch:", batches.shape)
Output:

这个例子展示了如何使用indices创建批索引,然后使用这些索引从大型数据集中提取批数据。这种方法在训练深度学习模型时特别有用。
5. 性能考虑
虽然concatenate和indices函数非常强大和灵活,但在处理大型数据集时,我们需要考虑性能问题。
5.1 使用concatenate的内存效率
当连接大型数组时,concatenate函数会创建一个新的数组,这可能会导致内存使用量显著增加。在这种情况下,考虑使用numpy.vstack、numpy.hstack或numpy.dstack可能会更有效率,因为它们可以避免不必要的数据复制。
5.2 indices的计算开销
对于非常大的数组,indices函数可能会消耗大量内存和计算资源。在这种情况下,考虑使用numpy.meshgrid或手动生成索引可能会更高效。
5.3 使用视图而不是复制
当可能的时候,尽量使用数组视图而不是复制数据。例如,使用切片操作通常会返回一个视图,而不是复制数据:
import numpy as np

# 创建一个大数组
large_array = np.arange(1000000)

# 使用视图而不是复制
view = large_array[::2]  # 每隔一个元素取一个

print("numpyarray.com - View shape:", view.shape)
print("numpyarray.com - View is a copy:", view.base is None)
Output:

这个例子展示了如何使用切片创建一个数组的视图,而不是复制数据。这在处理大型数据集时可以显著提高性能。
6. 结论
NumPy的concatenate和indices函数是强大的工具,可以用于各种数据处理和科学计算任务。concatenate允许我们灵活地组合数组,而indices使我们能够轻松生成复杂的索引结构。通过结合使用这两个函数,我们可以实现各种高级操作,从简单的数据增强到复杂的图像处理和机器学习任务。
然而,在使用这些函数时,我们需要注意性能问题,特别是在处理大型数据集时。通过理解这些函数的工作原理和适当的使用场景,我们可以充分利用它们的强大功能,同时避免潜在的性能陷阱。
无论你是在进行数据分析、科学计算还是机器学习,掌握concatenate和indices函数都将大大提高你的NumPy编程效率和能力。通过本文提供的详细解释和丰富的示例,你应该能够在各种场景中自信地应用这些函数,并探索它们更多的可能性。
 极客教程
极客教程