React MUI ButtonBase API
Material-UI是一个用户界面框架,提供预定义和可定制的React组件,用于更快速和简单的Web开发。Material-UI组件基于谷歌的Material Design。在本文中,让我们讨论Material-UI库中的ButtonBase API。
MUI提供的ButtonBase API: ButtonBase API用作构建许多其他按钮(如文本按钮、图标按钮或包含按钮)的基础组件。可以使用此API构建许多其他自定义按钮。
ButtonBase属性:
- action: 指定命令操作的引用
- centerRipple: 确定涟漪是否居中
- children: 指定组件的内容
- classes: 指定样式以覆盖默认样式
- component: 指定用于根节点的组件
- disabled: 确定组件是否禁用
- disableRipple: 确定是否禁用涟漪动画
- disableTouchRipple: 确定是否禁用触摸涟漪动画
- focusRipple: 确定ButtonBasr组件是否具有键盘焦点涟漪
- focusVisibleClassName: 帮助确定哪些DOM元素具有焦点
- LinkComponent: 指定在传递 href 属性时用于渲染链接的组件
- onFocusVisible: 触发组件以键盘聚焦时的回调函数
- sx: 系统属性,允许定义系统覆盖以及其他CSS样式
- touchRippleProps: 传递给 TouchRipple 元素的属性
- touchRippleRef: 传递给 TouchRipple 元素的引用
CSS规则:
-
root: 引用传递给根元素的样式
- disabled: 如果根元素被禁用,引用传递给根元素的类
- focusVisible: 如果使用键盘交互聚焦元素,引用传递给元素的类
创建React应用并安装模块:
步骤1: 使用以下命令创建React应用:
npx create-react-app foldername
步骤2: 在创建项目文件夹(即文件夹名称)之后,使用以下命令进入该文件夹:
cd foldername
步骤3: 在创建ReactJS应用程序之后,使用以下命令安装所需的模块:
npm install @mui/material
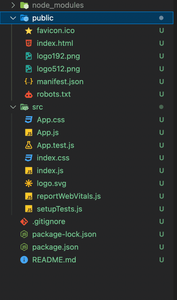
项目结构: 它将如下所示。

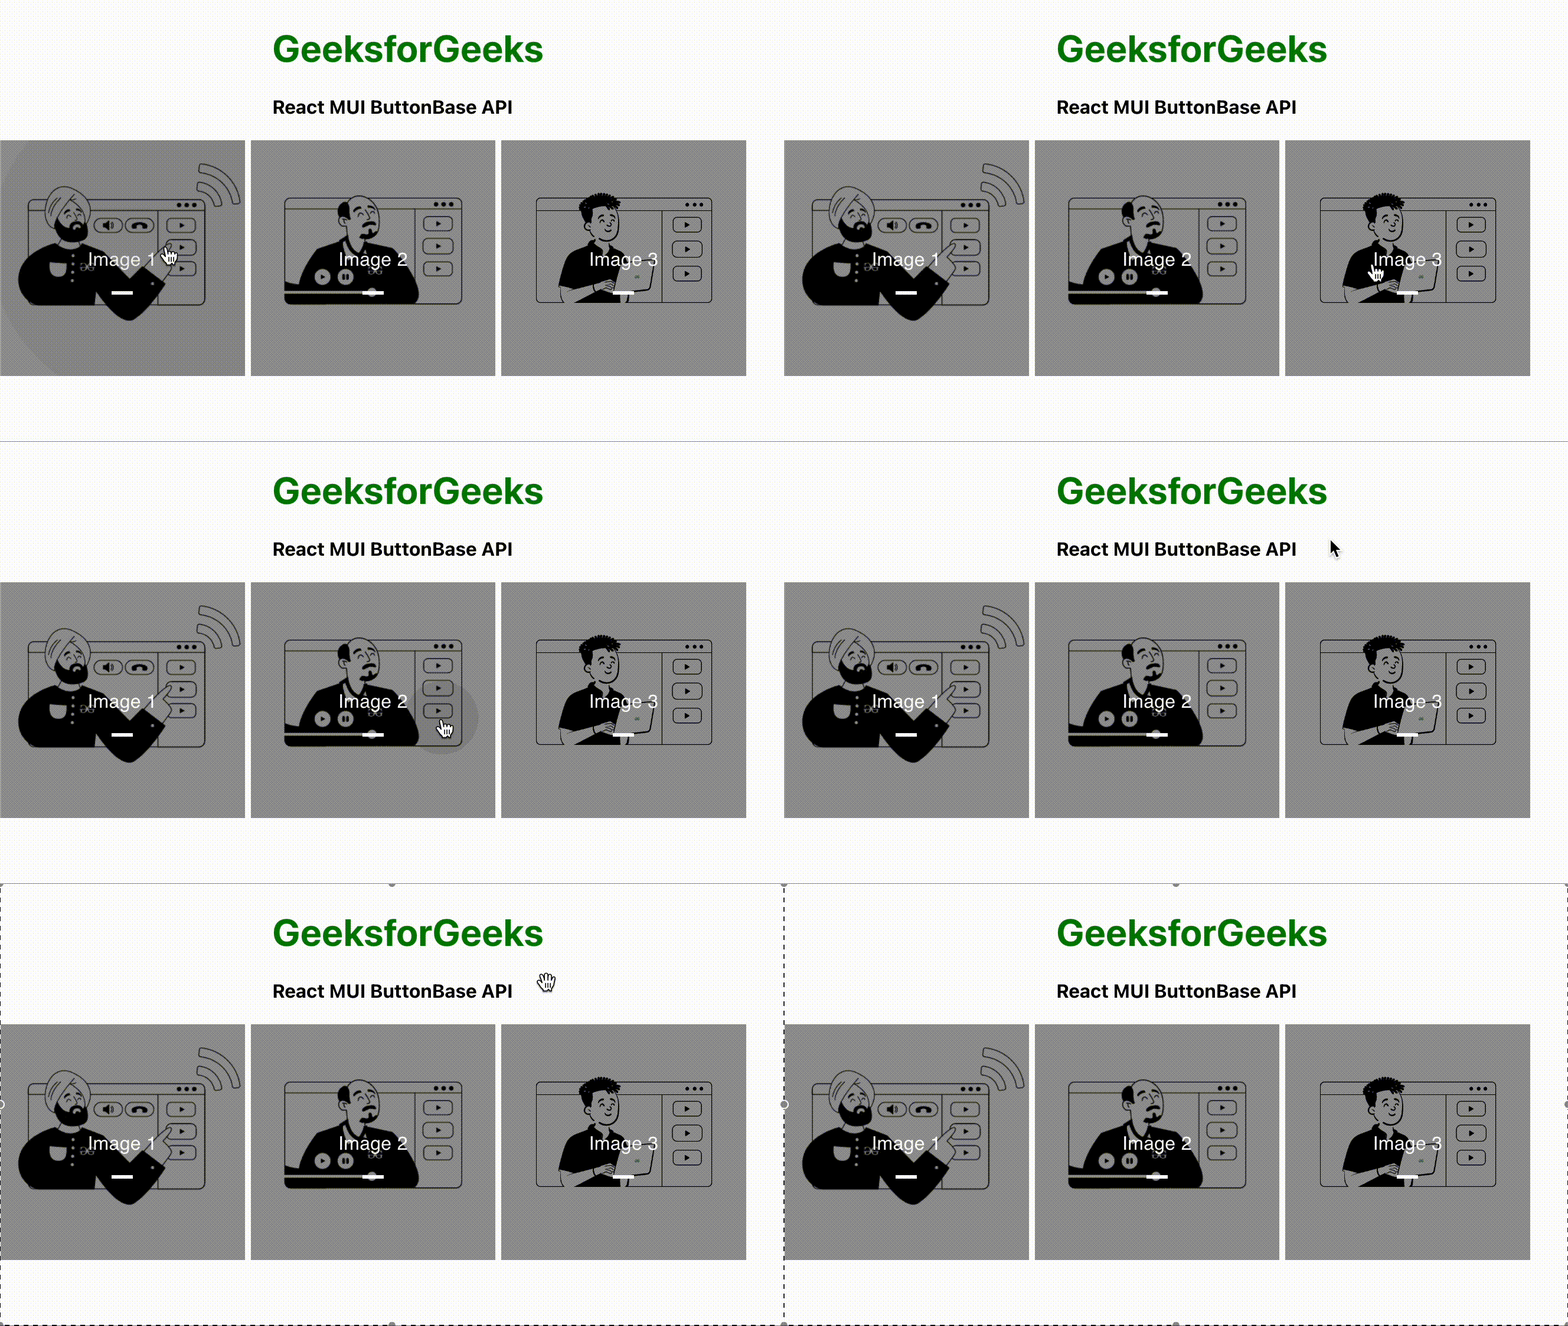
示例1: 在这个示例中,我们将尝试创建一个简单的应用程序,使用ButtonBase API来构建3个按钮,这些按钮具有不同的图像作为背景,并且居中显示文本。
现在在App.js文件中写下以下代码。这里,App是我们默认的组件,我们在这里写了我们的代码:
App.js
import * as React from 'react';
import { styled } from '@mui/material/styles';
import Box from '@mui/material/Box';
import ButtonBase from '@mui/material/ButtonBase';
import Typography from '@mui/material/Typography';

const images = [
    {
        url:
'https://media.geeksforgeeks.org/wp-content/uploads/20200316135008/red7.png',
        title: 'Image 1',
        width: '30%',
    },
    {
        url:
'https://media.geeksforgeeks.org/wp-content/uploads/20200316135014/yellow3.png',
        title: 'Image 2',
        width: '30%',
    },
    {
        url:
'https://media.geeksforgeeks.org/img-practice/MaskGroup58@2x-min-1637846347.png',
        title: 'Image 3',
        width: '30%',
    },
];

const ImageButton = styled(ButtonBase)(({ theme }) => ({
    position: 'relative',
    height: 200
}));

const ImageSrc = styled('span')({
    position: 'absolute',
    left: 0,
    right: 0,
    top: 0,
    bottom: 0,
    backgroundSize: 'cover',
    backgroundPosition: 'center 40%',
});

const Image = styled('span')(({ theme }) => ({
    position: 'absolute',
    left: 0,
    right: 0,
    top: 0,
    bottom: 0,
    display: 'flex',
    alignItems: 'center',
    justifyContent: 'center',
    color: theme.palette.common.white,
}));

const ImageBackdrop = styled('span')(({ theme }) => ({
    position: 'absolute',
    left: 0,
    right: 0,
    top: 0,
    bottom: 0,
    backgroundColor: theme.palette.common.black,
    opacity: 0.4,
}));

const ImageMarked = styled('span')(({ theme }) => ({
    height: 3,
    width: 18,
    backgroundColor: theme.palette.common.white,
    position: 'absolute',
    bottom: -2,
    left: 'calc(50% - 9px)',
}));
export default function BasicButtonGroup() {
    return (
        <div>
            <div
                className="head"
                style={{
                    width: "fit-content",
                    margin: "auto",
                }}
            >
                <h1
                    style={{
                        color: "green",
                    }}
                >
                    GeeksforGeeks
                </h1>
                <strong>React MUI ButtonBase API</strong>
                <br />
                <br />
            </div>
            <div
                style={{
                    margin: "auto",
                }}
            >
                <Box sx={{
                    display: 'flex', flexWrap: 'wrap',
                    minWidth: 300, width: '100%', gap: '5px'
                }}>
                    {images.map((image) => (
                        <ImageButton
                            focusRipple
                            key={image.title}
                            style={{
                                width: image.width,
                            }}
                        >
                            <ImageSrc style={{
                                backgroundImage: `url({image.url})`
                            }} />
                            <ImageBackdrop
                                className="MuiImageBackdrop-root" />
                            <Image>
                                <Typography
                                    component="span"
                                    variant="subtitle1"
                                    color="inherit"
                                    sx={{
                                        position: 'relative',
                                        p: 4,
                                        pt: 2,
                                        pb: (theme) =>
                                       `calc({theme.spacing(1)} + 6px)`,
                                    }}
                                >
                                    {image.title}
                                    <ImageMarked className=
                                        "MuiImageMarked-root" />
                                </Typography>
                            </Image>
                        </ImageButton>
                    ))}
                </Box>
            </div>
        </div>
    );
}
运行应用程序的步骤: 从项目的根目录中使用以下命令运行应用程序:
npm start
输出: 现在打开浏览器并访问http://localhost:3000/,您将看到以下输出:

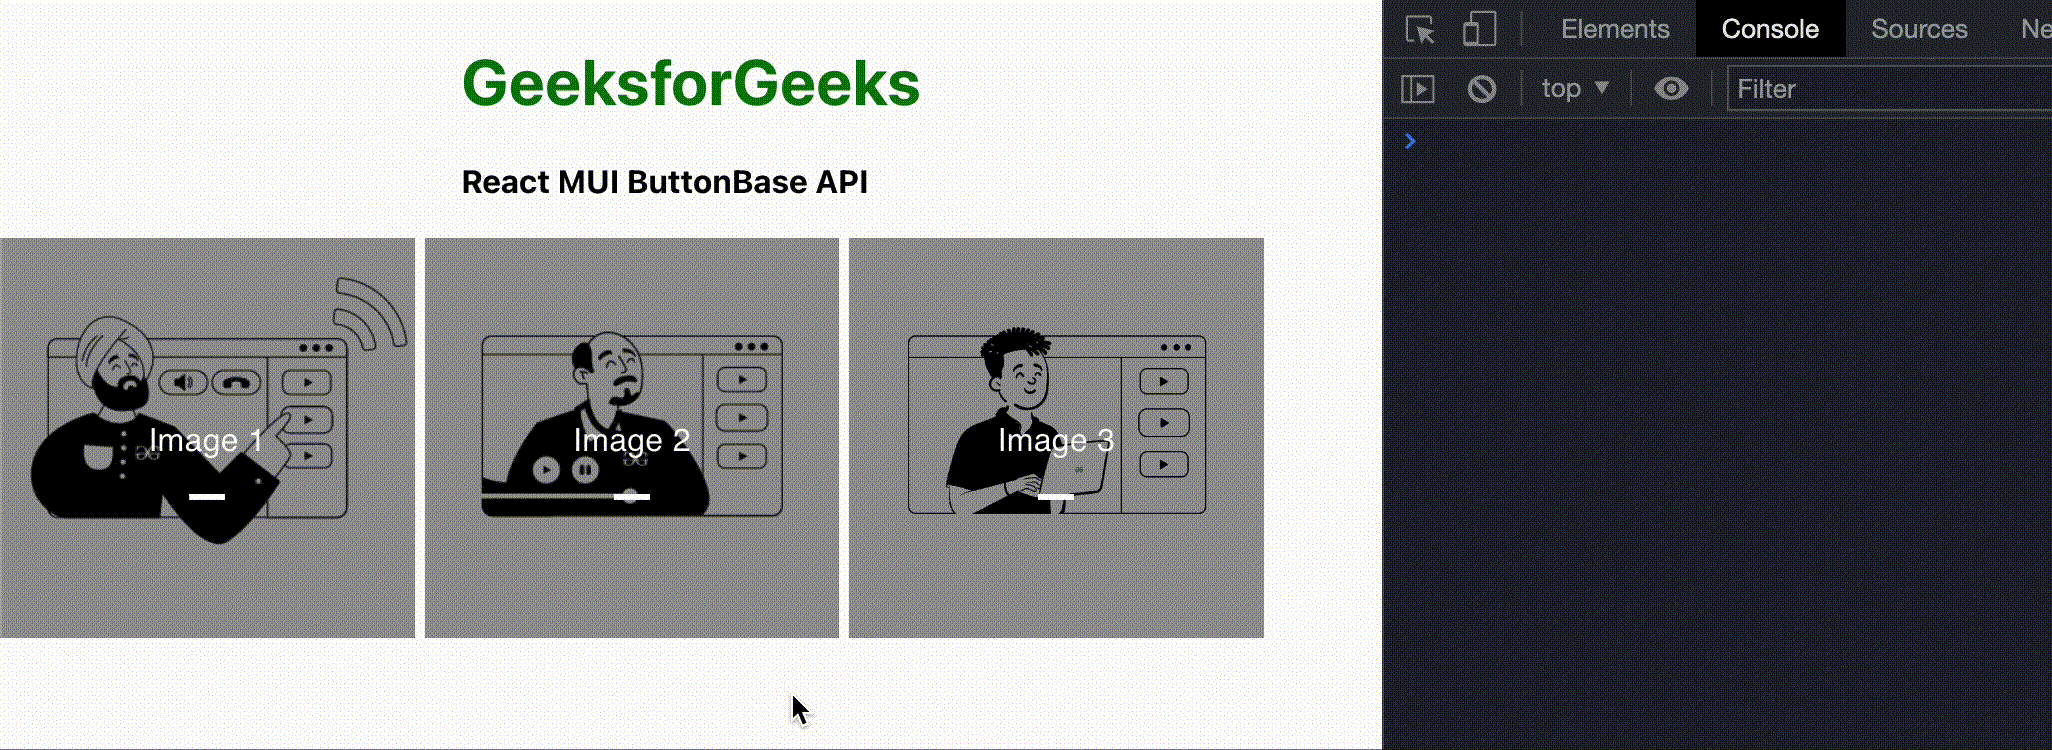
示例2 :在这个示例中,让我们修改上面的代码,使按钮2无效,并在通过键盘交互时聚焦按钮时触发回调函数。将你的App.js更改为如下所示。
App.js
import * as React from 'react';
import { styled } from '@mui/material/styles';
import Box from '@mui/material/Box';
import ButtonBase from '@mui/material/ButtonBase';
import Typography from '@mui/material/Typography';

const images = [
    {
        url:
'https://media.geeksforgeeks.org/wp-content/uploads/20200316135008/red7.png',
        title: 'Image 1',
        width: '30%',
    },
    {
        url:
'https://media.geeksforgeeks.org/wp-content/uploads/20200316135014/yellow3.png',
        title: 'Image 2',
        width: '30%',
    },
    {
        url:
'https://media.geeksforgeeks.org/img-practice/MaskGroup58@2x-min-1637846347.png',
        title: 'Image 3',
        width: '30%',
    },
];

const ImageButton = styled(ButtonBase)(({ theme }) => ({
    position: 'relative',
    height: 200
}));

const ImageSrc = styled('span')({
    position: 'absolute',
    left: 0,
    right: 0,
    top: 0,
    bottom: 0,
    backgroundSize: 'cover',
    backgroundPosition: 'center 40%',
});

const Image = styled('span')(({ theme }) => ({
    position: 'absolute',
    left: 0,
    right: 0,
    top: 0,
    bottom: 0,
    display: 'flex',
    alignItems: 'center',
    justifyContent: 'center',
    color: theme.palette.common.white,
}));

const ImageBackdrop = styled('span')(({ theme }) => ({
    position: 'absolute',
    left: 0,
    right: 0,
    top: 0,
    bottom: 0,
    backgroundColor: theme.palette.common.black,
    opacity: 0.4,
}));

const ImageMarked = styled('span')(({ theme }) => ({
    height: 3,
    width: 18,
    backgroundColor: theme.palette.common.white,
    position: 'absolute',
    bottom: -2,
    left: 'calc(50% - 9px)',
}));

export default function BasicButtonGroup() {
    return (
        <div>
            <div
                className="head"
                style={{
                    width: "fit-content",
                    margin: "auto",
                }}
            >
                <h1
                    style={{
                        color: "green",
                    }}
                >
                    GeeksforGeeks
                </h1>
                <strong>React MUI ButtonBase API</strong>
                <br />
                <br />
            </div>
            <div
                style={{
                    margin: "auto",
                }}
            >
                <Box sx={{
                    display: 'flex', flexWrap: 'wrap',
                    minWidth: 300, width: '100%', gap: '5px'
                }}>
                    {images.map((image) => (
                        <ImageButton
                            focusRipple
                            key={image.title}
                            style={{
                                width: image.width,
                            }}
                            onFocusVisible={() => {
                                console.log(`{image.title} focused!`);
                            }}
                            disabled={image.title === 'Image 2'}
                        >
                            <ImageSrc style={{
                                backgroundImage: `url({image.url})`
                            }} />
                            <ImageBackdrop
                                className="MuiImageBackdrop-root" />
                            <Image>
                                <Typography
                                    component="span"
                                    variant="subtitle1"
                                    color="inherit"
                                    sx={{
                                        position: 'relative',
                                        p: 4,
                                        pt: 2,
                                        pb: (theme) =>
                                       `calc(${theme.spacing(1)} + 6px)`,
                                    }}
                                >
                                    {image.title}
                                    <ImageMarked className=
                                        "MuiImageMarked-root" />
                                </Typography>
                            </Image>
                        </ImageButton>
                    ))}
                </Box>
            </div>
        </div>
    );
}
运行应用程序的步骤 :从项目的根目录运行应用程序,使用以下命令:
npm start
输出和查看方法:
- 当在http://localhost:3000/ URL上时,按下 tab (反复按下以聚焦不同的图像)键盘上的TAB键以在控制台中查看输出。
- 在最后一个图像失去焦点后,点击页面的任意位置,然后重复步骤1。

参考: : https://mui.com/material-ui/api/button-base/
 极客教程
极客教程