React MUI Badge API
MUI是一个用户界面库,提供预定义和可定制的React组件,用于更快速、易于开发的网页开发。MUI提供了一套全面的UI工具,帮助加快新功能的发布。在本文中,让我们讨论一下MUI库提供的TablePagination API。
Badge会在其子元素的右上方生成一个小徽章。我们可以将Badge组件包裹在一个图标周围,以在图标顶部显示徽章。在本文中,我们将学习如何导入MUI Badge API及其各种使用情况。
Props List:
- anchorOrigin: 这个属性基本上给出了徽章的位置(原点)。提供水平或垂直或两个字段以确定徽章的最终位置。例如,anchorOrigin = {{ vertical: ‘top’, horizontal: ‘right’ }}将把徽章定位在右上方。
- badgeContent: 提供将在徽章中渲染的内容。例如,要在消息图标上方显示4个未读消息,我们可以设置badgeContent = {4}
- children: 将根据此节点添加徽章。
- classes: 此属性用于覆盖或扩展应用于组件的样式。
- color: 定义组件的颜色。其值包括default、primary、secondary、error、info、success和warning。它支持默认和自定义主题颜色。
- component: 此属性给出了用于根节点的元素类型。该值可以是字符串、HTML元素或组件。
- invisible: 此属性接受布尔值。如果设置为true,徽章将是不可见的。
- max: 最多显示的计数。
- overlap: 在重叠处以特定形状包裹徽章。可以使用circular或rectangular等值。
- showZero: 它接受一个布尔值。它控制徽章在badgeContent为零时是否隐藏。默认情况下,它是false,这意味着当badgeContent变为零时不显示徽章。当设置为true时,徽章将保持可见,但显示为零。
- variant: 徽章变体。可以是圆点或标准变体。
- sx: 这是系统属性。它允许我们为组件定义额外的CSS样式。
语法:
<Badge badgeContent={3}>
    Geeksforgeeks
</Badge>
创建React应用并安装模块:
步骤1: 使用create-react-app初始化应用。
npx create-react-app myApp
步骤2: 进入项目目录。
cd myApp
安装 MUI: 可以通过 npm 或 yarn 等包管理器轻松安装。
npm install @mui/material @emotion/react @emotion/styled
或
yarn add @mui/material @emotion/react @emotion/styled
将Badge API导入项目:
import Badge from '@mui/material/Badge';
// or
import { Badge } from '@mui/material';
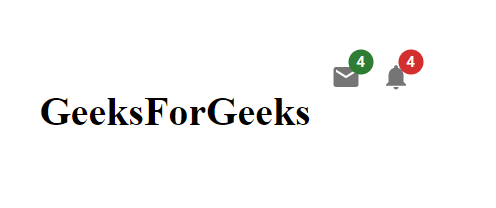
示例1: 让我们使用徽章 API 创建一个基本的徽章。我们将用徽章包裹两个图标。一个将显示未读消息的数量,另一个将显示通知的数量。我们将使用 badgeContent 属性提供数量。我们还将使用 color 属性为徽章提供不同的颜色。
import * as React from "react";
import Badge from "@mui/material/Badge";
import Stack from "@mui/material/Stack";
import MailIcon from "@mui/icons-material/Mail";
import NotificationsIcon from
    "@mui/icons-material/Notifications";

export default function ColorBadge() {
    return (
        <Stack spacing={2} direction="row">
            <h1>GeeksForGeeks</h1>
            <Badge badgeContent={4} color="success">
                <MailIcon color="action" />
            </Badge>
            <Badge badgeContent={4} color="error">
                <NotificationsIcon color="action" />
            </Badge>
        </Stack>
    );
}
输出:

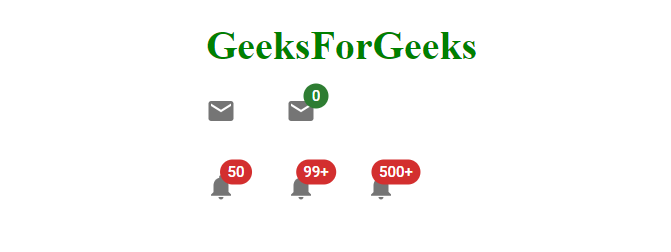
示例2: 现在让我们创建更多的徽章并使用高级属性,例如徽章的可见性和最大值。在这里,我们将使用两组图标。第一组将包含一个消息图标,我们将使用它来了解使用showZero属性的徽章可见性。另一组将包含一个通知图标,我们将使用它来了解使用max属性限制徽章内容的最大值。
import * as React from "react";
import Badge from "@mui/material/Badge";
import Stack from "@mui/material/Stack";
import MailIcon from "@mui/icons-material/Mail";
import NotificationsIcon from
    "@mui/icons-material/Notifications";

export default function ColorBadge() {
    return (
        <>
            <h1 style={{ color: "green" }}>GeeksForGeeks</h1>
            <Stack spacing={5} direction="row">
                <Badge badgeContent={0} color="success">
                    <MailIcon color="action" />
                </Badge>
                <Badge badgeContent={0} color="success" showZero>
                    <MailIcon color="action" />
                </Badge>
            </Stack>
            <br />
            <br />
            <Stack spacing={5} direction="row">
                <Badge badgeContent={50} color="error">
                    <NotificationsIcon color="action" />
                </Badge>
                <Badge badgeContent={100} color="error">
                    <NotificationsIcon color="action" />
                </Badge>
                <Badge badgeContent={555} max={500} color="error">
                    <NotificationsIcon color="action" />
                </Badge>
            </Stack>
        </>
    );
}
输出:

引用: https://mui.com/material-ui/api/badge/
 极客教程
极客教程