React.js蓝图面板堆栈(v2)组件面板
蓝图 是一个基于React的用于Web的UI工具包。该库在构建复杂且数据密集的桌面应用程序界面方面非常优化和流行。
在本文中,我们将讨论React.js蓝图面板堆栈(v2)组件面板。面板堆栈(v2)用于管理一堆面板,并只显示最顶部的面板。在一个面板中,每个面板都包含一个头部,其中包含一个返回按钮以返回到上一个面板。面板堆栈可以作为受控或不受控组件操作。
面板被提供为对象,其中包含renderPanel和其他属性用于渲染面板元素,标题将显示在头部和返回按钮中。此外,每个面板只在其位于堆栈顶部时被挂载,并且仅在关闭面板或打开一个面板位于其上方时被卸载。
React.js界面面板属性:
- htmlTitle: 表示要传递给组件的HTML标题
- props: 在渲染组件类型时传递给组件的属性。
- renderPanel: 表示此面板的渲染器。
- title: 要在此面板上方显示的标题。
React.js界面面板操作属性:
- closePanel: 用于调用此方法以编程方式关闭此面板。
- openPanel: 用于调用此方法以在堆栈顶部打开新面板。
React.js蓝图堆栈面板(v2)组件属性:
- className: 用于传递给子组件的类名列表。
- initialPanel: 用于指定在堆栈为空时显示的初始面板。
- onClose: 用于指定在关闭面板时调用的回调函数。
- onOpen: 用于指定在打开面板时调用的回调函数。
- renderActivePanelOnly: 确定PanelStack是否将所有面板都呈现到DOM中。
- showPanelHeader: 确定是否在每个面板的头部显示后退按钮。
- stack: 用于指定所有面板的列表。
语法:
<PanelStack2
    onOpen={addToPanelStack}
    onClose={removeFromPanelStack}
    renderActivePanelOnly={activePanelOnly}
    initialPanel={initialPanel}
/>
创建 React 应用并安装模块:
步骤1: 使用以下命令创建一个 React 应用:
npm create-react-app appname
步骤2: 创建您的项目文件夹(比如appname)后,使用以下命令进入该文件夹:
cd appname
步骤3: 在创建ReactJS应用程序之后,使用以下命令安装所需的模块:
npm install @blueprintjs/core
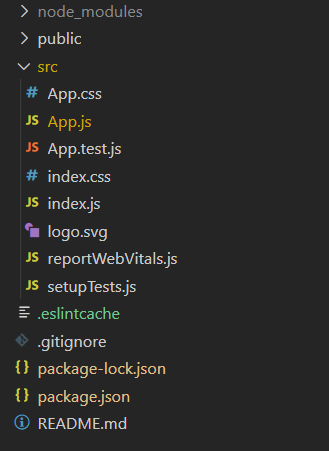
项目结构:

运行应用程序的步骤: 按照以下方式运行项目。
npm start
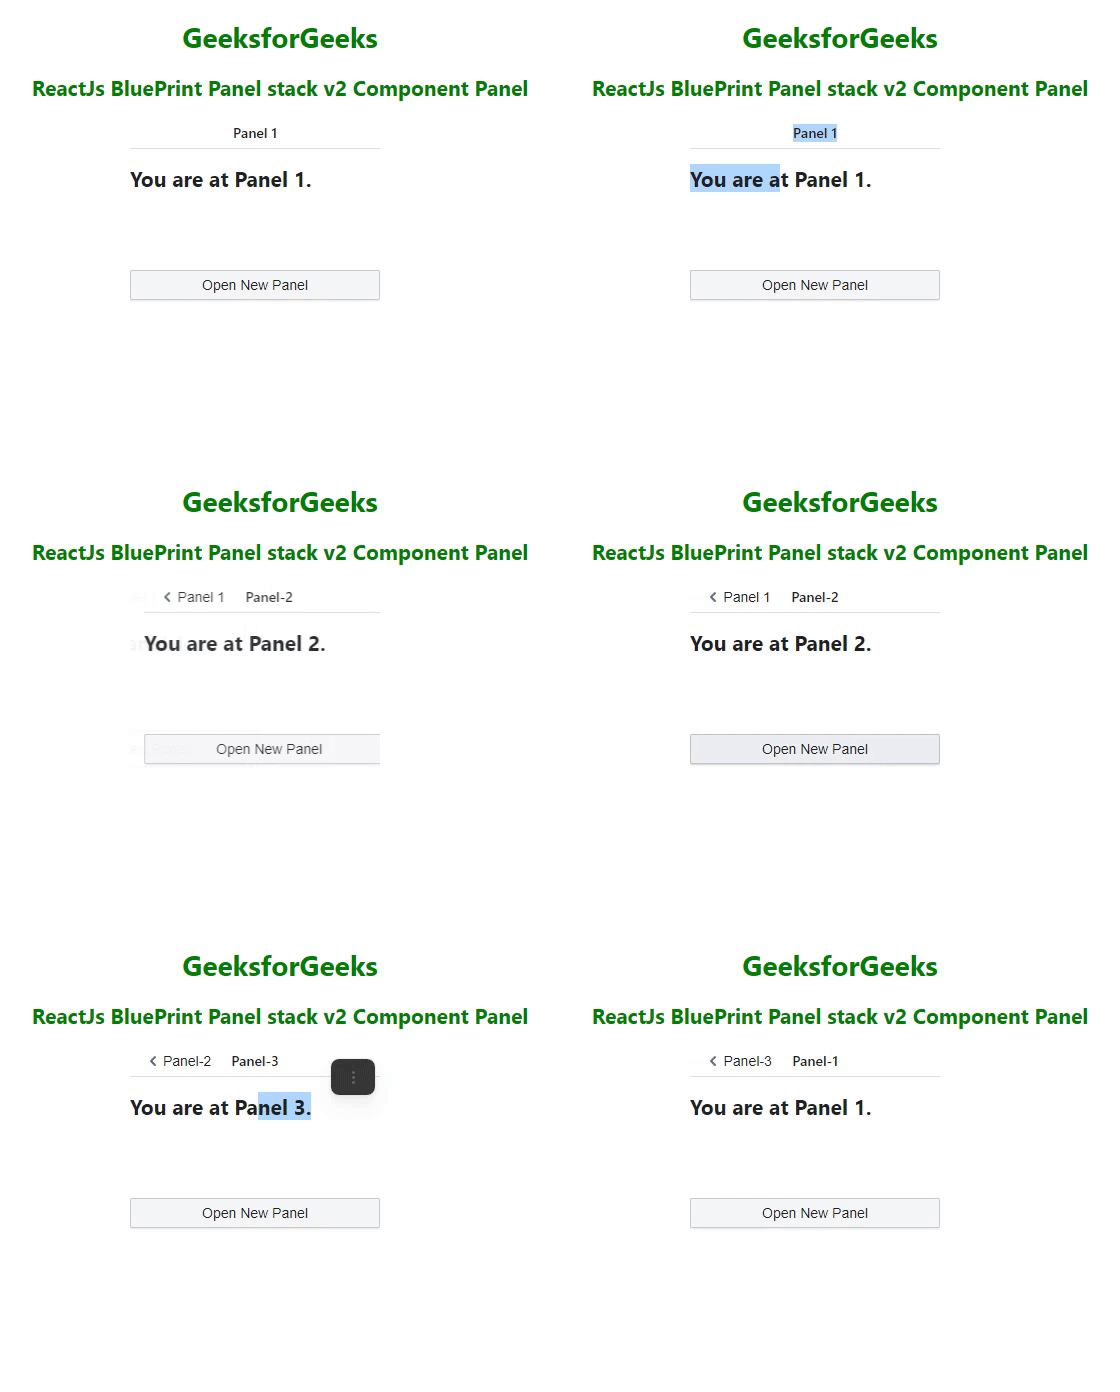
示例1: 下面的示例演示了Panel Stack v2组件的基本用法。
App.js
import React, { useCallback, useState } from "react";
import "@blueprintjs/core/lib/css/blueprint.css";
import { Button, PanelStack2 } from "@blueprintjs/core";
import "./App.css";

const Panel1 = (props) => {
    const openNewPanel = () => {
        props.openPanel({
            props: {},
            renderPanel: Panel2,
            title: `Panel-2`,
        });
    };

    return (
        <div className="docs-panel-stack-contents-example">
            <h2>You are at Panel 1.</h2>
            <Button onClick={openNewPanel}
                text="Open New Panel" />
        </div>
    );
};

const Panel2 = (props) => {
    const openNewPanel = () => {
        props.openPanel({
            props: {},
            renderPanel: Panel3,
            title: `Panel-3`,
        });
    };

    return (
        <div className="docs-panel-stack-contents-example">
            <h2>You are at Panel 2.</h2>
            <Button onClick={openNewPanel}
                text="Open New Panel" />
        </div>
    );
};

const Panel3 = (props) => {
    const openNewPanel = () => {
        props.openPanel({
            props: {},
            renderPanel: Panel1,
            title: `Panel-1`,
        });
    };

    return (
        <div className="docs-panel-stack-contents-example">
            <h2>You are at Panel 3.</h2>
            <Button onClick={openNewPanel}
                text="Open New Panel" />
        </div>
    );
};

const initialPanel = {
    props: {
        panelNumber: 1,
    },
    renderPanel: Panel1,
    title: "Panel 1",
};

function App() {
    const [activePanelOnly, setActivePanelOnly] =
        useState(true);
    const [showHeader, setShowHeader] = useState(true);
    const [currentPanelStack, setCurrentPanelStack] =
        useState([]);
    const addToPanelStack = useCallback(
        (newPanel) => setCurrentPanelStack((stack) =>
            [...stack, newPanel]),
        []
    );
    const removeFromPanelStack = useCallback(
        () => setCurrentPanelStack((stack) =>
            stack.slice(0, -1)),
        []
    );

    return (
        <div>
            <div style={{ textAlign: "center",
                color: "green" }}>
                <h1>GeeksforGeeks</h1>
                <h2>
                    ReactJs BluePrint Panel stack v2 Component Panel
                </h2>
            </div>
            <div
                className="main"
                style={{ height: "240px",
                    width: "300px", margin: "auto" }}
            >
                <PanelStack2
                    onOpen={addToPanelStack}
                    onClose={removeFromPanelStack}
                    renderActivePanelOnly={activePanelOnly}
                    initialPanel={initialPanel}
                />
            </div>
        </div>
    );
}

export default App;
App.css
.main>div {
    width: 250px;
    height: 320px;
}

.main>div button {
    margin: 60px auto;
    width: 100%;
}
输出:

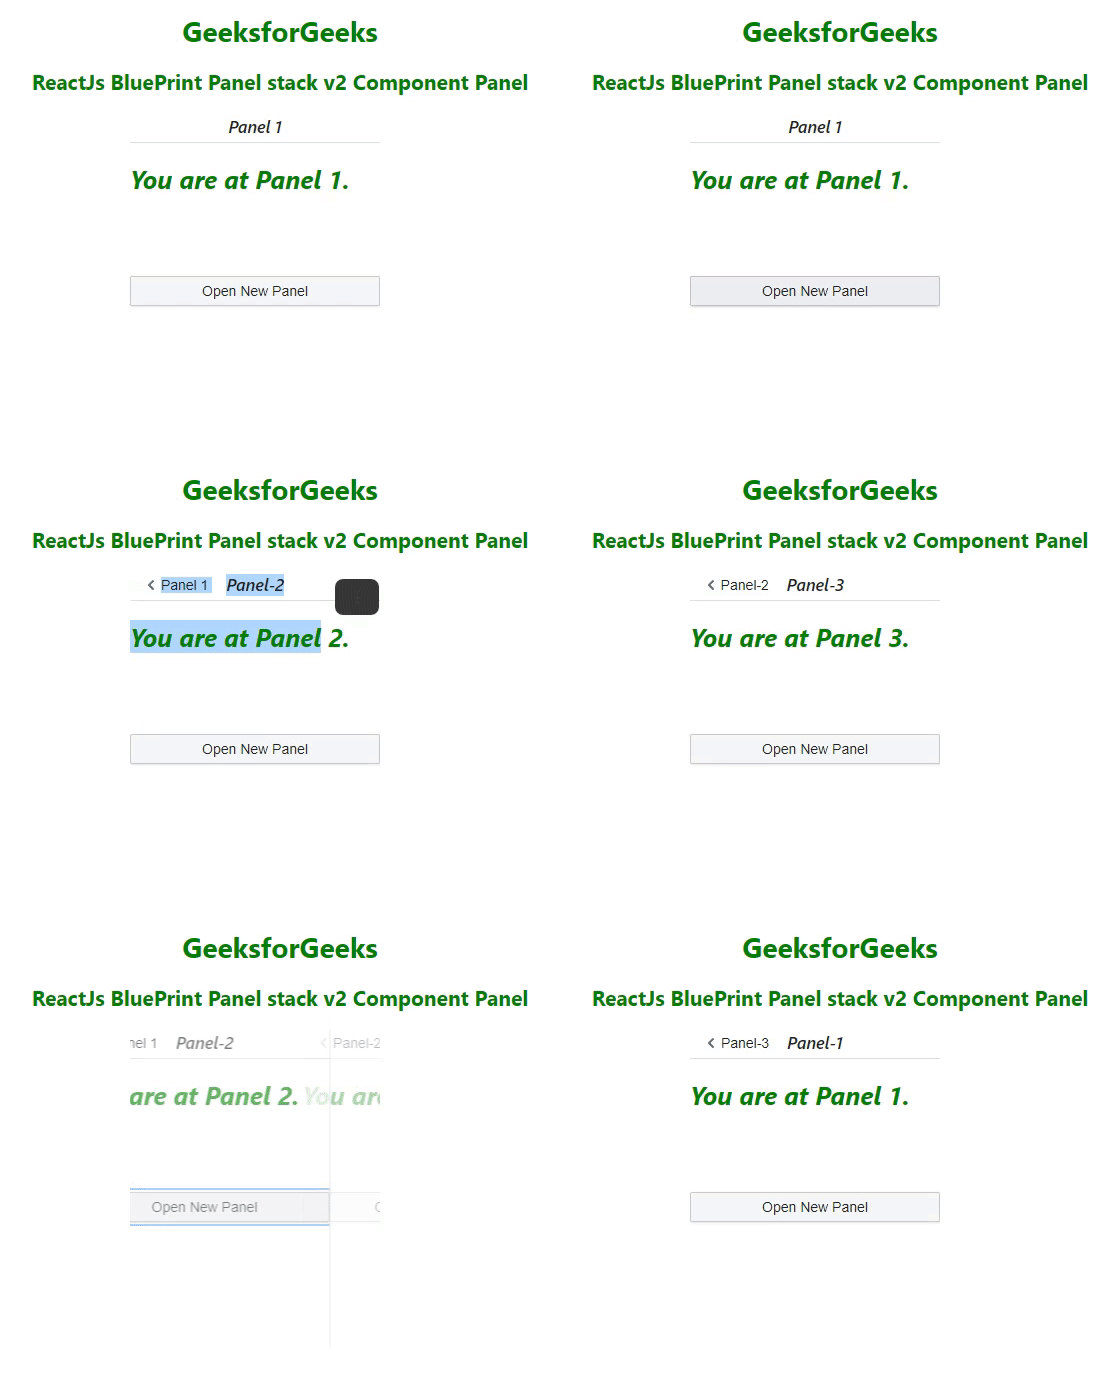
示例2: 下面的示例演示了使用className prop的自定义样式与面板堆栈v2组件的用法。
App.js
import React, { useCallback, useState } from "react";
import "@blueprintjs/core/lib/css/blueprint.css";
import { Button, PanelStack2 } from "@blueprintjs/core";
import "./App.css";

const Panel1 = (props) => {
    const openNewPanel = () => {
        props.openPanel({
            props: {},
            renderPanel: Panel2,
            title: `Panel-2`,
        });
    };

    return (
        <div className="docs-panel-stack-contents-example">
            <h2>You are at Panel 1.</h2>
            <Button onClick={openNewPanel}
                text="Open New Panel" />
        </div>
    );
};

const Panel2 = (props) => {
    const openNewPanel = () => {
        props.openPanel({
            props: {},
            renderPanel: Panel3,
            title: `Panel-3`,
        });
    };

    return (
        <div className="docs-panel-stack-contents-example">
            <h2>You are at Panel 2.</h2>
            <Button onClick={openNewPanel}
                text="Open New Panel" />
        </div>
    );
};

const Panel3 = (props) => {
    const openNewPanel = () => {
        props.openPanel({
            props: {},
            renderPanel: Panel1,
            title: `Panel-1`,
        });
    };

    return (
        <div className="docs-panel-stack-contents-example">
            <h2>You are at Panel 3.</h2>
            <Button onClick={openNewPanel}
                text="Open New Panel" />
        </div>
    );
};

const initialPanel = {
    props: {
        panelNumber: 1,
    },
    renderPanel: Panel1,
    title: "Panel 1",
};

function App() {
    const [activePanelOnly, setActivePanelOnly] =
        useState(true);
    const [showHeader, setShowHeader] = useState(true);
    const [currentPanelStack, setCurrentPanelStack] = useState([]);

    const addToPanelStack = useCallback(
        (newPanel) => setCurrentPanelStack((stack) =>
            [...stack, newPanel]),
        []
    );
    const removeFromPanelStack = useCallback(
        () => setCurrentPanelStack((stack) =>
            stack.slice(0, -1)),
        []
    );

    return (
        <div>
            <div style={{ textAlign: "center", color: "green" }}>
                <h1>GeeksforGeeks</h1>
                <h2>
                    ReactJs BluePrint Panel stack v2 Component Panel
                </h2>
            </div>
            <div
                className="main"
                style={{ height: "240px",
                    width: "300px", margin: "auto" }}
            >
                <PanelStack2
                    onOpen={addToPanelStack}
                    onClose={removeFromPanelStack}
                    renderActivePanelOnly={activePanelOnly}
                    initialPanel={initialPanel}
                    className="custom-panel"
                />
            </div>
        </div>
    );
}

export default App;
App.css
.main>div {
    width: 250px;
    height: 320px;
}

.main>div button {
    margin: 60px auto;
    width: 100%;
}

.custom-panel {
    font-style: italic;
    color: green;
    font-size: larger;
}
输出:

参考: https://blueprintjs.com/docs/#core/components/panel-stack2.panels
 极客教程
极客教程