React MUI API设计方法
React MUI 是一个UI库,提供了功能齐全的组件,将我们自己的设计系统带到我们的实现就绪组件中。MUI是一个用户界面库,为更快、更容易的Web开发提供了预定义和可定制的React组件,这些Material-UI组件基于Google的Material Design。
在本文中,我们将讨论 React MUI API设计方法 。API设计方法基于Material Design的原则,提供了一套易于使用和定制的预构建UI组件。MUI API设计方法的主要目标是提供一套全面一致的UI组件,可以轻松集成到基于React的应用程序中,同时提供高度的灵活性和定制性。这使开发人员可以快速创建视觉吸引人且功能强大的用户界面,而无需花费大量时间进行设计和样式设置。
API设计方法内容:
- 组合: 它指的是将几个组件组合在一起创建更复杂和可重用的UI元素。它使开发人员可以将用户界面分解为更小、更易管理的部分,从而更容易维护和定制整体设计。
- 规则: API设计方法遵循了一些规则,如扩展、本机属性、CSS类、嵌套组件、属性命名、受控组件和布尔值与枚举值。
- 术语表: 它指的是设计语言中使用的一套术语和定义的综合列表。它提供了一个共同的词汇,并有助于确保在设计和开发团队中一致使用语言和术语。
创建React项目:
步骤1: 通过在任何命令行中写入以下代码来创建React应用。
npx create-react-app app_name
步骤2: 然后,我们需要进入我们要工作的文件夹。
cd project_name
步骤3: 我们将安装 @mui/material 库来进行我们的项目开发。
npm install @mui/material @emotion/react @emotion/styled
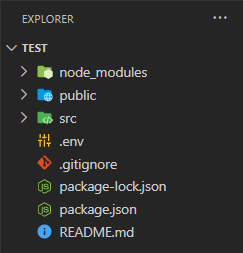
项目结构:

运行应用程序的步骤: 在终端中输入以下代码以运行服务器:
npm start
示例1: 下面是使用Spread和Prop Naming规则进行API设计的代码。
import React from 'react';
import { Box, Button, Typography } from '@mui/material';

const styledButton = {
    margin: '10px'
}
const styledBox = {
    boxShadow: 2,
    margin: '10px',
    display: 'flex',
    justifyContent: 'center',
    alignItems: 'center',
    flexDirection: 'column'
}

const Example = () => {

    return (
        <Box sx={styledBox}>
            <Typography sx={{ pt: 4, color: "green",
                              fontSize: 20 }}>
                GeeksforGeeks
            </Typography>
              <Typography>API design using spread and
                prop naming rules</Typography>
            <div>
                <Button variant="contained" color="primary"
                    sx={styledButton}>Normal Button</Button>
                <Button variant="contained" color="primary"
                    disabled sx={styledButton}>Disabled Button</Button>
                <Button variant="contained" color="primary"
                    disableRipple sx={styledButton}>
                        Ripple Disabled Button
                </Button>
            </div>
        </Box>
    );
}

export default Example;
输出:

示例2: 以下是使用CSS类和受控组件进行API设计的代码。
import React, { useState } from 'react';
import { Box, Button, TextField, Typography } from '@mui/material';
import { red } from '@mui/material/colors';

const ColorButton = {
    color: red[500],
    fontWeight: 600,
    backgroundColor: '#ffffff',
    margin: '10px',
    height: '35px',
    '&:hover': {
        backgroundColor: red[500],
        color: '#ffffff'
    },
};

const styledBox = {
    boxShadow: 2,
    margin: '10px',
    display: 'flex',
    alignItems: 'center',
    flexDirection: 'column'
}

const Example = () => {
    const [name, setName] = useState();
    const [text, setText] = useState(true);
    const handleChange = (event) => {
        setName(event.target.value);
    }
    const handleClick = () => {
        setText(false);
    }
    return (
        <Box sx={styledBox}>
            <Typography sx={{ pt: 4, color: "green",
                              fontSize: 20 }}>
                GeeksforGeeks
            </Typography>
            <Typography>API design using CSS classes and
                Controlled components</Typography>
            <div style={{ margin: '10px' }}>
                <TextField variant='outlined' label='Enter name'
                           onChange={handleChange} />
                <Button variant="contained" onClick={handleClick}
                        sx={ColorButton}>Sign Up</Button>
            </div>
            <div hidden={text} style={{ margin: '10px', fontSize: '20px',
                                        fontWeight: 600 }}>
                Hello {name}
            </div>
        </Box>
    );
}

export default Example;
输出:

参考: https://mui.com/material-ui/guides/api/
 极客教程
极客教程