React MUI组件
React MUI 是一个UI库,提供了完整的组件,将我们自己的设计系统引入到我们的成品组件中。MUI是一个用户界面库,提供预定义和可定制的React组件,用于更快、更简单的Web开发,这些Material-UI组件是基于Google的Material Design开发的。
使用MUI的主要优点之一是它允许开发人员快速、轻松地创建专业外观的界面,而无需花费大量时间进行设计。该库包括各种组件,包括按钮、表单、布局网格等,所有这些组件都被设计为完全可定制和适应不同的用例。
MUI提供了各种类型的组件:
| 组件类型 | 描述 |
|---|---|
| 输入 | MUI中的输入组件是一种标准输入字段,可用于从用户那里收集信息。 |
| 数据显示 | 这些组件为您的基于Material-UI的应用程序提供了一种便捷和一致的显示数据和信息的方式。 |
| 反馈 | 它指的是一组组件,提供了向用户传达操作结果的方式。 |
| 表面 | 它指的是一种为其他UI元素提供容器的组件类型。 |
| 导航 | 它指的是一种用于创建应用程序的导航界面的组件类型。 |
| 布局 | 它指的是一种用于组织应用程序界面结构和布局的组件类型。 |
| 工具 | 工具指的是一组增强MUI库功能和用户体验的实用函数和组件。 |
| 数据表格 | 数据表格,也称为数据表,是一种用于以表格形式显示大量结构化数据的UI组件。它通常包括用于不同数据字段的列,用于单个数据记录的行,以及用于排序、过滤、分页、选择等功能。 |
| 实验室 | 它是由Material-UI团队开发和维护的一组实验性组件和工具的集合。它为探索用户界面组件的新颖创新思路提供了平台。 |
语法:
按钮组件的语法:
import { Button } from '@mui/material';

function App() {
    return (
        <Button variant="contained" color="primary">
            Click Me
        </Button>
    );
}

export default App;
创建React应用并安装模块:
步骤1: 使用以下命令创建一个React应用:
npx create-react-app foldername
步骤2: 创建项目文件夹,即文件夹名称,然后使用以下命令切换到该文件夹:
cd foldername
步骤3 : 在创建ReactJS应用程序之后,使用以下命令安装所需的模块:
npm install @mui/material
npm install @emotion/react
npm install @emotion/styled
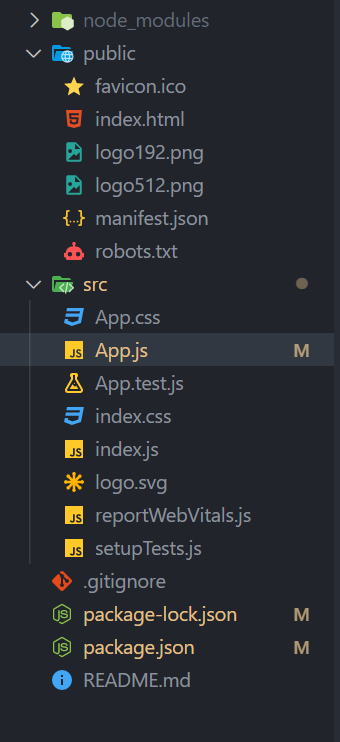
项目结构: 它将如下所示。

运行应用的步骤:
打开终端并输入以下命令。
npm start
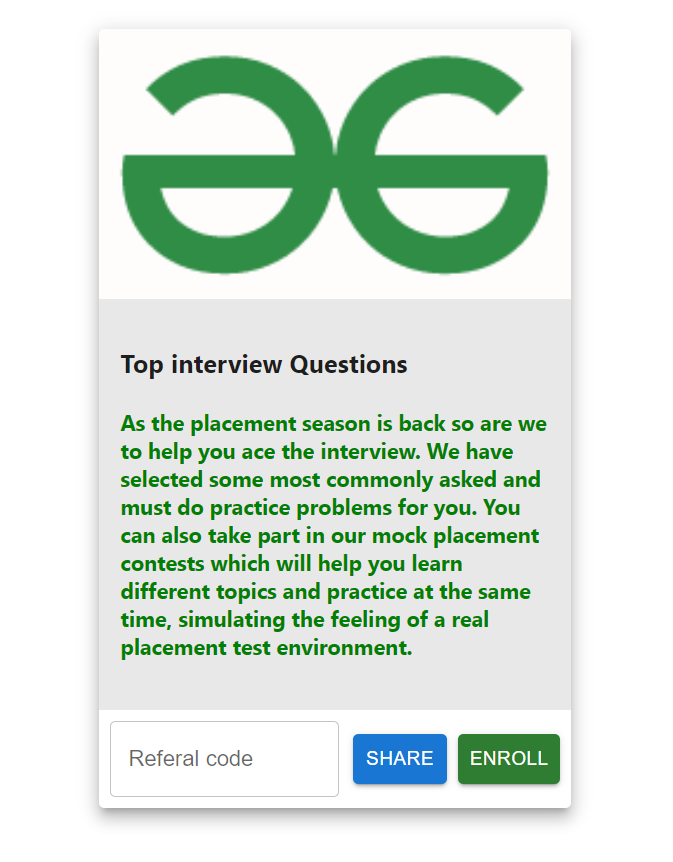
示例1: 在这个示例中,我们将创建一个包含文本框和按钮组件的卡片。
- 文件名: App.js
import * as React from "react";
import {
    Button,
    Card,
    CardMedia,
    CardActions,
    CardContent,
    TextField,
} from "@mui/material";

export default function Demo() {
    return (
        <div>
            <Card raised={true} sx={{ maxWidth: 400 }}>
                <CardMedia
                    component="img"
                    height="200"
                    image=
"https://media.geeksforgeeks.org/wp-content/cdn-uploads/gfg_200x200-min.png"
                    alt="GFG Logo"
                />
                <CardContent sx={{ bgcolor: "#E8E8E8" }}>
                    <h3>Top interview Questions</h3>
                    <h4 style={{ color: "green" }}>
                        As the placement season is back so are we to
                        help you ace the interview. We have selected
                        some most commonly asked and must do practice
                        problems for you. You can also take part in
                        our mock placement contests which will help
                        you learn different topics and practice at
                        the same time, simulating the feeling of a
                        real placement test environment.
                    </h4>
                </CardContent>
                <CardActions>
                    <TextField
                        id="outlined-basic"
                        label="Referral code"
                        variant="outlined"
                    />
                    <Button variant="contained" color="primary">
                        Share
                    </Button>
                    <Button variant="contained" color="success">
                        Enroll
                    </Button>
                </CardActions>
            </Card>
        </div>
    );
}
输出:

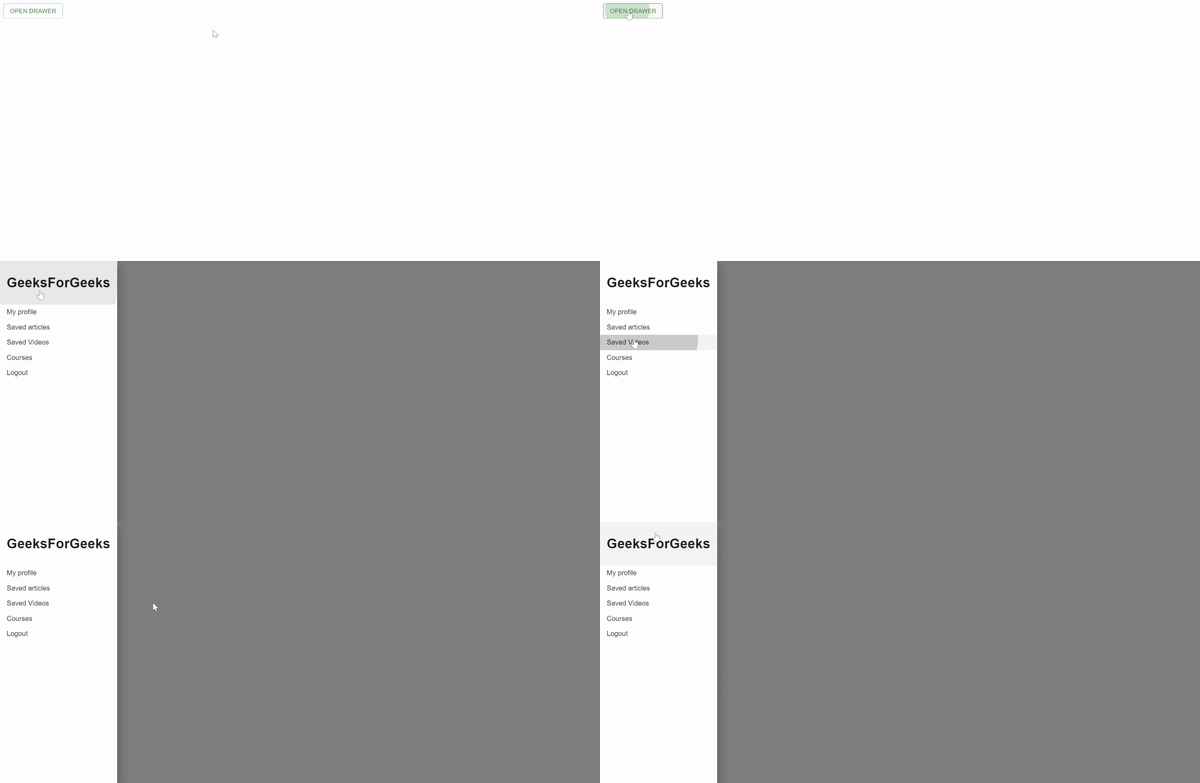
示例2: 在此示例中,我们将创建一个抽屉,它像一个具有背景的模态框一样在页面上方打开。我们将使用抽屉和按钮等组件。
- 文件名: App.js
import * as React from "react";
import Drawer from "@mui/material/Drawer";
import Button from "@mui/material/Button";
import MenuItem from "@mui/material/MenuItem";

export default function App() {
    const [open, setOpen] = React.useState(false);

    function handleOpen() {
        setOpen(!open);
    }

    function handleClose() {
        setOpen(false);
    }

    return (
        <>
            <Button onClick={handleOpen}
                    variant="outlined"
                    color="success">
                Open Drawer
            </Button>
            <Drawer anchor={"left"}
                    open={open}
                    onClose={handleClose}>
                <MenuItem>
                    <h1>GeeksForGeeks</h1>
                </MenuItem>
                <MenuItem>My profile</MenuItem>
                <MenuItem>Saved articles</MenuItem>
                <MenuItem>Saved Videos</MenuItem>
                <MenuItem>Courses</MenuItem>
                <MenuItem>Logout</MenuItem>
            </Drawer>
        </>
    );
}
输出:

参考文献: https://mui.com/components/
 极客教程
极客教程