创建自定义 Hook,使 Next.js 应用响应式
在本文中,我们将创建一个自定义 Hook,用于在响应式布局中有条件地渲染组件。我们将检查屏幕大小,并根据结果在 Next.js 应用中渲染组件。
首先,让我们通过创建一个 Next.js 项目来开始。
创建 Next.js 项目: 在终端中运行以下命令
npx create-next-app gfg-next
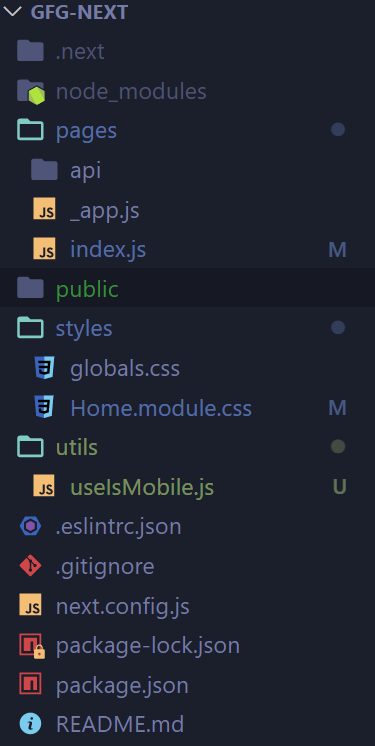
项目结构: 看起来就像这样。

步骤1: 创建一个自定义文件 /utils/useIsMobile.js 并将以下代码添加到其中。
import { useEffect, useState } from "react";

const useIsMobile = () => {
    const [width, setWidth] = useState(0);
    const handleWindowSizeChange = () => {
        setWidth(window.innerWidth);
    };

    useEffect(() => {
        handleWindowSizeChange();

        /* Inside of a "useEffect" hook add
           an event listener that updates
           the "width" state variable when
           the window size changes */
        window.addEventListener("resize",
            handleWindowSizeChange);

        // Return a function from the effect
        // that removes the event listener
        return () => {
            window.removeEventListener(
                "resize", handleWindowSizeChange);
        };
    }, []);

    return width <= 700;
};

export default useIsMobile;
步骤2: 使用下面的代码更新 index.js 文件
import Head from "next/head";
import styles from "../styles/Home.module.css";
import useIsMobile from "../utils/useIsMobile";

export default function Home() {
    const isMobile = useIsMobile();

    return (
        <div className={styles.container}>
            <Head>
                <title>Create Next App</title>
                <link rel="icon" href="/favicon.ico" />
            </Head>
            {isMobile ? <Mobile /> : <Desktop />}
        </div>
    );
}

function Mobile() {
    return (
        <div className={styles.main}>
            <h1 className={styles.title}>
                Welcome to
                    <a href="https://nextjs.org">
                    Next.js!
                </a>
            </h1>
            <h1 className={styles.subtitle}>
                Mobile UI
            </h1>
            <p className={styles.description}>
                Get started by editing mobile
                component in
                <code className={styles.code}>
                    pages/index.js
                </code>
            </p>
        </div>
    );
}

function Desktop() {
    return (
        <div className={styles.main}>
            <h1 className={styles.title}>
                Welcome to
                <a href="https://nextjs.org">
                    Next.js
                </a>
            </h1>
            <h1 className={styles.subtitle}>
                Desktop UI
            </h1>
            <p className={styles.description}>
                Get started by editing desktop
                component in
                <code className={styles.code}>
                    pages/index.js
                </code>
            </p>
        </div>
    );
}
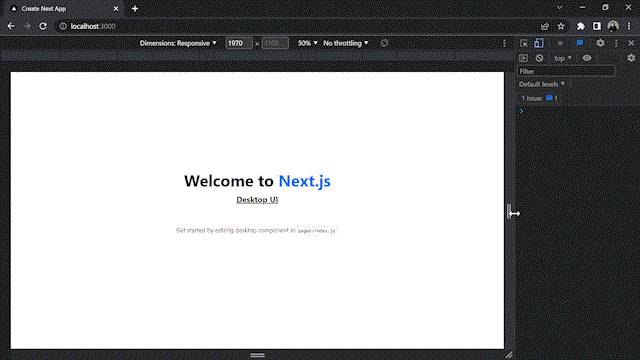
我们在一个文件中为移动和桌面代码创建了单独的组件,而我们的主组件’Home’只根据用户当前的屏幕大小渲染特定的组件。
步骤3: 在styles文件夹中创建一个Home.module.css文件,并添加以下CSS代码:
.container {
    padding: 0 2rem;
}

.main {
    min-height: 100vh;
    padding: 4rem 0;
    flex: 1;
    display: flex;
    flex-direction: column;
    justify-content: center;
    align-items: center;
}

.title a {
    color: #0070f3;
    text-decoration: none;
}

.title a:hover,
.title a:focus,
.title a:active {
    text-decoration: underline;
}

.title {
    margin: 0;
    line-height: 1.15;
    font-size: 4rem;
}

.subtitle {
    line-height: 1.15;
    text-decoration: underline;
}

.title,
.description {
    text-align: center;
}

.description {
    margin: 4rem 0;
    line-height: 1.5;
    font-size: 1.5rem;
}

.code {
    background: #fafafa;
    border-radius: 5px;
    padding: 0.75rem;
    font-size: 1.1rem;
    font-family: Menlo, Monaco, Lucida Console,
        Liberation Mono, DejaVu Sans Mono,
        Bitstream Vera Sans Mono,
        Courier New, monospace;
}
运行应用程序的步骤: 要运行该应用程序,请在终端中输入以下命令。
npm run dev
输出: 现在打开你的浏览器并输入 http://localhost:3000/ ,你将看到如下输出。

 极客教程
极客教程