如何在Next.js中添加表单验证
表单在现代Web应用程序中起着至关重要的作用,通过确保数据的准确性和有效性。Next.js是一个功能强大的用于构建React应用程序的框架,提供了表单验证功能,可以验证用户输入的数据是否符合预定义的规范,提供即时反馈并提高数据质量。本文将涵盖必要的概念,如必填字段、数据格式验证和自定义错误消息。
先决条件
- 介绍Next.js
- Next.js组件
- React useState
- NPM和NPX
创建NextJS应用程序的步骤
步骤1: 使用以下命令创建一个新的Next.js项目
- NPX: NPM 5.2+中的软件包运行工具,npx是运行Node软件包的简单CLI工具。
npx create-next-app form-validation-app
步骤2: 切换到项目目录:
cd form-validation-app
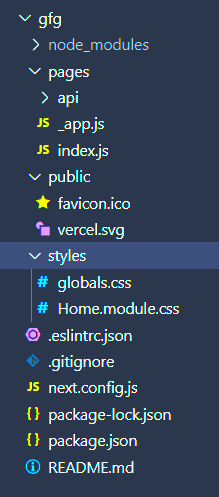
项目结构:

方法
为了添加表单验证,我们将使用useState和useEffect hooks来动态管理表单状态和验证规则。
React的 useState() hook在函数式组件中封装本地状态变量。它是一个特殊的函数,以初始状态作为参数,并返回一个双入口数组。它只包含单一值,并且需要多个状态实现的useState调用。
React的 useEffect hook处理诸如获取数据和更新DOM等副作用,它在每次渲染时运行,并使用依赖数组。
示例: 在这个示例中,我们将看到如何在Next.js中添加表单验证。
- App.js文件
import React, { useState, useEffect } from 'react';

const App = () => {
    const [name, setName] = useState('');
    const [email, setEmail] = useState('');
    const [password, setPassword] = useState('');
    const [errors, setErrors] = useState({});
    const [isFormValid, setIsFormValid] = useState(false);

    useEffect(() => {
        validateForm();
    }, [name, email, password]);
    // Validate form
    const validateForm = () => {
        let errors = {};

        if (!name) {
            errors.name = 'Name is required.';
        }

        if (!email) {
            errors.email = 'Email is required.';
        } else if (!/\S+@\S+\.\S+/.test(email)) {
            errors.email = 'Email is invalid.';
        }

        if (!password) {
            errors.password = 'Password is required.';
        } else if (password.length < 6) {
            errors.password = 'Password must be at least 6 characters.';
        }

        setErrors(errors);
        setIsFormValid(Object.keys(errors).length === 0);
    };
    // Submit
    const handleSubmit = () => {
        if (isFormValid) {
            console.log('Form submitted successfully!');
        } else {
            console.log('Form has errors. Please correct them.');
        }
    };

    return (
        <div style={styles.container}>
            <div style={styles.form}>
                <h1 style={styles.heading}>
                    Geeksforgeeks || Form Validation In Next.js
                </h1>
                <h3 style={styles.subHeading}>Login Page</h3>
                <input
                    style={styles.input}
                    placeholder="Name"
                    value={name}
                    onChange={(e) => setName(e.target.value)}
                />
                {errors.name && <p style={styles.error}>{errors.name}</p>}
                <input
                    style={styles.input}
                    placeholder="Email"
                    value={email}
                    onChange={(e) => setEmail(e.target.value)}
                />
                {errors.email && <p style={styles.error}>{errors.email}</p>}
                <input
                    style={styles.input}
                    placeholder="Password"
                    value={password}
                    onChange={(e) => setPassword(e.target.value)}
                    type="password"
                />
                {errors.password && <p style={styles.error}>{errors.password}</p>}
                <button
                    style={{ ...styles.button, opacity: isFormValid ? 1 : 0.5 }}
                    disabled={!isFormValid}
                    onClick={handleSubmit}
                >
                    Submit
                </button>
            </div>
        </div>
    );
};

const styles = {
    container: {
        display: 'flex',
        alignItems: 'center',
        justifyContent: 'center',
        minHeight: '100vh',
        backgroundColor: '#f0f0f0',
    },
    heading: {
        fontWeight: 'bold',
        fontSize: '25px',
        color: "green",
        textAlign: "center",
    },
    subHeading: {
        fontWeight: 'bold',
        fontSize: '25px',
        textAlign: "center",

    },
    form: {
        backgroundColor: '#fff',
        padding: '20px',
        borderRadius: '8px',
        boxShadow: '0 2px 4px rgba(0, 0, 0, 0.1)',
        width: '100%',
        maxWidth: '400px',
        margin: '0 auto',
    },
    input: {
        width: '100%',
        padding: '12px',
        marginBottom: '12px',
        border: '1px solid #ccc',
        borderRadius: '10px',
        fontSize: '16px',
        transition: 'border-color 0.2s ease',
    },
    button: {
        backgroundColor: 'green',
        color: '#fff',
        fontWeight: 'bold',
        fontSize: '16px',
        padding: '12px',
        border: 'none',
        borderRadius: '10px',
        cursor: 'pointer',
        width: '40%',
        transition: 'opacity 0.2s ease',
    },
    error: {
        color: 'red',
        fontSize: '14px',
        marginBottom: '6px',
    },
};

export default App;
步骤:
使用以下命令在URL http://localhost:3000 上运行 Next.js 应用程序。
npm run dev
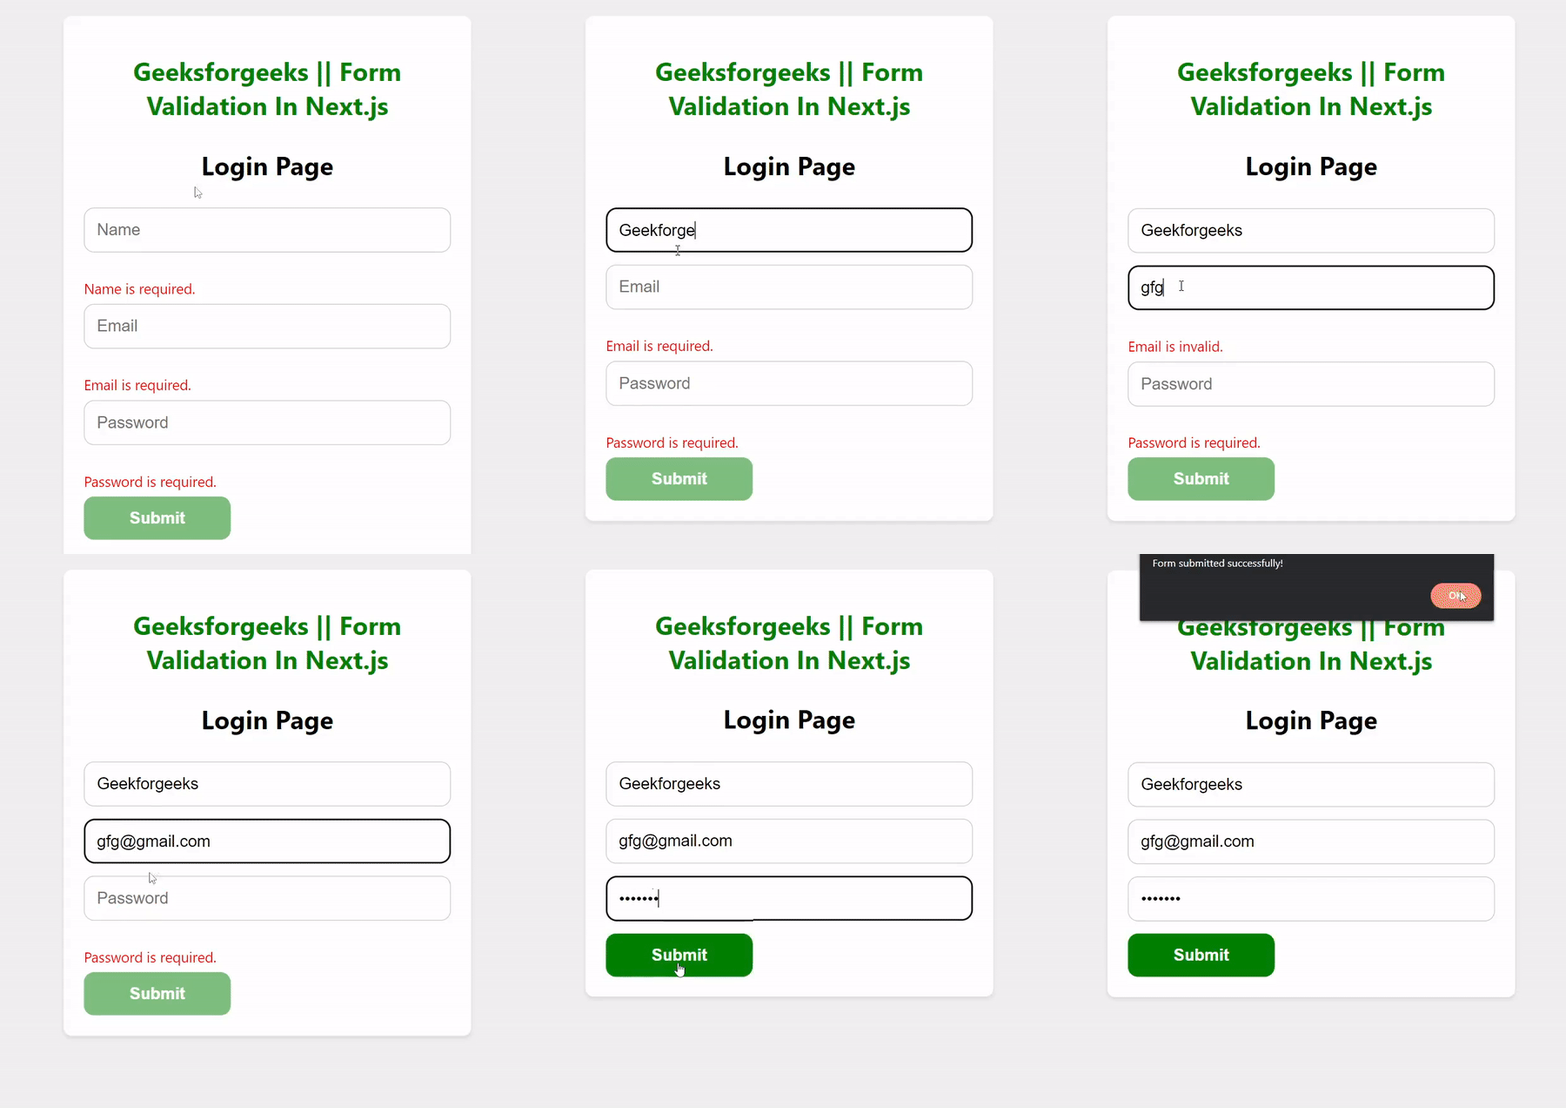
输出 :

 极客教程
极客教程