在Next.js应用程序中控制CSS模块的特异性
CSS模块是一种流行的技术,用于在JavaScript行为应用程序中进行CSS本地作用域。在Next.js应用程序中,CSS模块主要用于为我们的样式生成唯一的类名,防止它们与不同组件或库的样式发生冲突。在本文中,我们将探讨在Next.js应用程序中控制CSS模块特异性的方法。
控制Next.js应用程序中CSS模块特异性的方法
- 通过组合CSS模块和组件层次结构
- 使用带有作用域变量的动态样式
创建Next.JS应用程序的步骤
通过在VSCode终端中按照以下命令创建新的Next.js应用程序。
npx create-next-app css-module-hierarchy
cd css-module-hierarchy
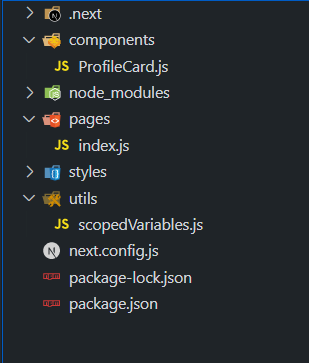
项目结构

方法1:结合CSS模块和组件层次结构
在这种方法中,我们利用组件的自然层次结构来控制Next.js App中CSS模块的特异性。这里的组件与它们自己的CSS模块配对。‘Header’组件具有类似“.header”和“.nav”的CSS模块,它控制头部部分的布局和样式。‘Button’组件也是如此,以确保特异性并防止类型泄漏到应用的其他部分。
语法
.button {
    /* Button styling */
}
const Button = ({ children }) => {
    return <button className={styles.button}>
                    {children}
           </button>;
};
示例: 现在,在上述目录结构中的相应文件中添加以下代码。
// components/Button.js

import React from "react";
import styles from "./Button.module.css";

const Button = ({ children }) => {
    return (
        <button className={styles.button}>
            {children}
        </button>
    );
};

export default Button;
// components/Header.js

import React from "react";
import styles from "./Header.module.css";

const Header = () => {
    return (
        <header className={styles.header}>
            <nav className={styles.nav}>
                <a className={styles.logo} href="#">
                    GeeksforGeeks
                </a>
            </nav>
        </header>
    );
};

export default Header;
// pages/index.js

import React from "react";
import Header from "../components/Header";
import Button from "../components/Button";

const Home = () => {
    return (
        <div>
            <Header />
            <h1 style={{ color: "green" }}>
                GeeksforGeeks
            </h1>
            <Button>Click Me</Button>
        </div>
    );
};

export default Home;
CSS
/* components/Button.module.css */
.button {
    padding: 10px 20px;
    background-color: lightblue;
    border: none;
    border-radius: 5px;
    cursor: pointer;
}
CSS
/* components/Header.module.css */

.header {
    background-color: lightgray;
    padding: 10px;
}

.nav {
    display: flex;
    justify-content: space-between;
    align-items: center;
}

.logo {
    color: green;
    text-decoration: none;
    font-size: 24px;
}
运行应用的步骤
现在,在终端中执行以下命令来运行应用:
npm run dev
输出

方法2:使用动态样式和作用域变量
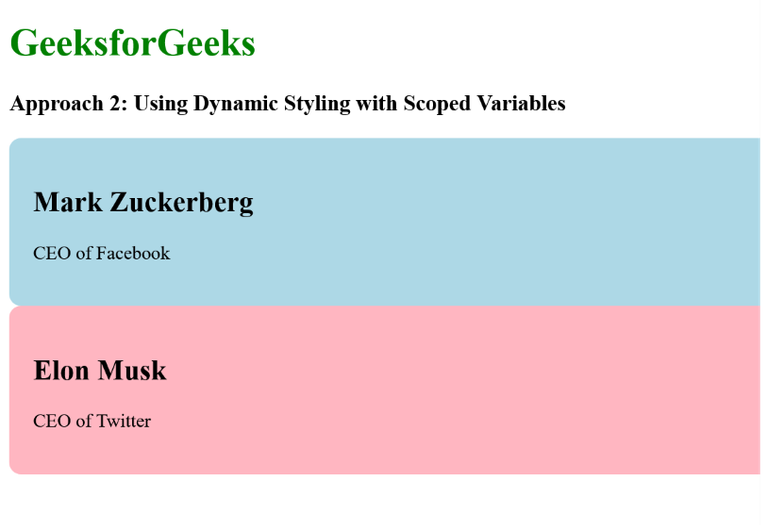
在这个方法中,我们使用了动态样式和作用域变量,我们创建了一个名为“scopedVariables.js”的自定义CSS JavaScript实用程序。在这个工具中,我们指定了“ProfileCard”的样式,其中包括控制样式颜色的CSS变量。在“ProfileCard”组件中,我们使用了作用域变量和CSS变量来实际应用动态样式。该组件还接受诸如name、jobTitle等props。通过将props注入到作用域样式中,我们创建了具体组件的动态、隔离的样式,并避免了冲突。
语法:
const generateScopedStyles = (componentName, variableValue) => {
    return `
        .{componentName} {               --custom-variable:{variableValue};
              /* Other styles using the custom variable */
         }
      `;
};
export default generateScopedStyles;
示例:
现在,在上面的目录结构中显示的相应文件中添加以下代码:
// components/ProfileCard.js

import React from "react";
import generateScopedStyles from "../utils/scopedVariables";

const ProfileCard = ({
    name,
    backgroundColor,
    jobTitle,
}) => {
    const componentName = "profile-card";
    const dynamicStyles = generateScopedStyles(
        componentName,
        backgroundColor
    );

    return (
        <div
            className={componentName}
            style={{ backgroundColor }}
        >
            <h2>{name}</h2>
            <p>{jobTitle}</p>
            <style jsx>{dynamicStyles}</style>
        </div>
    );
};

export default ProfileCard;
// pages/index.js

import React from "react";
import ProfileCard from "../components/ProfileCard";

const Home = () => {
    return (
        <div>
            <h1 style={{ color: "green" }}>
                GeeksforGeeks
            </h1>
            <h3>
                Approach 2: Using Dynamic Styling with
                Scoped Variables
            </h3>
            <ProfileCard
                name="Mark Zuckerberg"
                jobTitle="CEO of Facebook"
                backgroundColor="lightblue"
            />
            <ProfileCard
                name="Elon Musk"
                jobTitle="CEO of Twitter"
                backgroundColor="lightpink"
            />
        </div>
    );
};

export default Home;
// utils/scopedVariables.js

const generateScopedStyles = (
    componentName,
    variableValue
) => `
  .{componentName} {
    --profile-card-bg-color:{variableValue};
    background-color: let(--profile-card-bg-color);
    padding: 20px;
    border-radius: 10px;
  }
`;

export default generateScopedStyles;
运行应用程序的步骤
现在,在终端中执行以下命令来运行应用程序:
npm run dev
输出:

 极客教程
极客教程