ReactJS 如何通过ID获取元素
ReactJS 是一个广泛使用的用于创建用户界面的JavaScript库,它为开发人员提供了各种工具来操作文档对象模型(DOM)。在DOM操作中,常见的任务之一就是使用唯一标识符(ID)来访问元素。在ReactJS中,通过ID获取元素通常是指使用ref系统来创建对具有唯一ID的特定元素的引用,以便开发人员可以在React组件中与该元素进行交互或操作。在本文中,我们将深入讨论在ReactJS中通过ID获取元素的过程。
有几种可以在ReactJs中通过ID获取元素的方法,如下所示:
- 使用document.getElementById()
- 使用Refs
- 使用React状态
我们将通过示例来探讨上述所有方法及其基本实现。
先决条件
- 介绍React
- React Hooks
- NPM或NPX
创建React应用的步骤
步骤1:使用以下命令创建一个React应用:
npx create-react-app getelementID-app
步骤2:创建项目文件夹后,即getelementID-app,使用以下命令进行导航:
cd getelementID-app
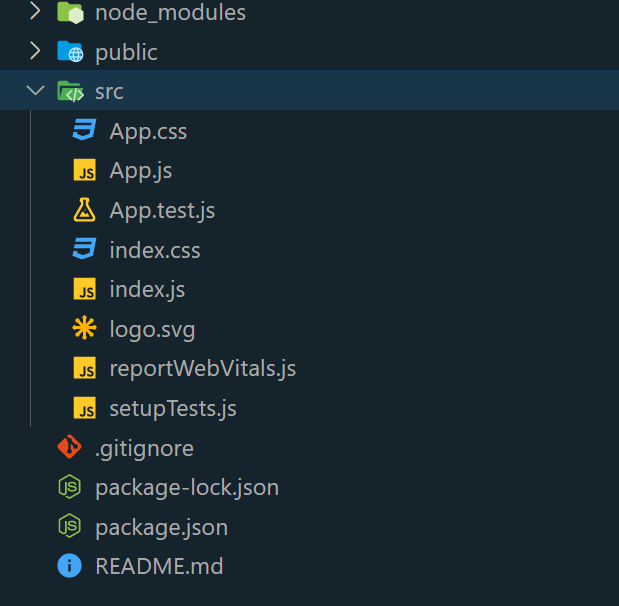
项目结构

方法1:使用 document.getElementById()
在这种方法中,元素是通过其唯一的ID使用 document.getElementById() 方法检索的。这是一种标准的DOM函数,证明了其效果。
语法:
const element = document.getElementById('yourElementId');
示例: 在这个示例中,我们有一个React组件,演示了点击ID为“myButton”的按钮会触发一个函数来为元素设置样式。点击按钮后,按钮的背景变为绿色,文本变为白色。此外,还应用了边框、内边距、边框半径和光标等各种样式属性。
App.js
import React, { Component } from 'react';

class App extends Component {
    handleClick = () => {
        const element = document.getElementById('myButton');
        if (element) {

            // Manipulate the retrieved element's style
            element.style.backgroundColor = 'green';
            element.style.color = 'white';
            element.style.border = 'none';
            element.style.padding = '10px 20px';
            element.style.borderRadius = '10px';
            element.style.cursor = 'pointer';
            // Add more styling properties as needed
        }
    };

    render() {
        return (
            <div style={styles.container}>
                <h1 style={styles.heading}>
                    Geekforgeeks
                </h1>
                <button id="myButton"
                        onClick={this.handleClick}>
                    Click me
                </button>
            </div>
        );
    }
}

export default App;

const styles = {
    container: {
        textAlign: 'center',
        margin: 'auto',
        padding: '20px',
        width: 400,
    }
};
输出:

方法2:使用Refs
在这种方法中,React中涉及使用React.createRef()创建一个ref,并通过ref属性将其附加到一个元素上。虽然不常见,但它提供了直接访问DOM节点的方式,并保持其封装在React组件中。
语法:
const node = this.myCallRef.current;
示例: 在这个示例中,这个React组件RefsExample使用createRef方法来访问和样式化一个按钮元素,在点击时应用自定义样式作为响应。
App.js
import React, { Component } from 'react';

class RefsExample extends Component {
    constructor(props) {
        super(props);
        this.myButtonRef = React.createRef();
    }

    handleClick = () => {
        if (this.myButtonRef.current) {

            // Manipulate the retrieved element's style
            const buttonElement = this.myButtonRef.current;
            buttonElement.style.backgroundColor = 'green';
            buttonElement.style.color = 'white';
            buttonElement.style.border = 'none';
            buttonElement.style.padding = '10px 20px';
            buttonElement.style.cursor = 'pointer';
            buttonElement.style.borderRadius = '10px';

            // Add more styling properties as needed
        }
    };

    render() {
        return (
            <div style={styles.container}>
                <h1 style={styles.heading}>
                    Geekforgeeks
                </h1>
                <button ref={this.myButtonRef}
                    onClick={this.handleClick}>
                    Click me
                </button>
            </div>
        );
    }
}

export default RefsExample;

const styles = {
    container: {
        textAlign: 'center',
        margin: 'auto',
        padding: '20px',
        width: 400,
    }
};
输出:

方法3:使用React状态
在这种方法中,使用React的状态机制来管理元素样式。当按钮被点击时,状态会被更新,从而修改按钮的外观。这保持了一种声明式的模式,并简化了在React组件中处理动态样式的方式。
语法:
this.setState((prevState, props) => ({
      counter: prevState.count + props.diff
}));
示例: App 是一个利用 React state 来管理按钮样式的 React 组件。初始状态下,按钮具有绿色背景、白色文字和圆角。然而,一旦点击了按钮,它的背景色会变为红色,但保留了其他独特的属性。
App.js
import React, { Component } from 'react';

class App extends Component {
    constructor(props) {
        super(props);
        this.state = {
            buttonStyles: {
                backgroundColor: 'green',
                color: 'white',
                border: 'none',
                padding: '10px 20px',
                cursor: 'pointer',
                borderRadius: '10px',
            },
        };
    }

    handleClick = () => {
        this.setState({
            buttonStyles: {
                backgroundColor: 'red',
                color: 'white',
                border: 'none',
                padding: '10px 20px',
                cursor: 'pointer',
                borderRadius: '10px',
            },
        });
    };

    render() {
        return (
            <div style={styles.container}>
                <h1 style={styles.heading}>
                    Geeksforgeeks
                </h1>
                <button
                    style={this.state.buttonStyles}
                    onClick={this.handleClick}
                >
                    Click Me
                </button>
            </div>
        );
    }
}

const styles = {
    container: {
        textAlign: 'center',
        margin: 'auto',
        padding: '20px',
        width: 400,
    },
    heading: {
        fontSize: '24px',
        marginBottom: '10px',
    },
};

export default App;
输出:

 极客教程
极客教程