可以将Chakra UI与Tailwind CSS混合使用吗
是的,可以将Chakra UI与Tailwind CSS混合使用。在本文中,我们将学习如何将Chakra UI与Tailwind CSS混合使用。Chakra UI是一个面向ReactJS的基于组件的开源前端框架。它是一个简单、易用且模块化的组件库,由Segun Adebayo创建。Chakra UI被数百万用户使用,可以轻松配置和扩展。Tailwind CSS是一种基于内联CSS的库,用于构建现代网站,无需为样式创建单独的文件。因此,我们将两者一起用于网页设计。
将Chakra UI与Tailwind CSS混合使用可以将Chakra UI的组件库和主题功能与Tailwind CSS的实用主义方法和响应式设计特性相结合,以创建外观美观、功能强大的用户界面,兼具两个框架的优势。我们使用了两种常见的方法来混合使用Chakra UI和Tailwind CSS。
- 创建Chakra UI卡片组件
- 创建Chakra UI表单控件组件
创建Chakra UI卡片组件
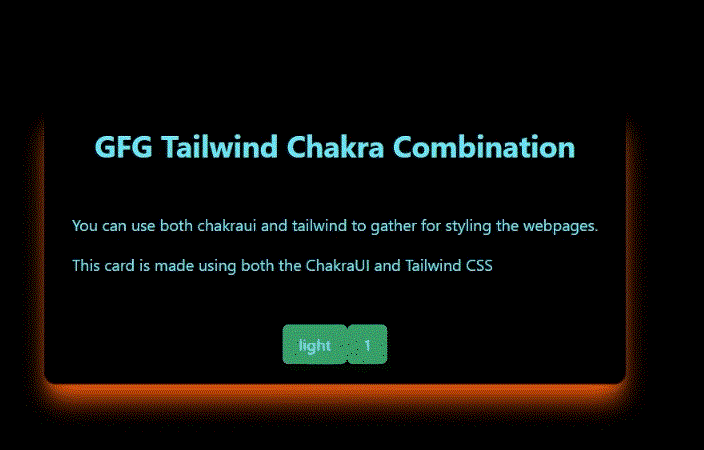
我们创建了一个卡片组件,其中包含标题、正文、按钮和表单控件组件。然后我们使用Tailwind CSS对组件进行样式设置。
前提条件
- NodeJS
- ReactJS
- Tailwind CSS
在Windows中安装Chakra UI和Tailwind CSS
步骤1: 使用以下命令创建一个React应用:
npx create-react-app folder_name
步骤2: 在创建好你的项目文件夹(即folder_name)之后,使用以下命令进入该文件夹:
cd folder_name
步骤3: 创建ReactJS应用后,通过执行以下命令安装Chakra UI。
npm install @chakra-ui/react @emotion/react @emotion/styled framer-motion
步骤4: 在index.js文件中添加
// index.js
import React from "react";
import ReactDOM from "react-dom/client";
import "./index.css";
import App from "./App";
import reportWebVitals from "./reportWebVitals";
import { ChakraProvider } from "@chakra-ui/react";

const root = ReactDOM.createRoot(
    document.getElementById("root"));

root.render(
    <React.StrictMode>
        <ChakraProvider>
            <App />
        </ChakraProvider>
    </React.StrictMode>
);

reportWebVitals();
步骤5: 通过输入以下命令安装TailwindCSS。
npm install -D tailwindcss
npx tailwindcss init
步骤6: 在 tailwind.config.js 中添加模板文件的路径
module.exports = {
    content: ["./src/**/*.{html,js,jsx}"],
    theme: {
        extend: {},
    },
    plugins: [],
}
步骤7: 将Tailwind指令添加到您的index.css文件中
@tailwind base;
@tailwind components;
@tailwind utilities;
步骤8: 编译您的 index.css 文件以扫描模板
npx tailwindcss -i ./src/index.css -o ./public/output.css
步骤9: 将编译好的CSS文件添加到 <head> 并开始使用Tailwind的实用类来为内容添加样式。
<link href="/public/output.css" rel="stylesheet">
现在TailwindCSS和ChakraUI已经安装并准备在项目中使用
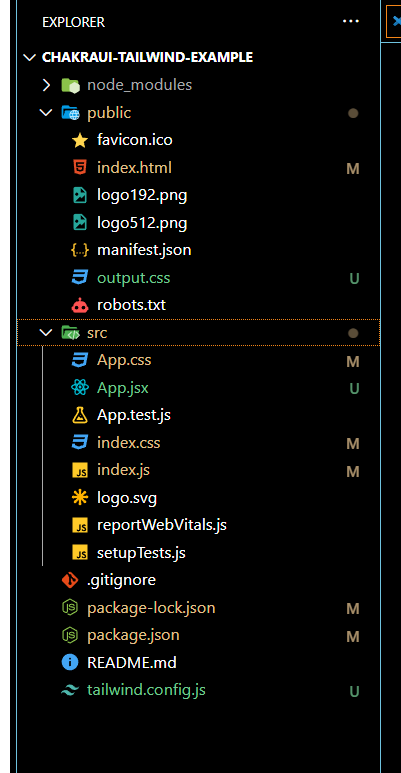
项目结构

示例: 使用Tailwind CSS实现Chakra UI卡片组件,以改变卡片的主题并使用各种CSS转换和更改卡片主题。
创建一个CardExample.jsx文件,并通过导入Box、Card、CardHeading、CardFooter和CardBody创建一个基本的卡片布局。
- Box: 创建响应式布局的容器。
- Card: 子元素的父包装器。
- CardHeader: 卡片的头部。
- CardFooter: 卡片的底部。
- CardBody: 卡片的主体。
- Heading: 渲染标题。
- Text: 渲染文本。
- Button: 渲染按钮。
为了实现卡片的主题更改,我们使用useState React Hook来存储其值,然后使用条件运算符根据hook的值来改变卡片和文本的颜色。
为了在卡片上实现CSS转换,创建两个useState Hook,一个用于转换文本,另一个用于选择转换,然后使用switch case将转换存储在文本中,并使用useEffect Hook在选择新转换时渲染更改。
在App.jsx中导入CardExample。
// CardExample.jsx
import {
    Box,
    Button,
    Card,
    CardBody,
    CardFooter,
    CardHeader,
    Heading,
    Text,
} from "@chakra-ui/react";
import React, { useEffect, useState } from "react";

const CardExample = () => {
    const [transformCount, setTransformCount] = useState(1);
    const [transformText, setTransformText] = useState("");

    useEffect(() => {
        changeTransfrom();
    }, [transformCount]);

    const changeTransfrom = () => {
        if (transformCount > 4) {
            setTransformCount(1);
        }
        switch (transformCount) {
            case 1:
                setTransformText("hover:rotate-6");
                break;

            case 2:
                setTransformText("hover:scale-105");
                break;

            case 3:
                setTransformText("hover:skew-x-12");
                break;

            case 4:
                setTransformText("hover:skew-y-12");
                break;

            default:
                setTransformText("hover:translate-x-12");
        }
    };
    const [darkTheme, setDarkTheme] = useState(true);
    console.log(transformText);
    return (
        <Box
            rounded={"xl"}
            className={`p-auto shadow-xl ${transformText}
            shadow-orange-600 bottom-20 duration-300 ease-in-out`}
        >
            <Card
                rounded={"xl"}
                align="center"
                bg={darkTheme ? "black" : "white"}
                className={`box `}
            >
                <CardHeader>
                    <Heading
                        size="xl"
                        className={darkTheme ?
                            ` text-cyan-300 ` : `text-cyan-600`}
                    >
                        GFG Tailwind Chakra Combination
                    </Heading>
                </CardHeader>
                <CardBody>
                    <Text
                        className={darkTheme ?
                            ` text-cyan-300 p-2` : `text-cyan-600 p-2`}
                    >
                        You can use both chakraui and tailwind to
                        gather for styling the webpages.
                    </Text>
                    <Text
                        className={darkTheme ?
                            ` text-cyan-300 p-2` : `text-cyan-600 p-2`}
                    >
                        This card is made using both the ChakraUI and
                        Tailwind CSS
                    </Text>
                </CardBody>
                <CardFooter>
                    <Button
                        color={darkTheme ? "cyan.300" : "blue"}
                        colorScheme={darkTheme ? "green" : "teal"}
                        onClick={() => {
                            setDarkTheme(!darkTheme);
                        }}
                    >
                        {darkTheme ? "light" : "dark"}
                    </Button>
                    <Button
                        color={darkTheme ? "cyan.300" : "blue"}
                        colorScheme={darkTheme ? "green" : "teal"}
                        onClick={() => {
                            setTransformCount(transformCount + 1);
                        }}
                    >
                        {transformCount}
                    </Button>
                </CardFooter>
            </Card>
        </Box>
    );
};

export default CardExample;
// App.jsx
import CardExample from "./CardExample";

function App() {
    return (
        <div className="bg-black shadow-xl
            text-white relative flex
            flex-row justify-center
            items-center h-screen w-full">
            <CardExample />
        </div>
    );
}

export default App;
在终端中输入以下命令来运行项目。
npm start
注意: 然后转到 http://localhost:3000
输出:

创建Chakra UI表单控件组件
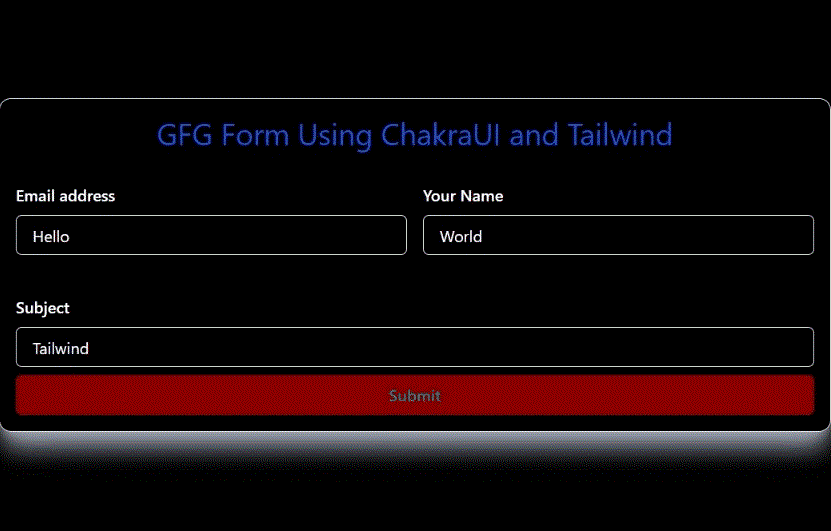
使用Tailwind CSS实现Chakra UI表单控件组件和Toast,以在Toast中显示文本。通过导入Flex、FormControl、FormLabel、Input和useToast来创建FormExample.jsx并创建表单布局。
- Flex: 类似于Box,但显示为flex。
- FormControl: 为其子元素提供功能和上下文。
- FormLabel: 类似于HTML标签,用于表单标签。
- Input: 用户输入的输入组件。
- useToast: 创建一个toast组件。
为了实现这个,我们使用useState React钩子来存储输入值,然后在toast组件中使用它们来显示toast中的值。
示例: 在这里,我们使用上述解释的方法。
在App.jsx中导入FormExample.jsx
//FormExample.jsx
import {
    Box,
    Button,
    Flex,
    FormControl,
    FormLabel,
    Input,
    Text,
    useToast,
} from "@chakra-ui/react";
import React from "react";
import { useState } from "react";

const FormExample = () => {
    const toast = useToast();
    const [email, setEmail] = useState("");
    const [name, setName] = useState("");
    const [subject, setSubject] = useState("");
    return (
        <Box className="col-span-3 w-full h-auto
                        shadow-gray-400 border
                        shadow-xl
                        rounded-xl lg:p-4">
            <Box className="p-4">
                <Text className="text-center text-3xl
                                 text-semibold
                                 text-blue-700">
                    GFG Form Using ChakraUI and Tailwind
                </Text>

                <Box className="grid md:grid-cols-2
                                gap-4 w-full py-6">
                    <Flex className="flex-col py-2">
                        <FormControl>
                            <FormLabel>
                                Email address
                            </FormLabel>
                            <Input
                                type="email"
                                onChange={(e) => {
                                    setEmail(e.target.value);
                                }}
                            />
                        </FormControl>
                    </Flex>
                    <Flex flexDirection={"column"}
                        className="py-2">
                        <FormControl>
                            <FormLabel>
                                Your Name
                            </FormLabel>
                            <Input
                                type="text"
                                onChange={(e) => {
                                    setName(e.target.value);
                                }}
                            />
                        </FormControl>
                    </Flex>
                </Box>
                <Flex flexDirection={"column"}
                    className="py-2">
                    <FormControl w="full">
                        <FormLabel>
                            Subject
                        </FormLabel>
                        <Input
                            type="text"
                            onChange={(e) => {
                                setSubject(e.target.value);
                            }}
                        />
                    </FormControl>
                </Flex>
                <Button
                    loadingText="Submitting"
                    color="teal"
                    bg="darkred"
                    variant="solid"
                    className="p-2 w-full"
                    onClick={() =>
                        toast({
                            title: "GFG says",
                            description: `{email}{name} ${subject}`,
                            status: "success",
                            position: "top",
                            duration: 9000,
                            isClosable: true,
                        })
                    }
                >
                    Submit
                </Button>
            </Box>
        </Box>
    );
};

export default FormExample;
// App.jsx
import "./App.css";
import FormExample from "./FormExample";
function App() {
  return (
    <div className="bg-black shadow-xl
        text-white relative flex
        flex-row justify-center
        items-center h-screen w-full">
      <FormExample />
    </div>
  );
}

export default App;
在终端中输入以下命令来运行项目。
npm start
注意: 然后转到 http://localhost:3000
输出:

 极客教程
极客教程