React Native 如何创建圆角或自定义边界半径
React Native通过borderRadius属性提供了一个简单的解决方案来实现这个效果。在本文中,我们将看到如何将border-radius应用于React Native组件。
边界半径起着重要的作用。它作为一个样式属性,控制各种UI元素的角落曲率。通过这个属性,我们可以将按钮、卡片、图像和任何其他元素的边缘变成圆角。
边界半径的属性
在我们深入示例之前,让我们了解与borderRadius关联的关键属性:
- borderRadius: 这个属性指定了元素的四个角的半径,从而创建了圆角。
- borderTopLeftRadius: 这个属性允许您为左上角定义一个特定的半径。
- borderTopRightRadius: 这个属性允许您为右上角定义一个特定的半径。
- borderBottomLeftRadius: 这个属性允许您为左下角定义一个特定的半径。
- borderBottomRightRadius: 这个属性允许您为右下角定义一个特定的半径。
语法
<Component style={{ borderBottomRightRadius: value }} />
<Component style={{ borderBottomLeftRadius: value }} />
...
安装和配置React Native的步骤
步骤1: 通过使用以下命令创建React Native应用程序:
npx create-expo-app borderRadius
步骤2: 在创建项目文件夹,即borderRadius之后,使用以下命令进入该文件夹:
cd borderRadius
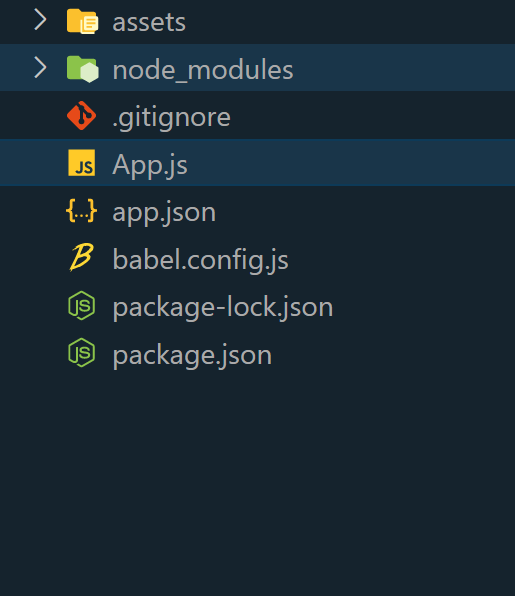
项目结构
项目的结构将会像这样。

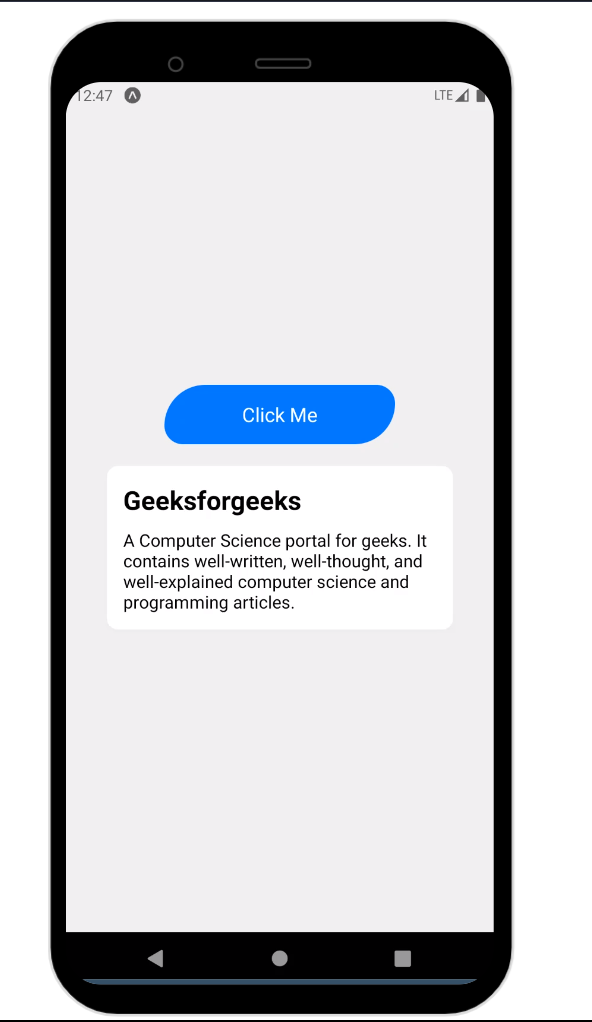
示例1: 在这个示例中,有一个居中的容器,包含两个主要组件:一个按钮和一个卡片。按钮具有蓝色背景和圆角(左上角和右下角比其他角更圆),以及白色文本。
// App.js

import React from "react";
import {
    View,
    TouchableOpacity,
    Text,
    StyleSheet,
} from "react-native";

const App = () => {
    return (
        <View style={styles.container}>
            <TouchableOpacity style={styles.button}>
                <Text style={styles.buttonText}>
                    Click Me
                </Text>
            </TouchableOpacity>
            <View style={styles.card}>
                <Text style={styles.cardHeading}>
                    Geeksforgeeks
                </Text>
                <Text style={styles.cardText}>
                    A Computer Science portal for geeks. It
                    contains well-written, well-thought, and
                    well-explained computer science and
                    programming articles.
                </Text>
            </View>
        </View>
    );
};

const styles = StyleSheet.create({
    container: {
        flex: 1,
        justifyContent: "center",
        alignItems: "center",
        backgroundColor: "#f0f0f0",
        padding: 20,
    },
    button: {
        backgroundColor: "#007BFF",
        padding: 15,
        // Apply borderRadius to the button
        borderTopLeftRadius: 55,
        borderTopRightRadius: 25,
        borderBottomLeftRadius: 25,
        borderBottomRightRadius: 55,
        justifyContent: "center",
        alignItems: "center",
        width: "60%",
    },
    buttonText: {
        color: "white",
        fontSize: 18,
    },
    card: {
        backgroundColor: "white",
        // Apply borderRadius to the Card
        borderRadius: 10,
        marginTop: 20,
        padding: 15,
        width: "90%",
        shadowColor: "rgba(0, 0, 0, 0.1)",
        shadowOffset: {
            width: 0,
            height: 2,
        },
        shadowOpacity: 1,
        shadowRadius: 4,
        elevation: 3,
    },
    cardHeading: {
        fontSize: 24,
        fontWeight: "bold",
        marginBottom: 10,
    },
    cardText: {
        fontSize: 16,
    },
});

export default App;
步骤 4: 前往终端并输入以下命令来运行 React Native 应用程序:
npx expo start
- 在Android上运行:
npx react-native run-android
- 在iOS上运行:
npx react-native run-ios
输出:

示例2: 在这个示例中,图像显示在一个容器内,这个容器居中显示在屏幕上。通过应用borderRadius属性,图像具有自定义的圆角。通过获取和显示特定URL的图像,利用Image组件的source属性。
// App.js
import React from "react";
import { View, Image, StyleSheet } from "react-native";

const App = () => {
    const imageUrl =
"https://media.geeksforgeeks.org/wp-content/uploads/20230816223829/geeksgforgeeks-logo-1.png";
    return (
        <View style={styles.container}>
            <Image
                source={{ uri: imageUrl }} // Load image from URL
                style={styles.profileImage}
            />
        </View>
    );
};

const styles = StyleSheet.create({
    container: {
        flex: 1,
        justifyContent: "center",
        alignItems: "center",
    },
    profileImage: {
        width: 300,
        height: 300,
        // Apply borderRadius to the Image
        borderTopLeftRadius: 105,
        borderTopRightRadius: 25,
        borderBottomLeftRadius: 25,
        borderBottomRightRadius: 105,
    },
});

export default App;
输出:

 极客教程
极客教程