PyGame 从位图设置鼠标光标
在这篇文章中,我们将看到如何使用PyGame模块在Python中从位图上设置鼠标指针。
什么是PyGame
- 它是一套跨平台的Python模块,用于编写视频游戏。
- 它包括计算机图形和声音库,旨在与Python编程语言一起使用。
- 它可以处理时间、视频、音乐、字体、不同的图像格式、光标、鼠标、键盘、操纵杆等。
什么是Bitmap
- 位图是一个二进制数据阵列,代表图像中像素的值。
- GIF是图形图像文件的一个例子,它有一个位图。
PyGame中的鼠标相关函数
它用于游戏中,程序需要对光标的位置保持更新。
pygame.mouse.get_pressed()
返回代表所有鼠标按钮状态的布尔运算序列。一个真值意味着在调用的时候鼠标正在被按下。
语法: pygame.mouse.get_pressed(num_buttons=3) -> (button1, button2, button3)。
参数:
- num_buttons :鼠标中的按钮数量(默认值=3)。
pygame.display.set_mode()
这个函数用于创建一个显示面。传入的参数是对显示类型的请求。实际创建的显示器将是系统所支持的最佳匹配。
语法: pygame.display.set_mode(resolution=(0,0), flags=0, depth=0)
参数:
- 分辨率:一对数字,代表窗口的宽度和高度。
- 标志:改变窗口类型的附加选项。
- 深度:用于颜色的比特数量。
pygame.mouse.get_pos()
这是用来获取鼠标光标的X和Y坐标的。这些坐标是相对于显示器的左上角而言的。光标的位置是相对于
语法: pygame.mouse.get_pos()
返回:鼠标的坐标被存储。
pygame.quit()
这是用来关闭游戏的。
语法: pygame.quit()
clock.tick()
通过每帧调用clock.tick(60)一次,程序的运行速度将永远不会超过每秒60帧。
语法:clock.tick(framerate=0)。
参数 :
- Framerate : 它将计算自上一次调用以来已经过去多少毫秒。
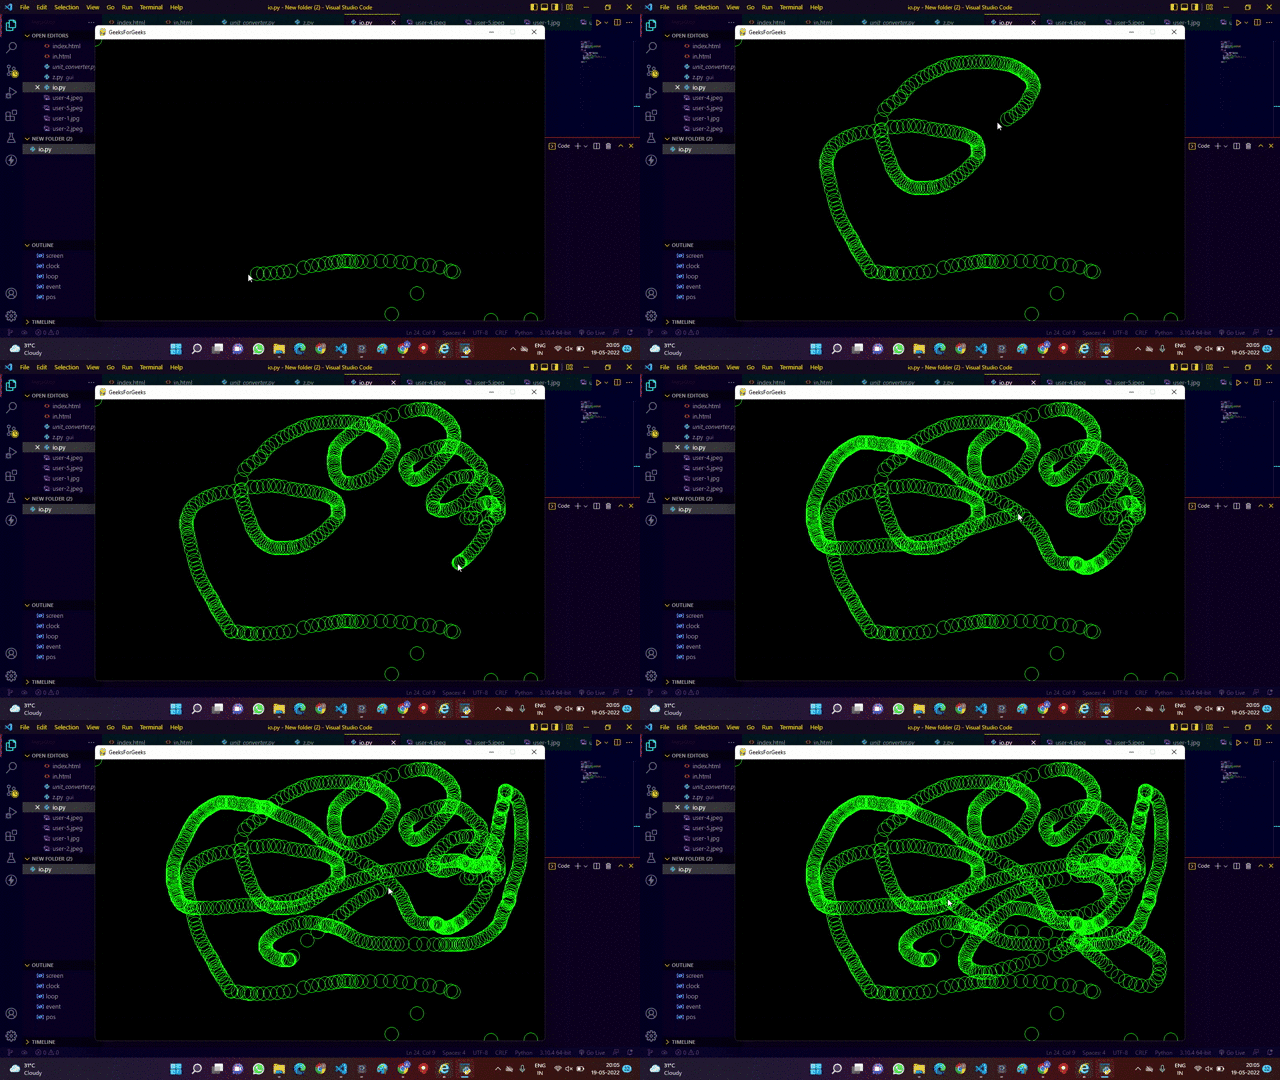
示例1: 创建main.py文件,在鼠标路径上创建一个圆圈
在这个例子中,我们要在光标在窗口内移动的地方在屏幕上画一个圆,要实现这个目标,我们必须遵循以下步骤。
- 我们将制作一张尺寸为960*600的画布。
- 编写代码,使我们的圈子。
- 在画布内保持鼠标光标的轨迹。
- 在光标移动的地方绘制圆圈。
import pygame
# initializing the pygame
pygame.init()
# displaying Canvas (960*600)
screen = pygame.display.set_mode((960, 600))
pygame.display.set_caption('GeeksForGeeks')
clock = pygame.time.Clock()

loop = True
while loop:

    for event in pygame.event.get():
        if event.type == pygame.QUIT:
            loop = False
    pos = pygame.mouse.get_pos()
    # giving color and shape to the circle
    pygame.draw.circle(screen, (0, 255, 0),
                       pos, 15, 1)
    pygame.display.update()
    clock.tick(60)


pygame.quit()
# quit()
输出:

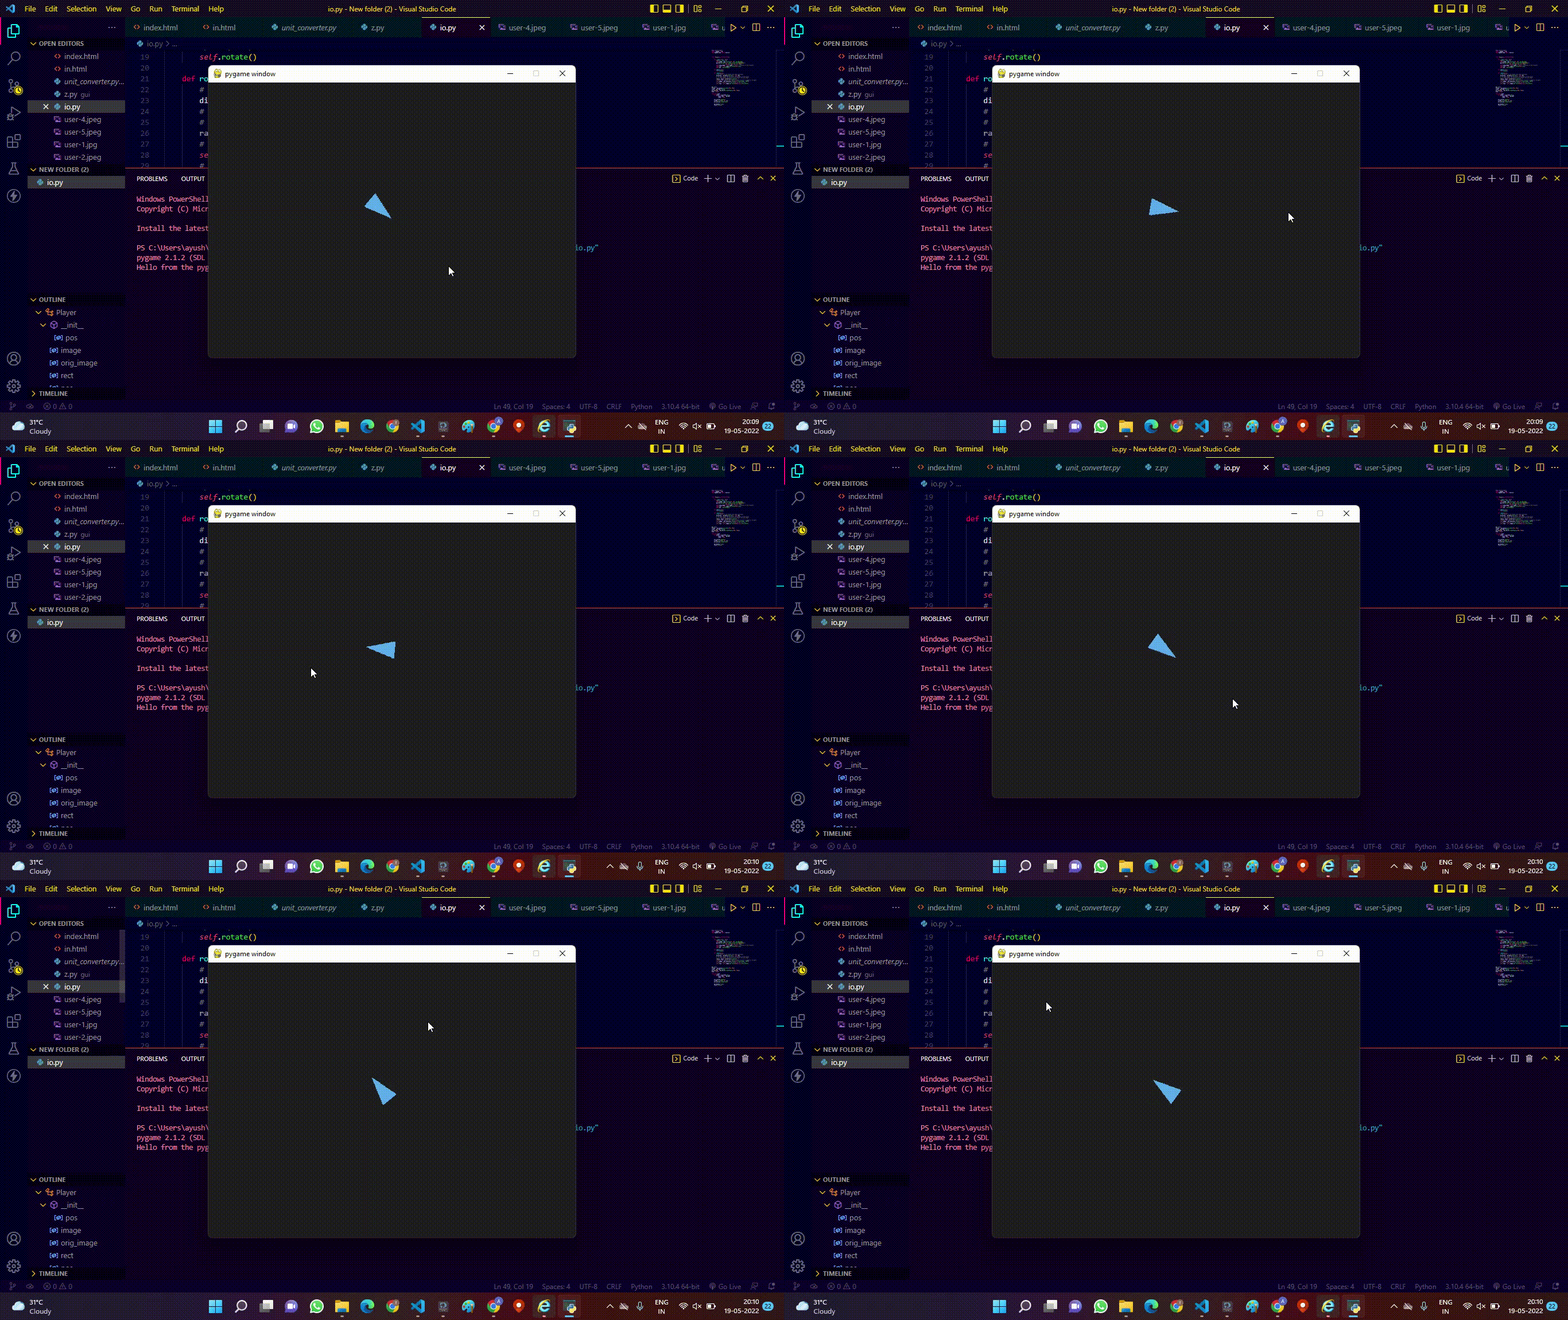
示例2: 创建main.py文件以定位光标的方向
在这个例子中,我们要在窗口中央画一个箭头,这个箭头指向光标,无论光标在画布窗口内如何移动,我们都要按照以下步骤来实现。
- 我们将制作一块尺寸为640*480的画布。
- 现在写一段代码,画一个箭头,指向鼠标的指针。
- 现在做一个程序,把箭头向光标方向旋转。
import pygame as pg
from pygame.math import Vector2


class Player(pg.sprite.Sprite):
   # main function starts here
    def __init__(self, pos):
        super().__init__()
        self.image = pg.Surface((50, 30),
                                pg.SRCALPHA)
        pg.draw.polygon(self.image,
                        pg.Color('steelblue2'),
                        [(0, 0), (50, 15), (0, 30)])
        self.orig_image = self.image
        # Store a reference to the original.
        self.rect = self.image.get_rect(center=pos)
        self.pos = Vector2(pos)

    def update(self):
        self.rotate()
# Rotate the arrow function

    def rotate(self):
        # The vector to the target (the mouse position).
        direction = pg.mouse.get_pos() - self.pos
        # .as_polar gives you the polar
        # coordinates of the vector,
        # i.e. the radius (distance to the target)
        # and the angle.
        radius, angle = direction.as_polar()
        # Rotate the image by the negative angle
        # (y-axis in pygame is flipped).
        self.image = pg.transform.rotate(self.orig_image,
                                         -angle)
        # Create a new rect with the
        # center of the old rect.
        self.rect = self.image.get_rect(center=self.rect.center)


pg.init()
# Creating a canvas of size 640*480
screen = pg.display.set_mode((640, 480))
clock = pg.time.Clock()
all_sprites = pg.sprite.Group(Player((300, 220)))
done = False

while not done:
    for event in pg.event.get():
        if event.type == pg.QUIT:
            done = True

    all_sprites.update()
    screen.fill((30, 30, 30))
    all_sprites.draw(screen)

    pg.display.flip()
    clock.tick(30)
输出:

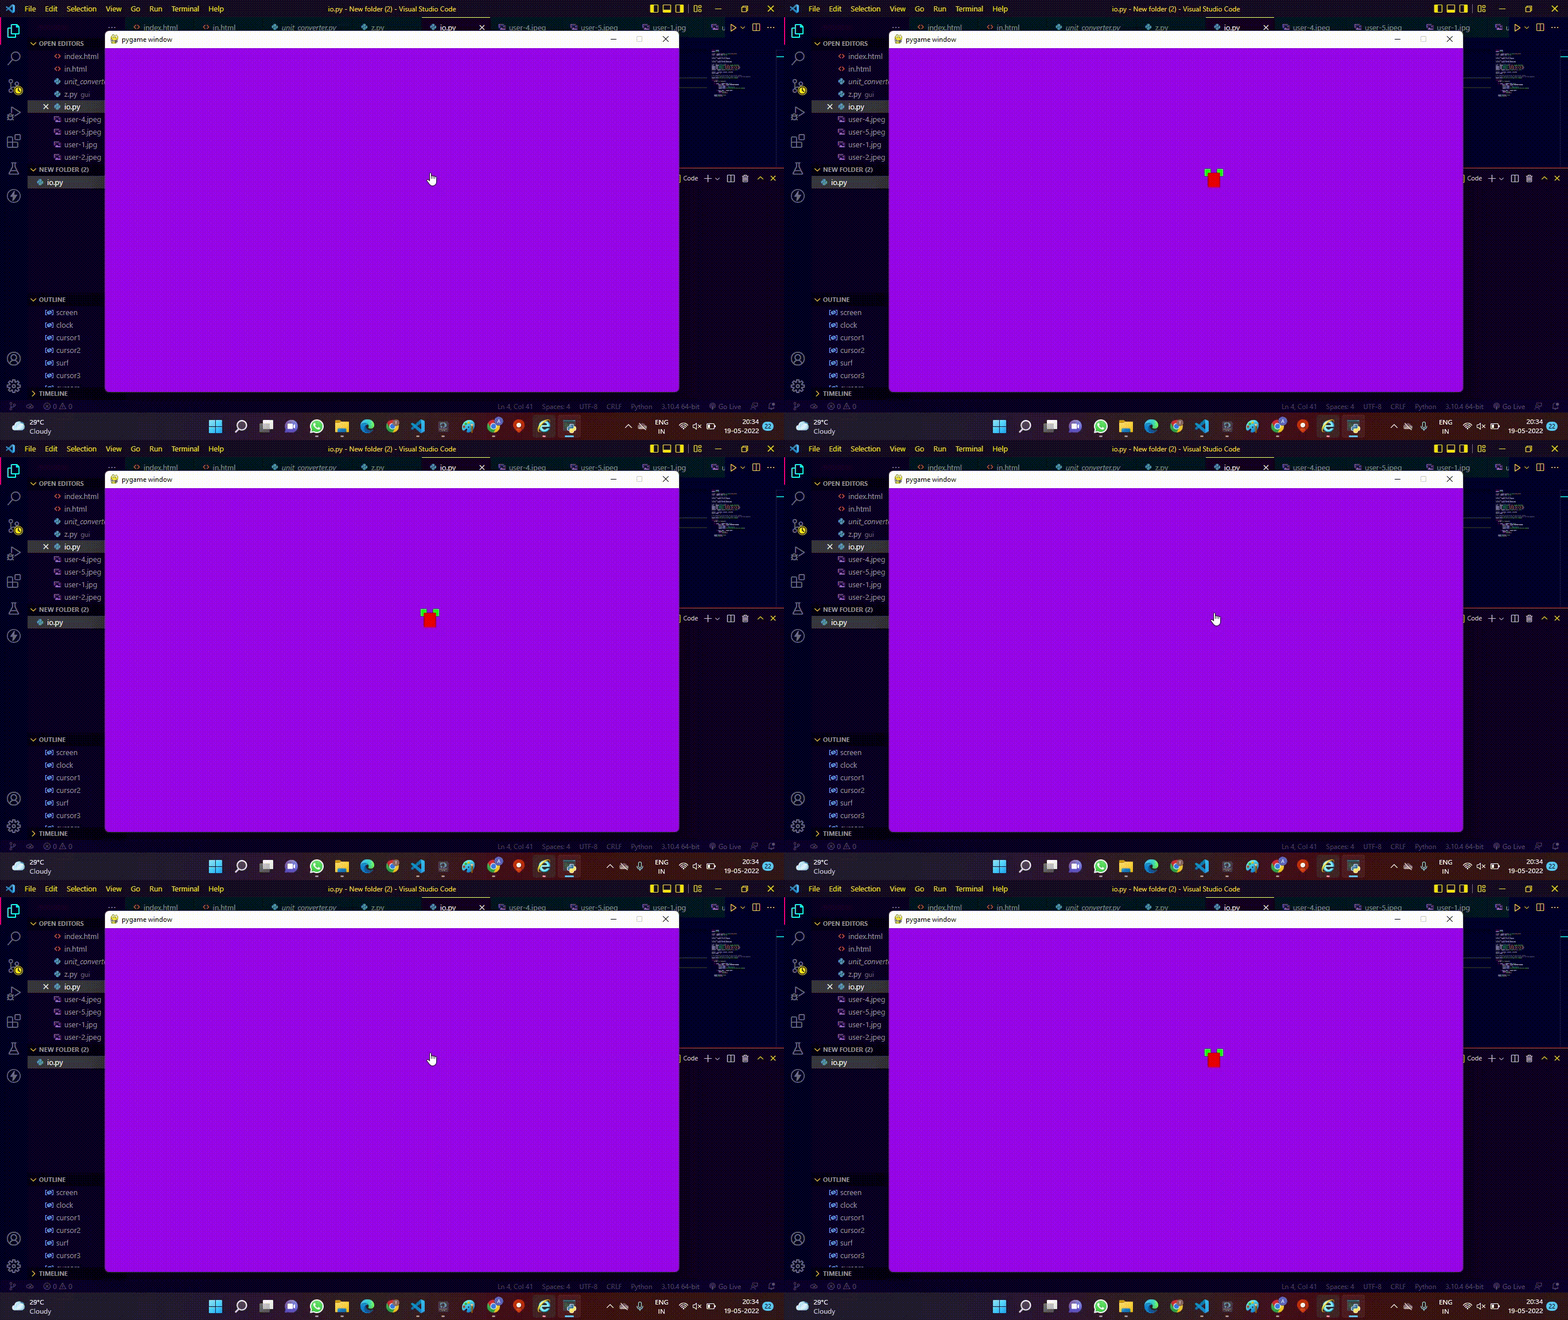
示例3: 改变鼠标的光标形状
在这个例子中,我们要改变光标的形状,只要我们点击鼠标,如果光标在屏幕窗口内,就可以实现这一点,我们必须遵循以下步骤。
- 首先,我们将制作一个600*400的画布。
- 白一个代码来跟踪鼠标的光标。
- 现在我们要写一段代码,在鼠标被点击时改变游标的形状。
import pygame
pygame.init()

# Creating a canvas of 600*400
screen = pygame.display.set_mode((600, 400))
clock = pygame.time.Clock()

# old type, "bitmap" cursor
cursor1 = pygame.cursors.diamond

# new type, "system" cursor
cursor2 = pygame.SYSTEM_CURSOR_HAND

# new type, "color" cursor
surf = pygame.Surface((30, 25), pygame.SRCALPHA)
pygame.draw.rect(surf, (0, 255, 0), [0, 0, 10, 10])
pygame.draw.rect(surf, (0, 255, 0), [20, 0, 10, 10])
pygame.draw.rect(surf, (255, 0, 0), [5, 5, 20, 20])
cursor3 = pygame.cursors.Cursor((15, 5), surf)

cursors = [cursor1, cursor2, cursor3]
cursor_index = 0

# the arguments to set_cursor can be a Cursor object
# or it will construct a Cursor object
# internally from the arguments
pygame.mouse.set_cursor(cursors[cursor_index])

while True:
    screen.fill("purple")

    for event in pygame.event.get():
        if event.type == pygame.MOUSEBUTTONDOWN:
            cursor_index += 1
            cursor_index %= len(cursors)
            pygame.mouse.set_cursor(cursors[cursor_index])

        if event.type == pygame.QUIT:
            pygame.quit()
            raise SystemExit

    pygame.display.flip()
    clock.tick(144)
输出:

 极客教程
极客教程