如何在OpenCV Python中对给定的图像执行距离转换?
我们可以使用方法 cv2.distanceTransform() 来执行距离变换。以下是此方法的语法。
语法
cv2.distanceTransform(src,distanceType,maskSize)
此方法接受以下参数 −
- src − 8位,单通道(二进制)源图像。
-
distanceType − 距离类型。
-
maskSize − 距离变换掩码的大小。
步骤
要对图像执行距离变换,我们可以按照以下步骤进行-
- 导入所需的库。在所有以下示例中,所需的 Python 库是 OpenCV 。请确保您已经安装了它。
-
使用 cv2.imread() 读取输入图像。使用此方法读取的 RGB 图像以 BGR 格式存储。可以将读取的 BGR 图像可选地分配给 img。
-
使用 cv2.cvtColor() 函数将此 BGR 图像转换为灰度图像。可以将转换的灰度图像可选地分配给 gray。
-
现在,在灰度图像上应用阈值处理以将其转换为二进制图像。调整第二个参数(threshValue)以获得更好的二进制图像。
-
使用 cv2.distanceTransform() 在二进制图像上应用距离转换。它返回一个距离变换图像。将此图像规范化为范围 [0,1]。
-
显示距离变换后的图像。
让我们看一些示例以更清晰地了解。
输入图像
我们将在以下示例中使用此图像作为输入文件。

示例
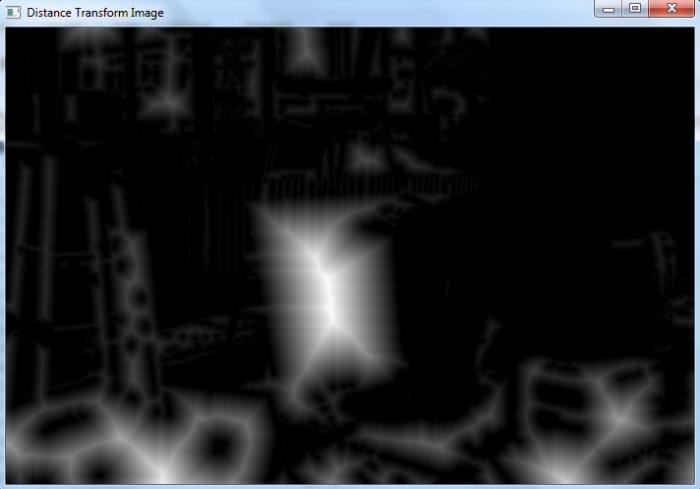
在此示例中,我们找到输入图像的距离变换。我们应用 cv2.DIST_L2 作为距离类型,并为掩码大小设置了3。
#以灰度模式加载图像
import cv2
import numpyas np
import matplotlib.pyplot as plt

#读取输入图像
img = cv2.imread('sketch.jpg')

#使用阈值处理将图像转换为二进制图像
gray = cv2.cvtColor(img, cv2.COLOR_BGR2GRAY)

#将灰度图像转换为二进制图像
ret,thresh = cv2.threshold(gray,150,255,cv2.THRESH_BINARY)

#在二进制图像上应用距离转换
dist = cv2.distanceTransform(thresh, cv2.DIST_L2, 3)

#将图像规范化为范围 {0.0, 1.0},以便我们可以可视化和阈值它
cv2.normalize(dist, dist, 0, 1.0, cv2.NORM_MINMAX)
cv2.imshow('Distance Transform Image', dist)
cv2.waitKey(0)
cv2.destroyAllWindows()
输出
当您运行以上 Python 程序时,它将产生以下输出窗口−

示例
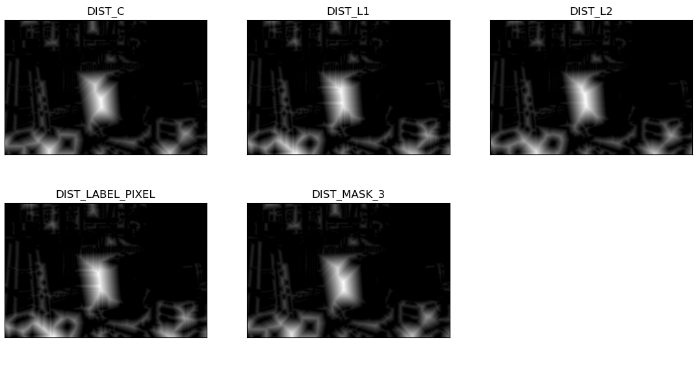
在这个例子中,我们计算输入图像的距离变换。我们应用五种不同的距离类型(distanceType)和掩膜大小(maskSize)为3。
# import required libraries
import cv2
import matplotlib.pyplot as plt

# Read the input image
img = cv2.imread('sketch.jpg')

# convert the image to grayscale
gray = cv2.cvtColor(img, cv2.COLOR_BGR2GRAY)

# Apply thresholding to convert the grayscale image to a binary image
ret,thresh = cv2.threshold(gray,150,255,cv2.THRESH_BINARY)

# Apply distance transform on the binary image
dist_C = cv2.distanceTransform(thresh, cv2.DIST_C, 3)
dist_L1 = cv2.distanceTransform(thresh, cv2.DIST_L1, 3)
dist_L2 = cv2.distanceTransform(thresh, cv2.DIST_L2, 3)
dist_LP = cv2.distanceTransform(thresh, cv2.DIST_LABEL_PIXEL, 3)
dist_M = cv2.distanceTransform(thresh, cv2.DIST_MASK_3, 3)

# Normalize the distance image for range = {0.0, 1.0}

# so we can visualize and threshold it
cv2.normalize(dist_C, dist_C, 0, 1.0, cv2.NORM_MINMAX)
cv2.normalize(dist_L1, dist_L1, 0, 1.0, cv2.NORM_MINMAX)
cv2.normalize(dist_L2, dist_L2, 0, 1.0, cv2.NORM_MINMAX)
cv2.normalize(dist_LP, dist_LP, 0, 1.0, cv2.NORM_MINMAX)
cv2.normalize(dist_M, dist_M, 0, 1.0, cv2.NORM_MINMAX)

# visualize the distance images
plt.subplot(231),plt.imshow(dist_C, cmap = 'gray')
plt.title('DIST_C'), plt.xticks([]), plt.yticks([])
plt.subplot(232),plt.imshow(dist_L1, cmap = 'gray')
plt.title('DIST_L1'), plt.xticks([]), plt.yticks([])
plt.subplot(233),plt.imshow(dist_L2, cmap = 'gray')
plt.title('DIST_L2'), plt.xticks([]), plt.yticks([])
plt.subplot(234),plt.imshow(dist_LP, cmap = 'gray')
plt.title('DIST_LABEL_PIXEL'), plt.xticks([]), plt.yticks([])
plt.subplot(235),plt.imshow(dist_M, cmap = 'gray')
plt.title('DIST_MASK_3'), plt.xticks([]), plt.yticks([])
plt.show()
输出
运行上述Python程序后,将会产生以下输出窗口,显示应用不同distanceType后得到的不同转换。

请注意这五个 distanceTypes之间的区别。
 极客教程
极客教程