使用MailChimp和NodeJS创建Newsletter应用程序
现在,每个企业都使用电子邮件营销来推广他们的业务并定期通过电子邮件给用户发送更新。也许,你也是一些网站的订阅者,比如GeeksforGeeks和许多其他网站。很简单,如果你订阅了,你就会定期收到他们的邮件;如果你取消订阅,你将不再收到邮件。
你有没有想过他们是如何通过一次点击向订阅用户发送邮件的呢? MailChimp是最好的电子邮件营销工具。此外,它允许你创建不同的列表来管理你的受众并发送批量邮件。然而,仅仅发送邮件是不够的。它应该有一些有吸引力的模板和MailChimp提供的文本,你可以直接选择默认模板来发送邮件。
在本教程中,我们将使用MailChimp和NodeJS创建一个简单的newsletter应用程序。当用户订阅我们的应用程序时,我们将学习如何构建受众列表并将用户存储到MailChimp中。
预先要求:
- NodeJs
创建MailChimp免费帐户:
现在,用户需要按照以下步骤创建MailChimp免费帐户并获取API密钥。
步骤1: 转到MailChimp.com并免费注册。此外,设置您的帐户配置文件。
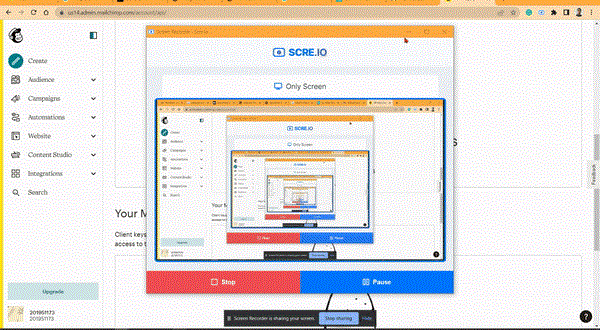
步骤2: 现在,为了获取API密钥,从屏幕左下方转到 配置文件 >> 其他 >> API密钥 >> 创建API密钥 。此外,请保存您的API密钥。我们将在我们的NodeJS应用程序中稍后使用它。
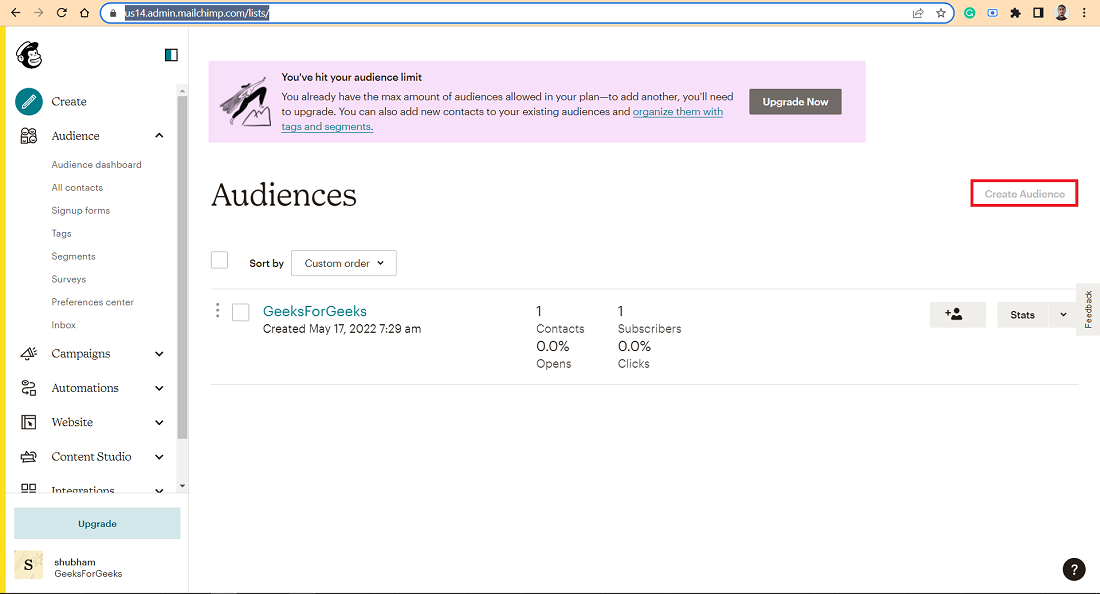
步骤3: 接下来,我们需要创建一个受众列表。请前往 https://us14.admin.mailchimp.com/lists/, 并点击创建受众列表。填写所需的详细信息,在受众仪表板上查看您的受众群体。
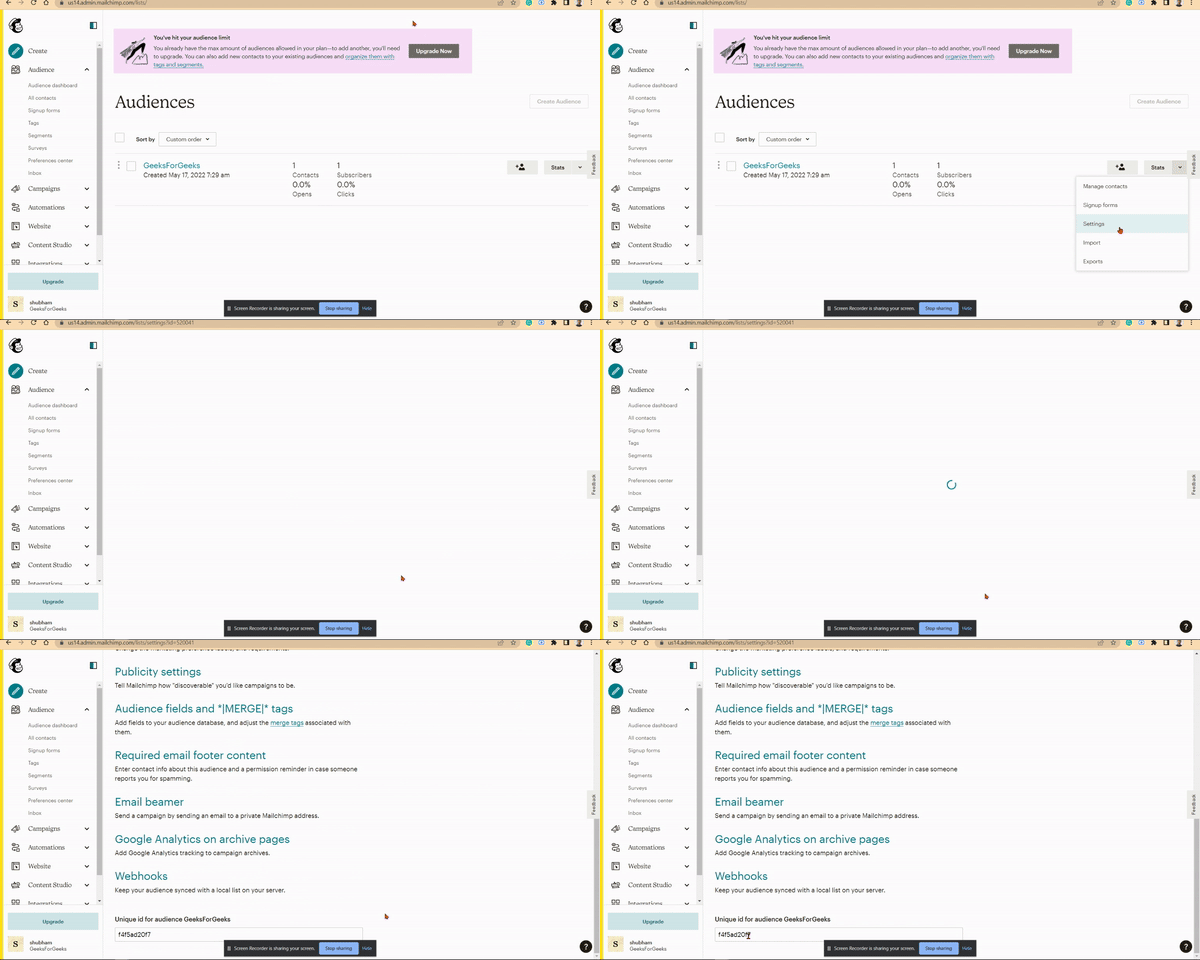
步骤4: 现在,我们需要获取观众列表的id。转到观众设置 -> 列表id。将列表id存储起来以在NodeJs应用程序中使用。
现在,我们已经准备好创建NodeJS应用程序。
创建NodeJS应用程序:
要创建新的NodeJS应用程序,请从终端进入您的项目目录,并输入以下命令。
npm init -y
接下来,在相同的目录下输入以下命令来安装所需的npm包。
npm i body-parser express https nodemon
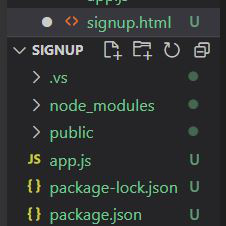
项目结构: 您的项目目录应该如下所示的图像。
示例: 本示例将演示如何使用MailChimp和NodeJS创建Newsletter应用程序。
在此文件中,我们将添加基本的express应用程序代码,以通过API密钥将数据发送给您的MailChimp。 ****
文件名:App.js
// import required packages
const express= require("express");
const https= require("https");
const bodyparser= require("body-parser");

const app= express();
app.use(express.static("public"));

app.use(bodyparser.urlencoded({extended:true}));

// On the home route, send signup html template
app.get("/",function(req,res){
  res.sendFile(__dirname+"/signup.html");
});

// Manage post request on home route and
// Send data to the MailChimp account via API
app.post("/",function(req,res){
  var firstName=req.body.Fname;
  var email=req.body.Email;
  var password=req.body.password;

  var data={
    members:[{
      email_address: email,
      status: "subscribed",
      merge_fields:{
        FNAME: firstName,
        LNAME: password
      }
    }]
  }

// Converting string data to JSON data
const jsonData= JSON.stringify(data);
const url="https://us14.api.mailchimp.com/3.0/lists/f4f5ad20f7";
const options={
  method:"POST",
  auth:"201951173:acfa4fffd113041454c6d953a71fa3e5-us14"
}

// On success send users to success, otherwise on failure template
const request=https.request(url,options,function(response){
  if(response.statusCode===200){
    res.sendFile(__dirname+"/success.html");
  }else{
    res.sendFile(__dirname+"/failure.html");
  }
  response.on("data",function(data){
    console.log(JSON.parse(data));
  });
});
  request.write(jsonData);
  request.end();
});

// Failure route
app.post("/failure",function(req,res){
   res.redirect("/");
})

app.listen(8000,function(){
  console.log("server is running on port 8000.");
})
现在,创建一个名为 signup.html 的新文件。
在这个文件中,我们将添加一个简单的表单来获取用户的数据并将其发送到 app.js 文件。
文件名:SignUp.html
<!doctype html>
<html lang="en">
  <head>
    <meta charset="utf-8">
    <meta name="viewport"
          content="width=device-width, initial-scale=1, shrink-to-fit=no">
    <meta name="description" content="">
    <meta name="author" content="">
    <link rel="icon" href="/docs/4.0/assets/img/favicons/favicon.ico">

    <title>Newslatter-Signup</title>

    <link rel="canonical" href=
"https://getbootstrap.com/docs/4.0/examples/sign-in/">

    <!-- Bootstrap core CSS -->
    <link rel="stylesheet" href=
"https://stackpath.bootstrapcdn.com/bootstrap/4.5.0/css/bootstrap.min.css"
          integrity=
"sha384-9aIt2nRpC12Uk9gS9baDl411NQApFmC26EwAOH8WgZl5MYYxFfc+NcPb1dKGj7Sk"
          crossorigin="anonymous">

    <!-- Custom styles for this template -->
    <link href="style.css" rel="stylesheet">
  </head>

  <body class="text-center">
    <!--form to get users data-->
    <form action="/" class="form-signin" method="post">
      <h1 class="h3 mb-3 font-weight-normal">signup to my website</h1>

      <input type="email" name="Email" id="inputEmail"
             class="form-control" placeholder="Email address"
             required autofocus>
      <input type="text" name="Fname" id="inputname"
             class="form-control" placeholder="Name"
             required>
      <input type="password" name="password" id="inputPassword"
             class="form-control" placeholder="Password"
             required>

      <!--On submit we are handling form data into app.js file-->
      <button class="btn btn-lg btn-primary btn-block"
              type="submit">Sign up</button>
    </form>
  </body>
</html>
接下来,创建一个新文件success.html,并添加给定的代码。
当用户成功订阅我们的通讯应用程序时,用户将被重定向到成功的路由。
文件名:Success.html
<!DOCTYPE html>
<html lang="en" dir="ltr">
  <head>
    <meta charset="utf-8">
    <title>successfully</title>
    <link rel="stylesheet" href=
"https://stackpath.bootstrapcdn.com/bootstrap/4.5.0/css/bootstrap.min.css"
          integrity=
"sha384-9aIt2nRpC12Uk9gS9baDl411NQApFmC26EwAOH8WgZl5MYYxFfc+NcPb1dKGj7Sk"
          crossorigin="anonymous">
  </head>
  <body>
    <div class="jumbotron jumbotron-fluid">
  <div class="container">
    <h1 class="display-4">Awesom</h1>
    <p class="lead">You are successful to signup in newslatter website,
      please look forward.</p>

  </div>
</div>
  </body>
</html>
当用户在订阅我们的新闻通讯应用时遇到错误时,用户将被重定向到失败路径。
文件名:Failure.html
<!DOCTYPE html>
<html lang="en" dir="ltr">

<head>
    <meta charset="utf-8">
    <title>Failure</title>
    <link rel="stylesheet" href=
 "https://stackpath.bootstrapcdn.com/bootstrap/4.5.0/css/bootstrap.min.css"
          integrity=
"sha384-9aIt2nRpC12Uk9gS9baDl411NQApFmC26EwAOH8WgZl5MYYxFfc+NcPb1dKGj7Sk"
          crossorigin="anonymous">
</head>

<body>
   <div class="jumbotron jumbotron-fluid">
    <div class="container">
      <h1 class="display-4">Uh oh!</h1>
      <p class="lead">Contact the developer</p>

      <form class="" action="/failure" method="post">
        <button class="btn btn-lg " type="submit"
                name="button">Try again</button>
      </form>
    </div>
   </div>
</body>

</html>
现在,我们需要为我们的应用程序添加基本样式。在public文件夹中,您有一个style.css文件。将以下代码添加到style.css文件中。
我们将在这个文件中为我们的HTML模板添加基本样式。
文件名:Style.css
html,
body {
  height: 100%;
}

body {
  display: -ms-flexbox;
  display: -webkit-box;
  display: flex;
  -ms-flex-align: center;
  -ms-flex-pack: center;
  -webkit-box-align: center;
  align-items: center;
  -webkit-box-pack: center;
  justify-content: center;
  padding-top: 40px;
  padding-bottom: 40px;
  background-color: lightgrey;
}

.form-signin {
  width: 100%;
  max-width: 330px;
  padding: 15px;
  margin: 0 auto;
}
.form-signin .checkbox {
  font-weight: 400;
}
.form-signin .form-control {
  position: relative;
  box-sizing: border-box;
  height: auto;
  padding: 10px;
  font-size: 16px;
}
.form-signin .form-control:focus {
  z-index: 2;
}
.form-signin input[type="email"] {
  margin-bottom: -1px;
  border-bottom-right-radius: 0;
  border-bottom-left-radius: 0;
}
.form-signin input[type="password"] {
  margin-bottom: 10px;
  border-top-left-radius: 0;
  border-top-right-radius: 0;
}
运行应用程序的步骤: 要在终端上运行该项目,请转到项目目录并输入以下命令。
nodemon app.js
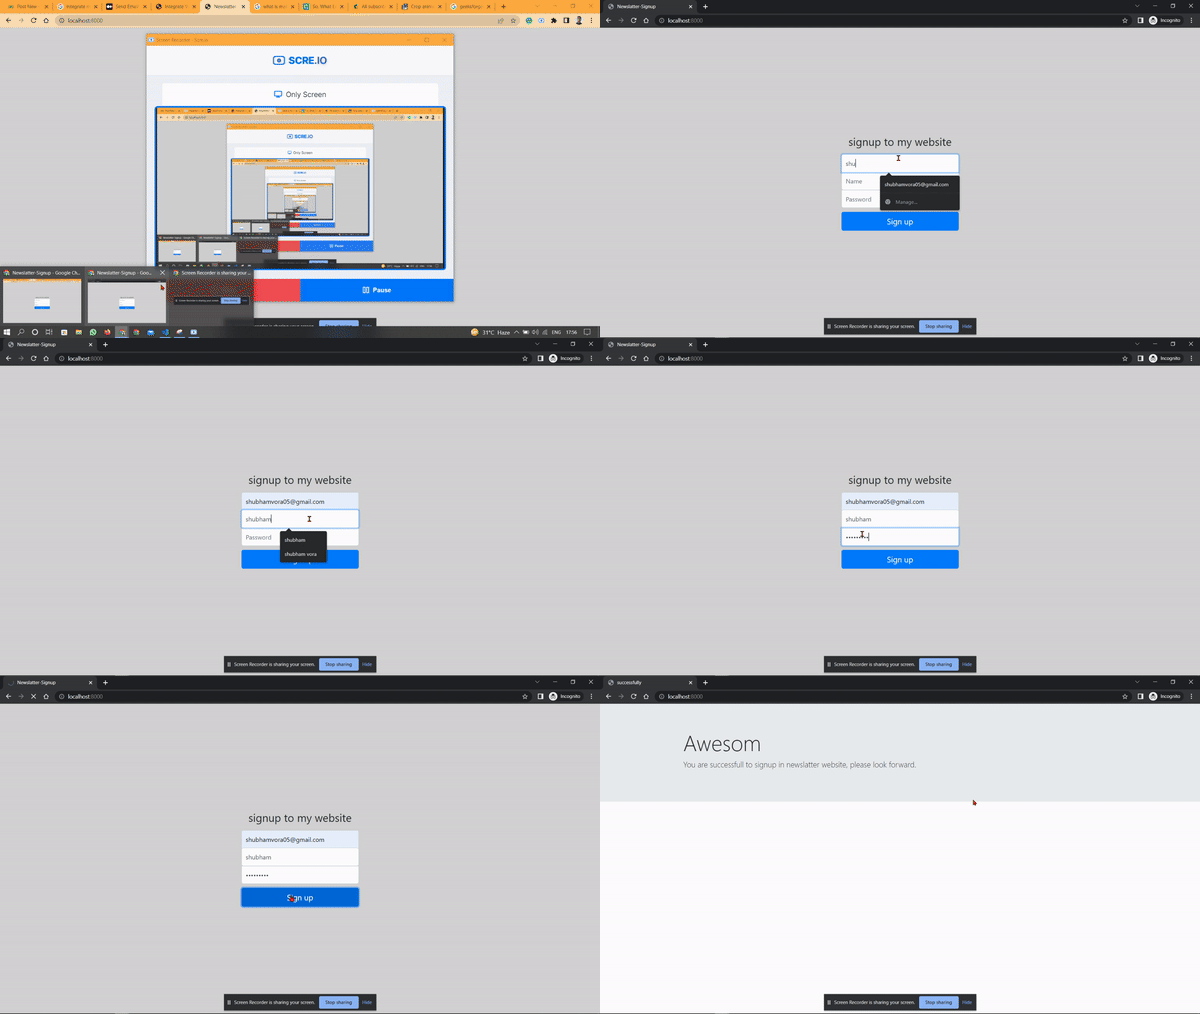
输出: 您将看到应用程序在localhost:8000上成功运行。
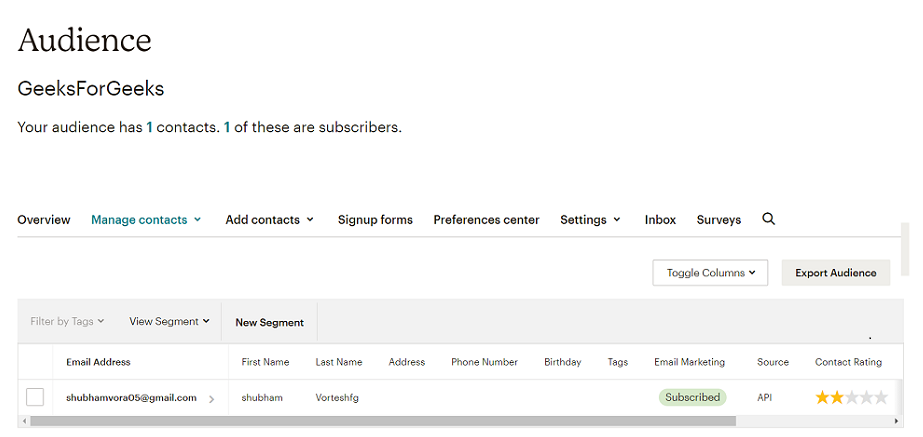
此外,在 MailChimp 中,您可以转到 Audience >> All contacts,您将看到所有已添加的联系人列表。
 极客教程
极客教程