Mongoose Query.prototype.then()函数
Mongoose(蒙古斯) 是一个用于MongoDB的对象数据建模(ODM)库。它定义了一个强类型模式,具有默认值和模式验证,以后将其映射到MongoDB文档。
Mongoose Query API.prototype.then()(Mongoose 查询 API.prototype.then()) 方法在执行查询后返回一个Promise。如果在执行特定操作时发生任何错误,它将由catch块处理。
语法:
query.then(resolve).catch(reject)
参数:
- resolve: 在没有错误时返回的函数。
- reject: 在任何错误后返回的函数。
返回类型: 此方法返回一个promise。
安装mongoose模块:
步骤1: 您可以访问链接以安装mongoose模块。您可以使用以下命令安装此软件包。
npm install mongoose
步骤2: 安装mongoose模块后,您可以使用以下命令在命令提示符中检查您的mongoose版本。
npm version mongoose
步骤3: 随后,您可以创建一个文件夹并添加一个例如index.js文件,要运行此文件,您需要运行以下命令。
node index.js
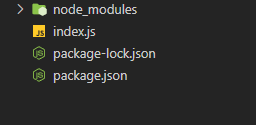
项目结构: 项目结构将如下所示:

样本收集: 在执行该函数之前,以下是数据库中的样本数据。您可以使用任何GUI工具或终端查看数据库,就像我们使用MongoDB Compass GUI工具一样,如下所示:

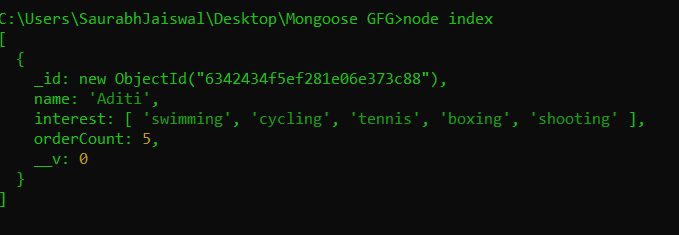
示例1: 在这个示例中,我们正在检索所有兴趣为拳击的客户。
// Importing the module
const mongoose = require('mongoose');

// Set Up the Database connection
mongoose.connect(
    'mongodb://localhost:27017/geeksforgeeks', {
    useNewUrlParser: true,
    useUnifiedTopology: true
})


// Defining customerSchema schema
const customerSchema = new mongoose.Schema(
    { name: String, interest: Array, orderCount: Number }
)


// Defining customerSchema model
const Customer = mongoose.model(
    'Customer', customerSchema);

//Finding the record in the collection
Customer.find({ interest: "boxing" }).then((res) => {
    console.log(res)
});
运行应用程序的步骤: 使用以下命令运行index.js文件:
node index.js

示例2: 在这个示例中,我们故意通过在find方法中传递String(它需要一个对象来完美运行)来制造一个错误,然后使用 .catch( ) 来捕获它。
// Importing the module
const mongoose = require('mongoose');

// Set Up the Database connection
mongoose.connect(
    'mongodb://localhost:27017/geeksforgeeks', {
    useNewUrlParser: true,
    useUnifiedTopology: true
})


// Defining customerSchema schema
const customerSchema = new mongoose.Schema(
    { name: String, interest: Array, orderCount: Number }
)


// Defining customerSchema model
const Customer = mongoose.model(
    'Customer', customerSchema);


Customer.find("boxng").then((res) => {
    console.log(res)
}).catch((err) => {
    console.log("Man, You got an error")
    console.log(err)
});
运行应用程序的步骤: 使用以下命令运行index.js文件:
node index.js

参考: https://mongoosejs.com/docs/api/query.html#query_Query-then
 极客教程
极客教程