React MUI 选择输入
React MUI 是一个提供了完全加载组件的UI库,将我们自己的设计系统引入到我们的产品级组件中。MUI是一个用户界面库,提供了预定义和可定制的React组件,用于更快、更容易的Web开发,这些Material-UI组件基于Google的Material Design。
在本文中,我们将讨论React MUI选择输入。选择组件用于从一个选项列表中收集用户提供的数据。
React MUI选择输入属性:
- autowidth: 如果为true,则弹出窗口的宽度将根据菜单中的项自动设置,否则至少为选择输入的宽度。
- children: 表示选择列表中的项的 元素。
- classes: 表示要覆盖默认样式的样式。
- defaultOpen: 表示初始打开的组件。
- defaultValue: 表示默认值。
- displayEmpty: 如果为true,则即使没有选择任何项,也会显示一个值。
- IconComponent: 表示在NativeSelect组件中显示箭头的图标。
- id: 表示包装元素的ID。
- input: 表示Input元素,不一定是MUI Input组件的特定元素。
- inputProps: 表示应用于NativeSelect组件的属性。
- label: 表示选择的标签。
- labelId: 表示作为附加标签的元素的ID。
- MenuProps: 表示与菜单元素相关的props。
- multiple: 如果为true,则值必须是一个数组,并且菜单将支持多个选择。
- native: 如果为true,则组件使用本地的select元素。
- onChange: 表示当活动元素改变时触发的回调函数。
- onClose: 表示当组件请求关闭时触发的回调。
- onOpen: 表示当组件请求打开时触发的回调。
- renderValue: 用于渲染所选值。
- sx: 表示一个系统属性,允许定义系统覆盖和额外的CSS样式。
- value: 表示输入值。
- variant: 表示要用于NativeSelect的变体。
React MUI NativeSelect属性:
-
children: 它代表在选择列表中表示项的
- classes: 它代表覆盖默认样式的样式。
- IconComponent: 它代表在NativeSelect组件中显示箭头的图标。
- input: 它代表输入元素,不一定专门针对MUI Input组件。
- inputProps: 它代表应用于NativeSelect组件的属性。
- onChange: 它代表当活动元素改变时触发的回调函数。
- sx: 它代表一个系统 prop,允许定义系统覆盖和额外的CSS样式。
- value: 它代表输入值。
- variant: 它代表用于NativeSelect的变体。
创建React项目:
步骤1: 要创建一个React应用程序,您需要通过npm命令安装React模块。
npm create-react-app project name
步骤2: 在创建React项目后,进入文件夹执行不同的操作。
cd project name
步骤3: 创建 ReactJS 应用程序后,使用以下命令安装所需的模块:
npm install @mui/material @emotion/react @emotion/styled
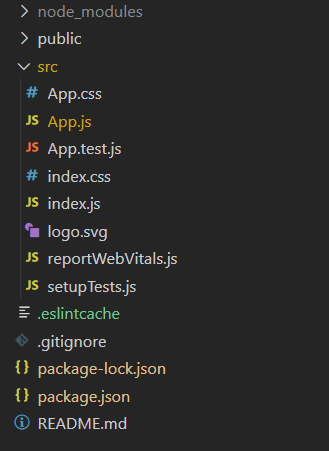
项目结构:

运行应用程序的步骤:
npm start
示例1: 下面的示例演示了React MUI Select输入框。
import React from "react";
import InputLabel from "@mui/material/InputLabel";
import MenuItem from "@mui/material/MenuItem";
import FormControl from "@mui/material/FormControl";
import Select from "@mui/material/Select";

function App() {
    const [algorithm, setAlgorithm] = React.useState("");

    const handleChange = (event) => {
        setAlgorithm(event.target.value);
    };

    return (
        <div>
            <div style={{ textAlign: "center", color: "green" }}>
                <h1>GeeksforGeeks</h1>
                <h2>React MUI Select Input</h2>
            </div>
            <div style={{ textAlign: "center" }}>
                <FormControl sx={{ m: 1, minWidth: 200 }}>
                    <InputLabel id="demo-simple-select-label">
                        Algorithm
                    </InputLabel>
                    <Select
                        labelId="demo-simple-select-label"
                        id="demo-simple-select"
                        value={algorithm}
                        label="Algorithm"
                        onChange={handleChange}
                    >
                        <MenuItem value={1}>Stack</MenuItem>
                        <MenuItem value={2}>Queue</MenuItem>
                        <MenuItem value={3}>Array</MenuItem>
                    </Select>
                </FormControl>
            </div>
        </div>
    );
}

export default App;
输出:

示例2:
以下示例演示了使用React MUI multiple select input作为芯片的效果。
import React from "react";
import OutlinedInput from '@mui/material/OutlinedInput';
import InputLabel from '@mui/material/InputLabel';
import { useTheme } from '@mui/material/styles';
import FormControl from '@mui/material/FormControl';
import Select from '@mui/material/Select';
import Chip from '@mui/material/Chip';
import { Box } from "@mui/system";
import { MenuItem } from "@mui/material";

const ITEM_HEIGHT = 45;
const ITEM_PADDING_TOP = 5;
const MenuProps = {
    PaperProps: {
        style: {
            maxHeight: ITEM_HEIGHT * 4.5 + ITEM_PADDING_TOP,
            width: 250,
        },
    },
};

const names = [
    'Stack',
    'Queue',
    'Array'
];

function getStyles(algo, algorithm, theme) {
    return {
        fontWeight:
            algorithm.indexOf(algo) === -1
                ? theme.typography.fontWeightRegular
                : theme.typography.fontWeightMedium,
    };
}

function App() {
    const theme = useTheme();
    const [algorithm, setAlgorithm] = React.useState([]);

    const handleChange = (event) => {
        const {
            target: { value },
        } = event;
        setAlgorithm(
            typeof value === 'string' ? value.split(',') : value,
        );
    };

    return (
        <div>
            <div style={{ textAlign: "center", color: "green" }}>
                <h1>GeeksforGeeks</h1>
                <h2>React MUI Select Input</h2>
            </div>
            <div style={{ textAlign: "center" }}>
                <FormControl sx={{ m: 1, width: 300 }}>
                    <InputLabel id="demo-multiple-chip-label">
                        Algorithm
                    </InputLabel>
                    <Select
                        labelId="demo-multiple-chip-label"
                        multiple
                        value={algorithm}
                        onChange={handleChange}
                        input={<OutlinedInput id="select-multiple-chip"
                        label="Algorithm" />}
                        renderValue={(selected) => (
                            <Box sx={{ display: 'flex',
                            flexWrap: 'wrap', gap: 0.5 }}>
                                {selected.map((value) => (
                                    <Chip key={value}
                                        label={value} />
                                ))}
                            </Box>
                        )}
                        MenuProps={MenuProps}
                    >
                        {names.map((algo) => (
                            <MenuItem
                                key={algo}
                                value={algo}
                                style={getStyles(algo, algorithm, theme)}
                            >
                                {algo}
                            </MenuItem>
                        ))}
                    </Select>
                </FormControl>
            </div>
        </div>
    );
}

export default App;
输出:

参考: https://mui.com/material-ui/react-select/
 极客教程
极客教程