如何在Material-UI React中使用排版
Material UI(MUI) 是一个基于Google的Material Design的开源React组件库。MUI提供了一组强大且可自定义的组件,使Web开发变得更容易。Material UI是一个很棒的库,它为你做出选择,但同时也允许你进行自定义选择。所有的组件都可以进行自定义设置。
Typography 是MUI的一个组件,用于规范所有文字类别。它在各种文字变体(如标题、副标题、说明文等)中保持一致的大小、字体、颜色等风格,在整个应用程序中都会发挥作用。
语法:
<Typography color="primary"
            align="center"
            gutterBottom={true}
            variant="h3" component="p">
    h3 default variant but wrapped by p tag.
</Typography>
React MUI Typography:
- 通用: MUI不会自动启动Roboto字体。您程序中使用的任何字体都必须由您加载。
- Roboto字体CDN: 可以使用以下CDN链接添加Roboto字体
<link rel=”stylesheet” href=”https://fonts.googleapis.com/css?family=Roboto:300,400,500,700&display=swap”/> - 通过npm安装: 可以打开终端并运行以下命令来安装Roboto字体 npm install @fontsource/roboto 或者使用 yarn add @fontsource/roboto 以使用yarn进行安装。
- 组件: 使用typography组件,将一组标准的字重和字号应用到你的应用程序中非常简单。
- 主题: 当我们无法使用typography组件时,typography主题是一个有用的工具。
- 更改语义元素: variantMapping属性由typography组件用于将UI变体链接到语义元素。
- 添加和禁用变体: 我们可以添加自定义的typography变体,除了默认的typography变体,还可以禁用这些变体如果我们不需要它们。
- 系统props: typography支持所有系统属性。它们可以直接作为组件的prop使用。
- 访问性: 对于可访问的typography,有几个重要的事项需要记住:颜色,字体大小,标题层次结构。
- API: Typography的API包括:
<Typography />
让我们创建React应用来深入了解 Typography 组件及其不同的变体。
步骤1: 使用以下命令创建React应用程序。
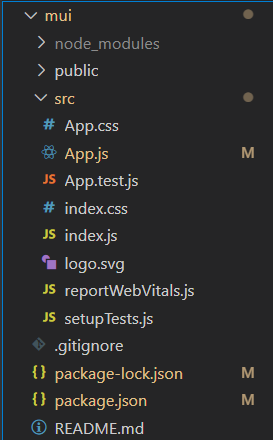
npx create-react-app mui
步骤2: 使用以下命令进入项目目录。
cd mui
步骤3: 安装必需的MUI模块,将MUI添加到您的项目中。
npm install @mui/material @emotion/react @emotion/styled
步骤4: 删除app.js文件中的默认内容。

示例1: 在这个示例中,我们将按照Material UI的默认主题,在app.js文件中详细介绍Typography组件的各种变体。我还解释了每个变体的功能,并使用了不同的传递给它们的props。
App.js
import { Typography } from '@mui/material'

function App() {
    return (
        <>
            <h1 style={{ color: "green" }} >
                Geeks for Geeks
            </h1>
            <h3 >React MUI Typography</h3>
            {/* wrapped by h2 tag and aligned in center */}
            <Typography variant="h2" align="center">
                I am h2 default variant.
            </Typography>

            {/* wrapped by h3 tag and color is primary */}
            <Typography variant="h3" color="primary">
                I am h3 default variant.
            </Typography>

            {/* wrapped by h5 tag and have margin on top=5 */}
            <Typography variant="h5" sx={{ mt: 5 }}>
                I am h5 default variant.
            </Typography>

            {/* subtitle1 is wrapped by h6 tag */}
            <Typography variant="subtitle1">
                I am subtitle1 default variant.
            </Typography>

            {/* subtitle2 is bold version of subtitle1
                and by default, wrapped by p h6
                  but due to component prop="h6",
                now it is wrapped by "p" */}
            <Typography variant="subtitle2" component="p">
                I am subtitle2 default variant.
            </Typography>


            {/* wrapped by p tag */}
            <Typography variant="body1">
                I am body1 default variant.
            </Typography>

            {/* wrapped by p tag but with smaller
                size compared to body1 variant */}
            <Typography variant="body2">
                I am body2 default variant.
            </Typography>

            {/* wrapped by span ,all in caps and bold*/}
            <Typography variant="button"
                display="block" gutterBottom>
                Button text
            </Typography>

            {/* wrapped by span and monospace*/}
            <Typography variant="caption"
                display="block" gutterBottom>
                Caption text
            </Typography>

            {/* wrapped by span and all in caps */}
            <Typography variant="overline"
                display="block" gutterBottom>
                Overline text
            </Typography>
        </>
    );
}

export default App;
运行应用的步骤: 打开终端并输入以下命令。
npm start
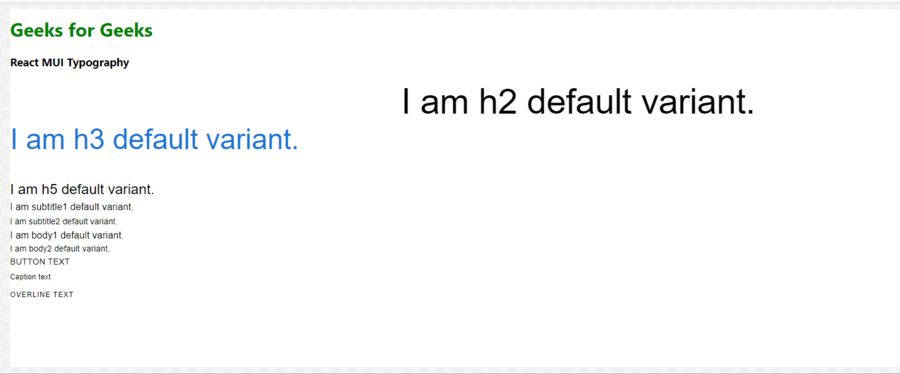
输出:

解释: 上面代码的输出遵循默认的主题,因此:
- h2 变体被 h2 标签包裹。
- h3 变体被 h3 标签包裹。
- h5 变体被 h5 标签包裹。
- subtitle1 和 subtitle2 被 h6 标签包裹。但是 subtitle2 使用了组件属性作为一次性自定义,因此 subtitle2 被 p 标签包裹。
- body1 和 body2 被 p 标签包裹。
- button、caption 和 overline 被 span 标签包裹。
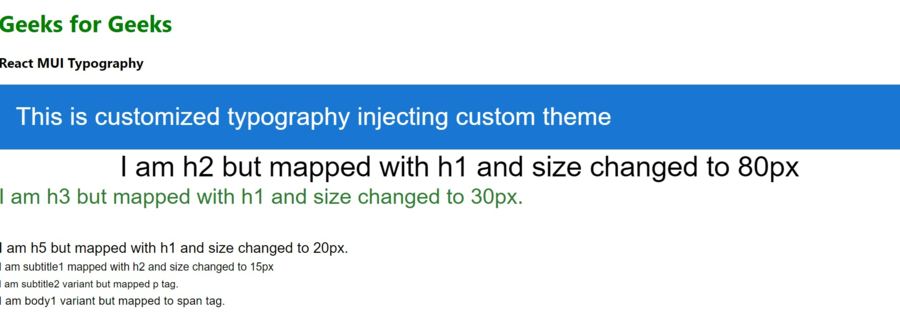
示例2: 在这个示例中,我们将在app.js文件中遍历全部的Typography组件变体,如下面给定的自定义主题代码所述。此外,我已经解释了每个变体的功能,并使用了不同的传入属性。在示例1中,我们使用的是默认主题,因此有固定的大小和标签包裹它们。而在示例2中,我们创建了一个自定义主题,因此变体的映射发生了变化,因此包裹不同变体的标签发生了变化,同时每个变体的字体大小也进行了定制。
App.js
import { Typography, Box } from '@mui/material'
import { createTheme, ThemeProvider } from '@mui/material/styles';

// customized theme to create your custom
//design for typography component
const theme = createTheme({
    // it is use to change the HTML tag which wraps text
    components: {
        MuiTypography: {
            defaultProps: {
                variantMapping: {
                    h1: 'h1',
                    h2: 'h1',
                    h3: 'h1',
                    h4: 'h1',
                    h5: 'h1',
                    h6: 'h1',
                    subtitle1: 'h2',
                    subtitle2: 'h2',
                    body1: 'span',
                    body2: 'span',
                },
            },
        },
    },
    // it is changing the font size of variant
    typography: {
        h2: {
            fontSize: "40px"
        },
        h3: {
            fontSize: "30px"
        },
        h5: {
            fontSize: "20px"
        },
        subtitle1: {
            fontSize: "15px"
        }
    }
});

function App() {
    return (
        <>
            <h1 style={{ color: "green" }}>Geeks for Geeks</h1>
            <h3>React MUI Typography</h3>
            <Box sx={{ p: 3, backgroundColor: 'primary.main' }}>
                <Typography variant="h4" color="white">
                    This is customized typography injecting
                    custom theme
                </Typography>
            </Box>

            <ThemeProvider theme={theme}>
                {/* wrapped by h1 tag, aligned in center
                    and font size changed */}
                <Typography variant="h2" align="center">
                    I am h2 but mapped with h1 and size changed to 80px
                </Typography>

                {/* wrapped by h1 tag and color is success */}
                <Typography variant="h3" color="success.main">
                    I am h3 but mapped with h1 and size changed to 30px.
                </Typography>

                {/* wrapped by h1 tag and have margin on top=5 */}
                <Typography variant="h5" sx={{ mt: 5 }}>
                    I am h5 but mapped with h1 and
                    size changed to 20px.
                </Typography>

                {/* subtitle1 is wrapped by h2 tag and
                    font size is changed*/}
                <Typography variant="subtitle1">
                    I am subtitle1 mapped with h2
                    and size changed to 15px
                </Typography>

                {/* subtitle2 is bold version of subtitle1,
                    wrapped by h2 but due to component prop='p',
                    now it is wrapped by "p" */}
                <Typography variant="subtitle2" component="p">
                    I am subtitle2 variant but mapped p tag.
                </Typography>

                {/* wrapped by span tag */}
                <Typography variant="body1"
                    display="block" gutterBottom>
                    I am body1 variant but mapped to span tag.
                </Typography>

            </ThemeProvider>
        </>

    );
}

export default App;
输出:

说明: 这是一个使用自定义主题的排版示例,因此将变体映射更改为另一个HTML标签,还更改了变体的大小,不再遵循默认大小。
参考: https://mui.com/material-ui/react-typography/
 极客教程
极客教程